Picture this: it’s a rainy Saturday, the oven’s already preheated, and you’re standing in your kitchen with a half‑filled jar of gingerbread spice that’s been gathering dust since last year’s holidays. You’re craving something sweet, but the last batch you made was a soggy, uneven mess that left you wondering if gingerbread could ever be a dessert that actually tasted like a treat. That night, after a few too many mugs of hot cocoa, I decided to experiment. I pulled out the molasses, the chocolate bars, and a bag of mini marshmallows that had been hiding in the pantry, and I promised myself—this time, I’d make something that would make the whole house smell like a campfire and a Christmas tree at the same time.
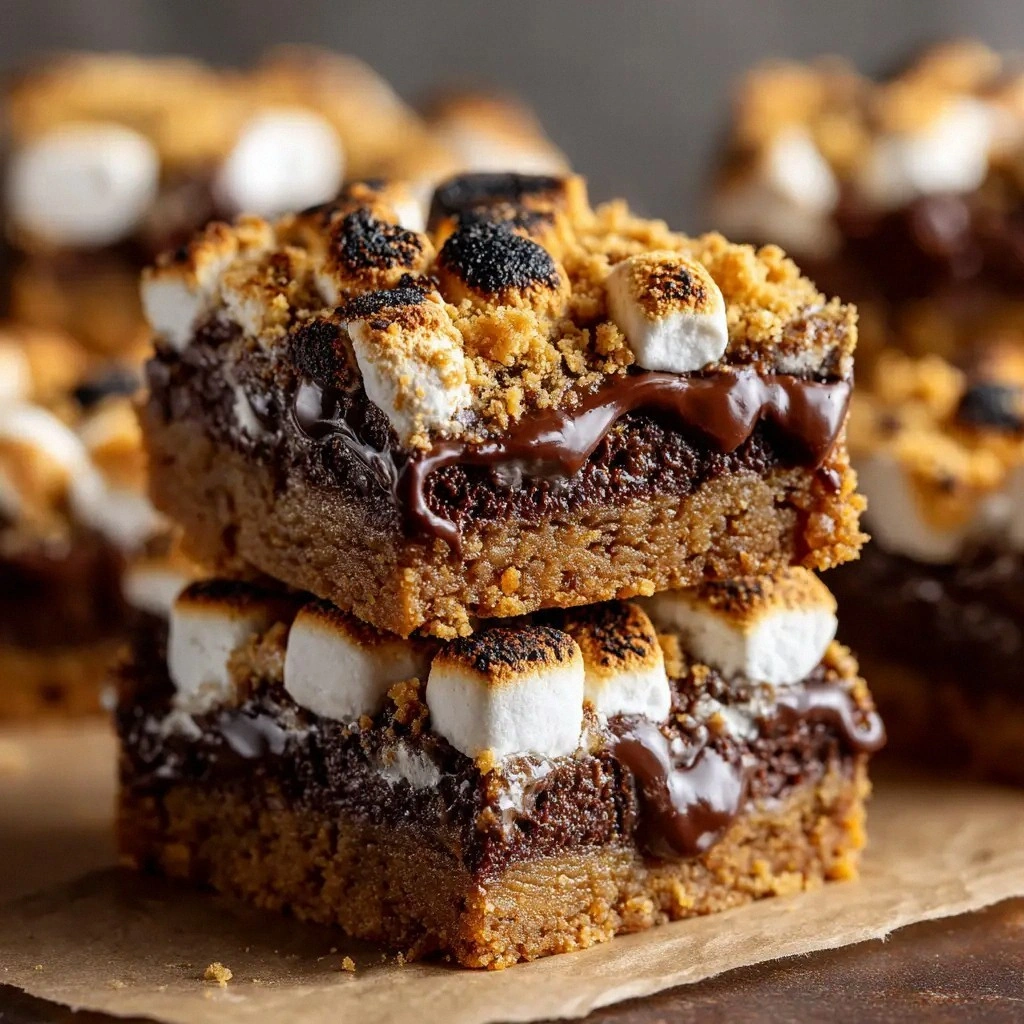
I started with a bold statement: This is hands down the best version of a gingerbread cookie bar you’ll ever make at home. The first thing that struck me was the aroma—sweet, spicy, and a little smoky from the molasses. As the dough began to rise, the kitchen filled with a comforting scent that felt like a hug. The texture of the finished bars is a delicate balance: the crust is crisp enough to crack, yet the center remains soft and chewy, almost like a molten chocolate core. I dare you to taste this and not go back for seconds. If you’re skeptical, just let the scent of the butter and cinnamon guide you into the moment.
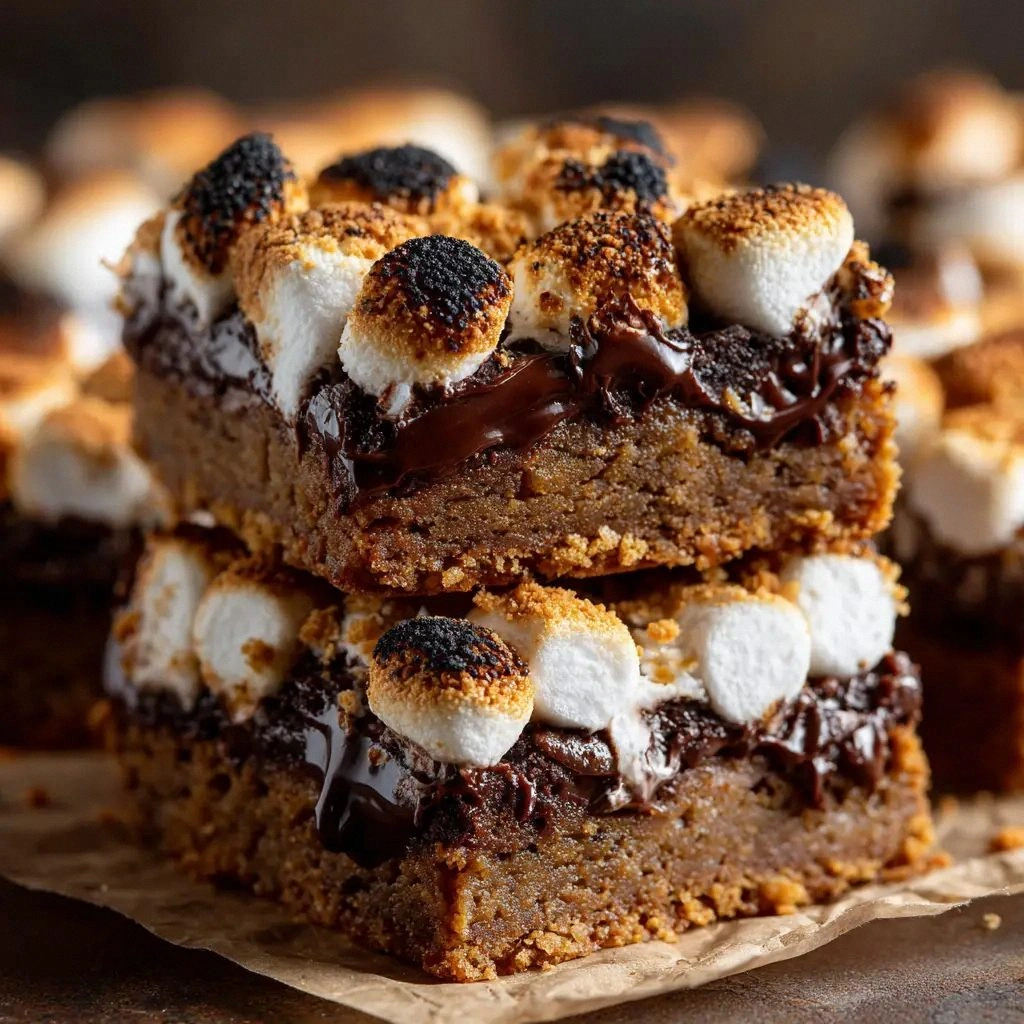
What sets this recipe apart from the endless variations you find online is the way the ingredients converse. The molasses doesn’t just sweeten; it deepens the flavor profile, giving the gingerbread a caramelized undertone that pairs beautifully with the rich chocolate. The mini marshmallows are toasted to a golden brown, creating a caramelized exterior that gives a satisfying crunch before they melt into a gooey, chocolate‑laden center. I’ve experimented with different chocolate types, but the full‑fat milk chocolate bars I chose strike a perfect balance between sweetness and creaminess, letting the gingerbread spices shine through. Most recipes get this completely wrong by using dark chocolate or chocolate chips that melt too quickly, but I’ve found that full‑fat bars hold their shape just enough to give that decadent bite.
Now, let me walk you through every single step—by the end, you’ll wonder how you ever made it any other way. I’ll share a technique you won’t expect: the secret to a perfectly even bake is a simple trick involving parchment paper and a cooling rack that keeps the bars from becoming too soggy. I’ll also give you a kitchen hack that will save you time and keep your countertop clean. And if you’re still on the fence, picture yourself pulling this out of the oven, the whole kitchen smelling incredible, and the first bite sending a wave of nostalgia and joy through your senses. Ready? Let’s dive in.
What Makes This Version Stand Out
- Flavor Depth: The combination of molasses, ginger, and a hint of nutmeg creates a complex, layered taste that feels both festive and comforting.
- Texture Contrast: Crispy edges meet a chewy center, and toasted marshmallows add a delightful crunch before they melt into goo.
- Ingredient Quality: Using full‑fat milk chocolate bars and unsalted butter ensures a richer, more indulgent experience.
- Make‑Ahead Friendly: The bars can be refrigerated or frozen, making them perfect for holiday parties or last‑minute gift‑making.
- Visual Appeal: The golden brown crust and glossy chocolate drizzle make for Instagram‑worthy dessert bars that look as good as they taste.
- Time Efficiency: The dough comes together quickly, and the bake time is under 30 minutes, so you’ll have dessert ready in no time.
Inside the Ingredient List
The Flavor Base
The 2.5 cups of all‑purpose flour provide the structure that holds everything together. It’s the silent hero that gives the bars their bite. If you skip the flour, you’ll end up with a sticky mess that can’t hold its shape. For a slightly lighter texture, you can substitute half the flour with cake flour, but this recipe’s current ratio strikes the perfect balance between chewiness and firmness.
The 0.75 cup of unsalted butter is the fat that melts into the dough, creating a tender crumb. Butter also carries the warm, nutty flavor that complements the spices. If you’re vegan, coconut oil will work, but the flavor profile will shift slightly toward a tropical note. Butter’s temperature matters: at room temperature, it blends smoothly with the sugars; if it’s too cold, the dough can become crumbly.
The Sweetener & Spice Mix
The 0.5 cup of packed brown sugar gives a caramel sweetness that pairs beautifully with the molasses. Brown sugar’s molasses content also adds moisture, preventing the bars from drying out. If you prefer a lighter sweet spot, you can use an equal amount of white sugar, but the depth will be less pronounced.
The 0.5 cup of molasses is the star of the show. It not only sweetens but also adds a deep, complex flavor that’s reminiscent of a caramelized log. Molasses also contributes to the bars’ darker hue. If you can’t find molasses, you can use dark corn syrup as a substitute, but it won’t have the same robust taste.
Ground ginger, cinnamon, nutmeg, and cloves are the aromatic quartet that turns ordinary cookies into holiday magic. Each spice brings its own personality: ginger offers a peppery kick, cinnamon adds warmth, nutmeg gives a nutty undertone, and cloves bring a subtle sharpness. Together, they create a symphony that sings with every bite. If you’re allergic to any of these spices, you can reduce or omit them, but the flavor will be noticeably lighter.
The Texture Crew
The single large egg binds the dough and adds richness. It also helps the chocolate and marshmallows set into a cohesive structure. If you’re looking for a dairy‑free version, a flax egg (1 tablespoon ground flaxseed mixed with 3 tablespoons water) will do the trick, though the bars will be slightly denser.
Baking soda and salt are the leavening agents that give the bars a slight lift without making them airy. Baking soda reacts with the acidic molasses and spices, creating tiny pockets of air that keep the bars from becoming too dense. Salt, on the other hand, balances the sweetness and brings out the spices’ complexity. If you’re watching sodium intake, reduce the salt to 0.25 tsp, but keep the baking soda to preserve texture.
The Unexpected Star
The 4 full‑size milk chocolate bars are not just for decoration; they’re an integral part of the flavor and texture. They melt into pockets of chocolatey bliss that contrast with the spiced dough. If you prefer a darker bite, swap half the bars for dark chocolate, but note that the sweetness will decrease.
The 1 10‑ounce bag of mini marshmallows is the secret to that unforgettable gooey center. When toasted, they develop a caramelized crust that gives a satisfying crunch before they melt into a silky, chocolate‑laden center. If you’re allergic to dairy, look for dairy‑free marshmallows; they’ll behave similarly during toasting.
The 0.25 cup of graham cracker crumbs adds a subtle crunch and a hint of vanilla‑sweetness that complements the chocolate. They also help to absorb excess moisture, keeping the bars from becoming too soft. For a gluten‑free version, use gluten‑free graham crackers, but ensure they’re finely ground.
Everything’s prepped? Good. Let’s get into the real action.
The Method — Step by Step
- Preheat your oven to 350°F (175°C). Line a 9×13 inch baking pan with parchment paper, leaving a 2‑inch overhang on each side. This overhang will make it easier to lift the entire slab out after baking. While the oven warms, bring the butter to room temperature and set aside. This ensures a smooth, cohesive dough.
- In a large mixing bowl, combine the flour, baking soda, and salt. Sift the dry ingredients to aerate them, then whisk until fully blended. The dry mix will form the backbone of the bars; skipping this step will result in uneven distribution of spices.
- In a separate bowl, cream together the butter, brown sugar, and molasses until light and fluffy. The mixture should look pale and airy. This creaming step incorporates air into the dough, giving the bars a lighter crumb.
- Add the egg to the creamed mixture, beating until fully incorporated. Then stir in the ginger, cinnamon, nutmeg, and cloves. The spices dissolve into the butter‑sugar base, creating a fragrant, well‑distributed flavor profile.
- Gradually add the dry ingredients to the wet mixture, mixing until just combined. Overmixing here can lead to a tough texture, so stop as soon as the dough holds together.
- Press the dough evenly into the prepared pan. Use a spatula or the back of a spoon to smooth the surface. The dough should be flat and even, as this ensures uniform baking.
- Arrange the chocolate bars in a single layer on top of the dough. They’ll melt slightly into the warm dough, creating chocolate pockets that will be the star of the show. If you like a more pronounced chocolate flavor, you can break the bars into smaller pieces.
- Sprinkle the mini marshmallows evenly over the chocolate layer. The marshmallows will toast during baking, developing a caramelized crust. If you prefer a deeper caramelization, briefly toast the marshmallows in a skillet before adding them.
- Bake for 25–28 minutes, or until the edges are golden brown and the center is set. The bars should smell toasty, like a campfire with a hint of cinnamon. Avoid opening the oven door early; the heat loss can cause the bars to collapse.
- Let the bars cool in the pan for 10 minutes. During this time, the chocolate will firm up and the marshmallows will finish toasting. After 10 minutes, lift the slab using the parchment overhang and transfer to a wire rack to cool completely.
- Once cooled, cut into bars or squares using a sharp knife. For a cleaner cut, dip the knife in hot water and wipe it dry between each cut. The bars should be firm enough to hold their shape, yet tender enough to bite into.
That’s it—you did it. But hold on, I’ve got a few more tricks that will take this to another level.
Insider Tricks for Flawless Results
The Temperature Rule Nobody Follows
Many bakers bake gingerbread at 375°F, thinking a higher temperature gives a crisper top. In reality, 350°F allows the molasses to caramelize slowly, creating a richer flavor without burning the chocolate. If you’re using a convection oven, lower the temperature by 25°F to avoid over‑browning.
Why Your Nose Knows Best
The moment the dough hits the oven, the aroma of cinnamon and molasses rises like a promise. Trust that scent—it signals the dough is baking at the right rate. If you smell a faint metallic taste, the oven may be too hot or the chocolate bars too close to the heating element.
The 5‑Minute Rest That Changes Everything
After removing the bars from the oven, let them rest on the pan for exactly five minutes. This brief pause allows the chocolate to set fully, preventing it from sliding off when you cut. It also lets the marshmallows finish toasting to a perfect golden brown.
The Even Layer Trick
If the dough seems uneven after pressing it into the pan, use a flat-bottomed glass to level the surface. An even base ensures uniform heat distribution, preventing the center from undercooking while the edges burn.
The Cooling Rack Secret
Cooling the bars on a rack instead of a flat surface prevents condensation from forming on the bottom. This condensation can make the bars soggy and ruin the crisp edges you’ve worked so hard to achieve.
Creative Twists and Variations
This recipe is a playground. Here are some of my favorite ways to switch things up:
Spiced Nut Variation
Add a handful of chopped pecans or walnuts to the dough before baking. The nuts add crunch and a buttery flavor that pairs beautifully with the gingerbread spices.
Coconut Crumble Twist
Replace the graham cracker crumbs with toasted coconut flakes. The coconut adds a tropical note that contrasts with the warm spices, creating a unique flavor profile.
Dark Chocolate Delight
Swap half of the milk chocolate bars for dark chocolate. The bittersweet flavor will deepen the chocolate experience while still complementing the molasses.
Minty Freshness
Add a teaspoon of peppermint extract to the dough. The mint will give a cool counterbalance to the warm spices, making the bars feel like a holiday candy cane.
Almond Joy Edition
Stir in a quarter cup of shredded coconut and a tablespoon of almond butter into the dough. This gives the bars a chewy, coconut‑almond texture reminiscent of the popular candy.
Gluten‑Free Option
Replace all-purpose flour with a gluten‑free blend that contains xanthan gum. Keep the rest of the recipe unchanged for a gluten‑free version that still delivers on flavor and texture.
Storing and Bringing It Back to Life
Fridge Storage
Store the bars in an airtight container at room temperature for up to five days. The chocolate will stay firm, and the dough will remain chewy. If you notice any dryness, lightly dampen a paper towel and place it in the container for a short period; this will rehydrate the bars.
Freezer Friendly
Wrap the bars individually in plastic wrap, then place them in a freezer bag. They’ll keep for up to three months. When you’re ready to enjoy them, let them thaw at room temperature for 30 minutes before serving.
Best Reheating Method
To revive frozen bars, microwave on high for 10–15 seconds or heat in a 300°F oven for 5 minutes. Add a tiny splash of water before reheating; it steams the bars back to a moist, chewy center without melting the chocolate.