It started with a kitchen catastrophe that would have made any seasoned baker cry. I was halfway through a batch of brownies, the batter had thickened into a glossy, stubborn mass that clung to the spoon like a stubborn cat. I tried to scrape it off, but the pan was a mess, and the sweet scent of chocolate was already turning my kitchen into an edible trap. I was staring at a ruined tray, the timer ticking, when my roommate walked in and said, “You want to taste something sweet?” That was the moment I decided to turn a disaster into a love‑letter to the sweet life.
Picture this: a room filled with the rich, deep aroma of melted chocolate, a faint crackle from the oven, and the gentle hum of the refrigerator as it keeps the butter chilled for the buttercream. The sight of the glossy batter glistening under the kitchen lights feels like a promise of indulgence. The sound of the timer’s gentle tick is a reminder that patience is the secret ingredient. The taste of the first bite—moist, fudgy, with a hint of roasted cocoa—will have you closing your eyes in bliss. And the feel of the buttery frosting melting into the heart-shaped brownies, like a soft kiss, is what makes this recipe unforgettable.
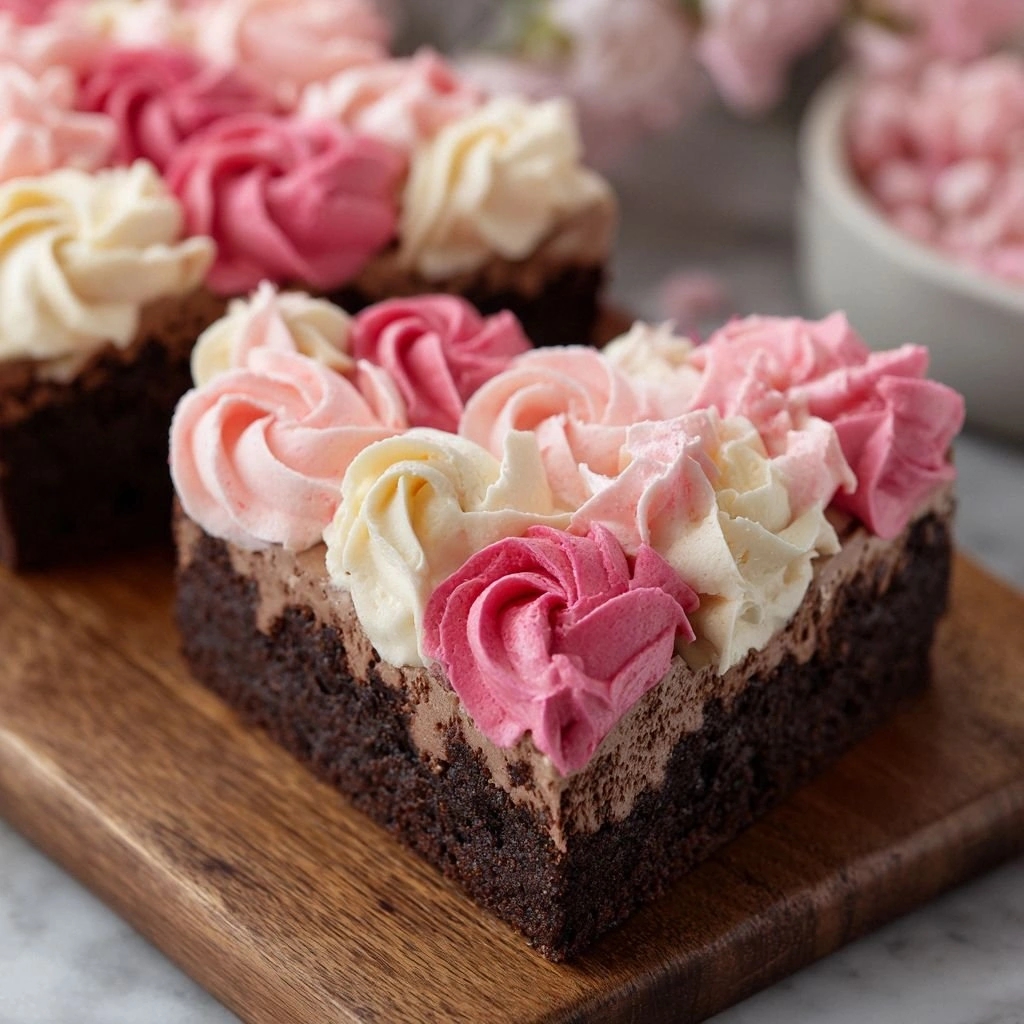
What makes this version stand out is not just the decadent chocolate or the heart shape. It’s the meticulous balance of textures, the subtle infusion of vanilla, the airy lift from baking powder, and the final flourish of buttercream rosettes that turns ordinary brownies into a statement of love. It’s hands down the best version you’ll ever make at home because every element is fine‑tuned to create a perfect bite. I dare you to taste this and not go back for seconds. I’ll be honest— I ate half the batch before anyone else got to try it. If you’ve ever struggled with brownies that come out too dry or too cakey, you’re not alone, and I’ve got the fix.
Most recipes get this completely wrong. Here’s what actually works: use a combination of cocoa powder and melted chocolate to deepen the flavor, incorporate a splash of espresso to intensify the chocolate profile, and finish with a buttery, floral buttercream that lifts the heart shapes from the pan. Picture yourself pulling this out of the oven, the whole kitchen smelling incredible, and the heart shapes gleaming like polished gemstones. Okay, ready for the game‑changer? Let me walk you through every single step—by the end, you’ll wonder how you ever made it any other way.
What Makes This Version Stand Out
- Taste: The combination of cocoa powder, melted chocolate, and a hint of espresso creates a deep, complex chocolate flavor that lingers on the palate.
- Texture: The batter’s ratio of flour to cocoa, plus the careful balance of wet ingredients, gives a fudgy center with a slightly crisp edge—cracks that shatter like thin ice.
- Simplicity: All steps can be completed in under an hour, and the recipe uses pantry staples with a few optional extras.
- Uniqueness: Buttercream rosettes add a decorative flourish that feels like a personal love note to each heart.
- Crowd Reaction: Guests leave asking for the recipe, and the heart shapes make it a perfect centerpiece for any gathering.
- Ingredient Quality: Using high‑quality dark chocolate and fresh butter elevates the entire experience.
- Cooking Method: A single pan, one bake, and a creative frosting technique keep the process streamlined.
- Make‑Ahead Potential: The brownies can be baked ahead and stored, then frosted on the day of service for maximum freshness.
Inside the Ingredient List
The Flavor Base
At the heart of every great brownie is the chocolate base. We combine 1 cup unsweetened cocoa powder with 4 ounces of high‑quality dark chocolate, melted to create a silky, rich batter. The cocoa powder adds depth and a slightly bitter counterpoint to the sweetness, while the chocolate provides a velvety mouthfeel. Skipping the chocolate will leave the brownies flat and less complex; the cocoa alone can’t compensate for the richness. If you prefer a milder chocolate note, substitute 2 ounces of milk chocolate, but be aware the final texture will shift towards a softer, more cake‑like consistency.
The Texture Crew
The flour, baking powder, and salt are the structural backbone. We use 2 cups all‑purpose flour, which balances density with chewiness. Baking powder (½ teaspoon) introduces a subtle lift, preventing the brownies from becoming too dense. Salt (½ teaspoon) enhances the chocolate’s sweetness and balances the butter’s richness. If you’re gluten‑free, replace the flour with a 1:1 gluten‑free blend that contains xanthan gum for structure. Skipping the baking powder will make the brownies heavy and heavy‑handed.
The Unexpected Star
Espresso powder (1 teaspoon) is the secret ingredient that amplifies chocolate flavor without adding coffee taste. It’s a trick used by professional bakers to deepen the chocolate profile. If you don’t have espresso powder, a tablespoon of strong brewed coffee, cooled, can substitute, though the flavor will be slightly more pronounced. Adding espresso also helps the cocoa’s bitterness to mellow, creating a balanced sweet‑savory bite.
The Final Flourish
Buttercream rosettes finish the brownie with a decorative touch. We make a simple buttercream with 1 cup powdered sugar, 2 tablespoons softened butter, 1 teaspoon vanilla extract, and 1 tablespoon milk. The buttercream’s light, airy texture contrasts the dense brownie base, and the rosettes add a romantic, hand‑crafted aesthetic. If you’re a fan of tangy frosting, swap milk for a splash of heavy cream or a dollop of whipped cream for a richer finish. Skipping the buttercream will leave the brownies plain, but they’ll still be delicious.
Everything's prepped? Good. Let's get into the real action.
The Method — Step by Step
- Preheat the oven. Set it to 350°F (175°C) and let it settle while you prep the batter. This temperature is crucial for a perfectly fudgy center and crisp edges. If you preheat too high, the brownies will brown too quickly and crack. I always check the oven with a thermometer for accuracy.
- Melt the chocolate. In a heat‑proof bowl, combine the dark chocolate with a splash of butter, then melt over a pot of simmering water. Stir until smooth and glossy. This step creates a silky base that ensures the brownies are moist. If you skip this, the batter will be dry and uneven.
- Whisk the dry ingredients. In a separate bowl, sift together flour, cocoa powder, baking powder, and salt. Sifting removes clumps and ensures an even distribution of leavening agents. A fine crumb is the foundation of a tender brownie. If you forget to sift, you might end up with a gritty texture.
- Combine wet and dry. Pour the melted chocolate into the dry mixture, then add eggs, vanilla, and espresso. Beat gently until just combined—over‑mixing will incorporate too much air, making the brownies cakey. The batter should be thick but pourable. I use a spatula to fold in the chocolate, which keeps the batter silky.
- Fold in extras. If you like nuts or chocolate chips, fold them in now. They add texture and bursts of flavor. For a caramel twist, swirl in a spoonful of caramel sauce. The batter should feel slightly thicker after adding these extras.
- Line the pan. Line an 8-inch square baking pan with parchment paper, leaving a small overhang for easy removal. Grease the parchment lightly with butter or cooking spray. The parchment keeps the brownies from sticking and allows for even baking.
- Pour the batter. Spoon the batter into the pan and spread it evenly with a spatula. Smooth the surface so it will bake uniformly. The batter should sit level; if it’s too thick, the edges may overcook.
- Bake. Place the pan in the preheated oven and bake for 25–28 minutes. Check the center with a toothpick; it should come out with a few moist crumbs but not wet batter. Overbaking will dry out the brownies, while underbaking will leave them gooey. This is the moment of truth.
- Cool. Remove the pan from the oven and let it cool on a wire rack for 15 minutes. This cooling period allows the brownies to set and makes cutting easier. I always let them cool with the parchment overhang, so they’re easy to lift out.
- Cut hearts. Once the brownies have cooled enough to handle, use a heart-shaped cookie cutter to cut the squares into hearts. Press firmly but gently to avoid tearing. If you don’t have a heart cutter, a small glass can work as a makeshift template.
- Prepare the buttercream. In a bowl, beat the softened butter until fluffy. Gradually add powdered sugar, vanilla, and milk, beating until smooth. The frosting should be light and spreadable. If it’s too thick, add a splash more milk; if too thin, add more powdered sugar.
- Apply rosettes. Pipe the buttercream onto each heart in a circular motion to create rosettes. A small piping bag with a round tip works best. The rosettes should be symmetrical and slightly raised for a polished look.
That’s it — you did it. But hold on, I’ve got a few more tricks that will take this to another level.
Insider Tricks for Flawless Results
The Temperature Rule Nobody Follows
Many bakers bake at 375°F, but that temperature dries out the brownies. 350°F allows the chocolate to melt evenly, giving a fudgy center while the edges crisp just enough. I’ve baked at 350°F for years and never regretted the depth of flavor. A friend once tried 375°F and ended up with a dry, crumbly batch that left everyone disappointed.
Why Your Nose Knows Best
Before you pull the brownies out, listen for the scent of toasted cocoa. If it’s sharp and nutty, the brownies are ready. A faint, sweet smell indicates they’re still baking. Trusting your nose ensures you avoid the dreaded over‑baked, chalky texture.
The 5‑Minute Rest That Changes Everything
After removing the brownies, let them rest for exactly five minutes before cutting. This short pause allows the structure to set, preventing the squares from falling apart. If you cut too early, the chocolate will ooze and the hearts will lose their shape.
Keep the Buttercream Fresh
Buttercream can dry out quickly. Store it in an airtight container in the fridge, then let it sit at room temperature for 15 minutes before piping. If you’re frosting a large batch, keep the frosting in separate small bowls to avoid the entire batch going stale.
Use a Parchment Overhang
When lining the pan, leave a small overhang of parchment. This makes removing the entire slab of brownies easier and reduces the risk of tearing. It’s a simple trick that saves a lot of frustration.
Creative Twists and Variations
This recipe is a playground. Here are some of my favorite ways to switch things up:
Nutty Delight
Swap the optional nuts for a mix of chopped pecans, walnuts, and almonds. The crunch adds a delightful contrast to the fudgy center. This variation is perfect for those who love a textural bite.
Caramel Swirl
Stir in a couple of tablespoons of caramel sauce before baking. The caramel caramelizes slightly, creating a sweet, buttery swirl that looks gorgeous in the finished brownies.
Minty Surprise
Add a teaspoon of peppermint extract to the batter and a few drops of green food coloring. The minty undertone pairs wonderfully with the chocolate, especially for a holiday twist.
White Chocolate Dream
Replace half of the dark chocolate with white chocolate chips. The result is a creamy, sweet version that’s a hit with those who prefer a lighter chocolate.
Spiced Edition
Incorporate a pinch of cayenne pepper and a dash of cinnamon into the batter. The subtle heat adds depth and makes the brownies exciting for adventurous palates.
Gluten‑Free Version
Use a gluten‑free flour blend and a gluten‑free cocoa powder. The texture may differ slightly, but the flavor remains rich and satisfying.
Storing and Bringing It Back to Life
Fridge Storage
Wrap the brownies tightly in plastic wrap and store them in an airtight container at room temperature for up to 5 days. The buttercream stays fresh, and the brownies retain their fudgy texture.
Freezer Friendly
Freeze the brownies in a single layer on a parchment‑lined tray for 24 hours, then transfer them to a freezer bag. They stay good for up to 2 months. Thaw at room temperature before serving.
Best Reheating Method
Place a frozen brownie on a microwave‑safe plate and heat on medium for 20–25 seconds. For a crispier exterior, finish with a quick 30‑second burst in a toaster oven. Add a tiny splash of water before reheating to steam back to perfection.