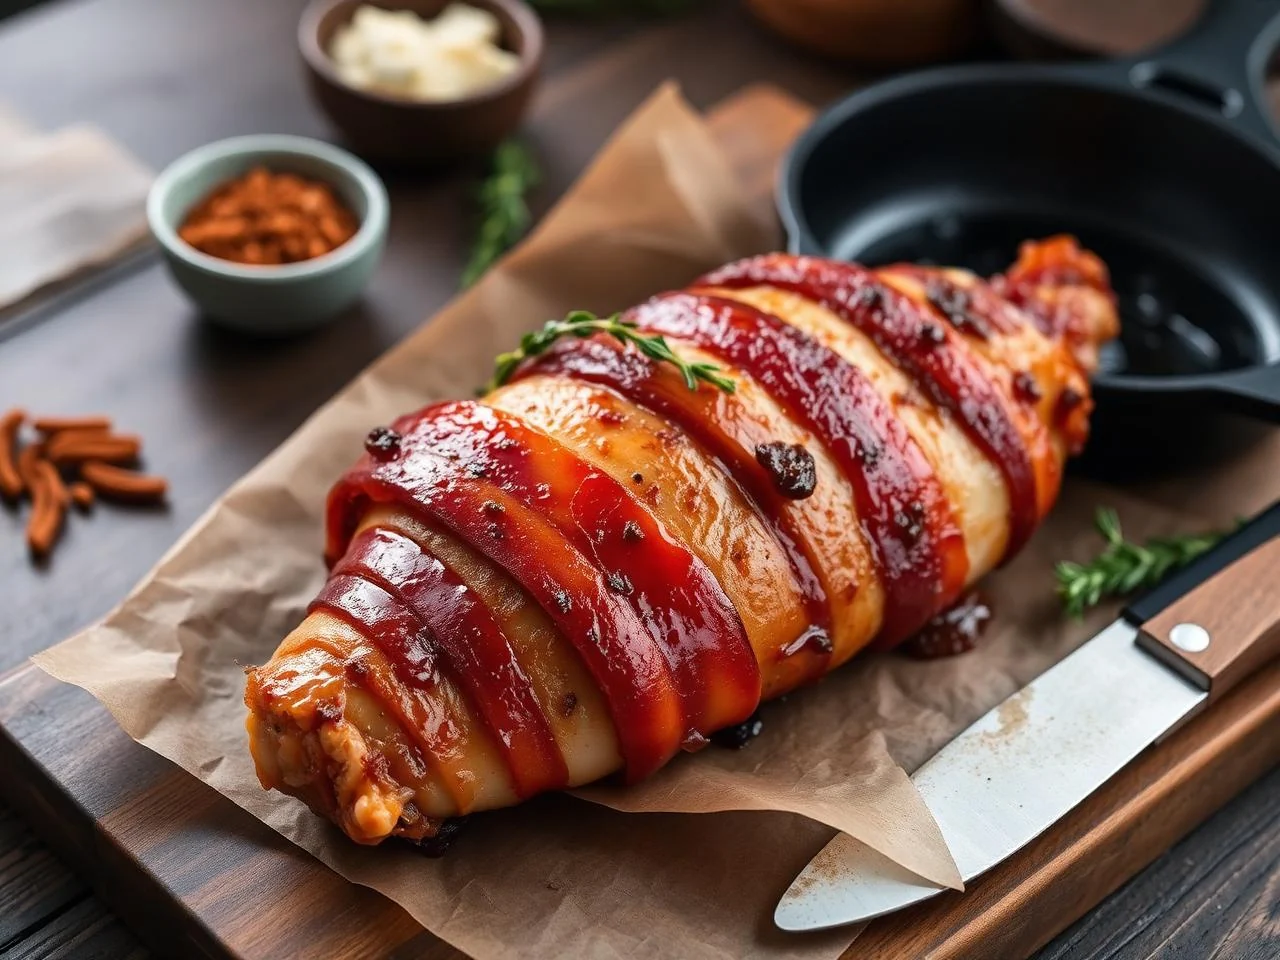
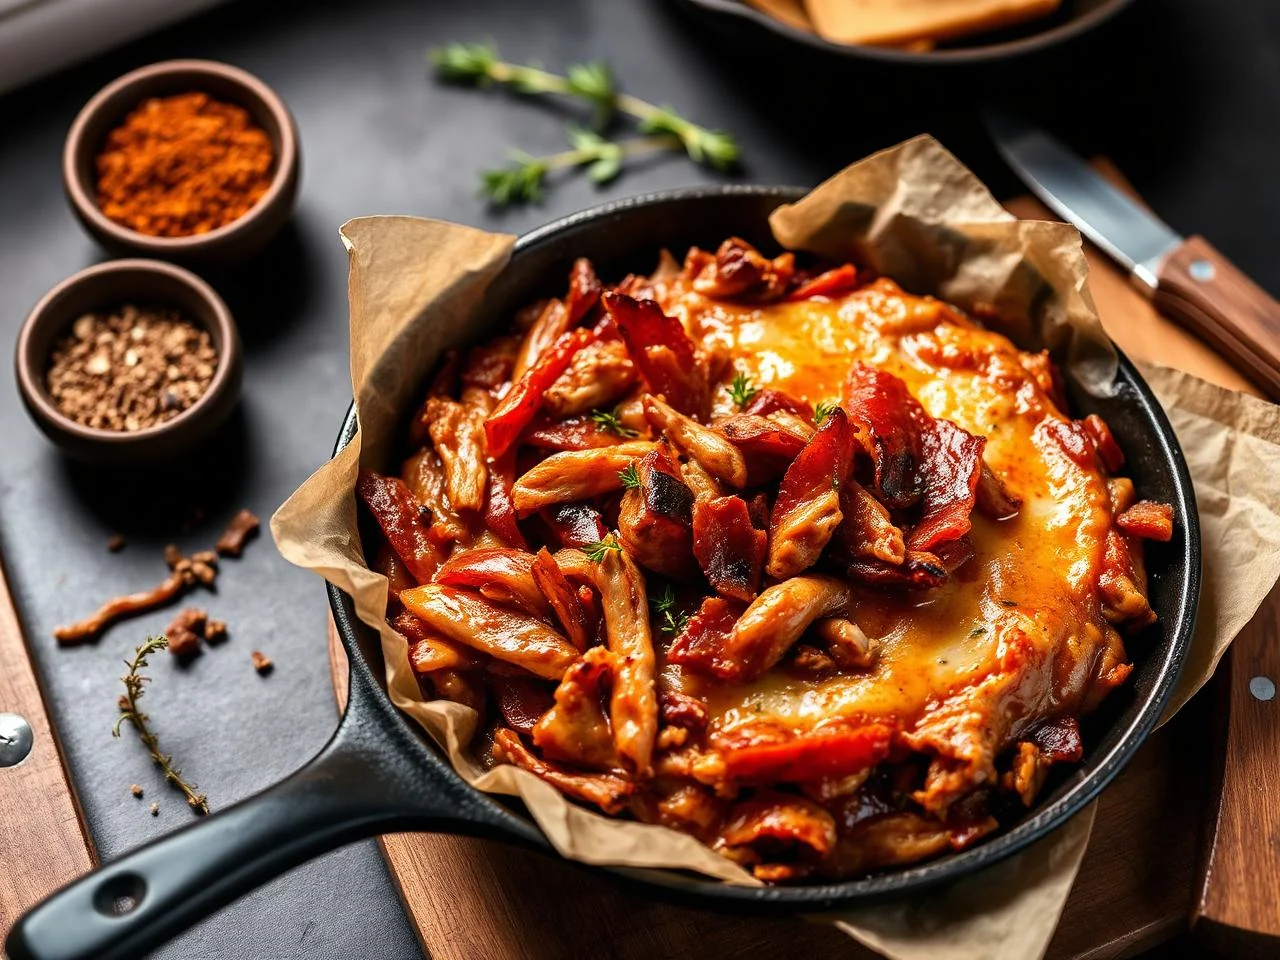
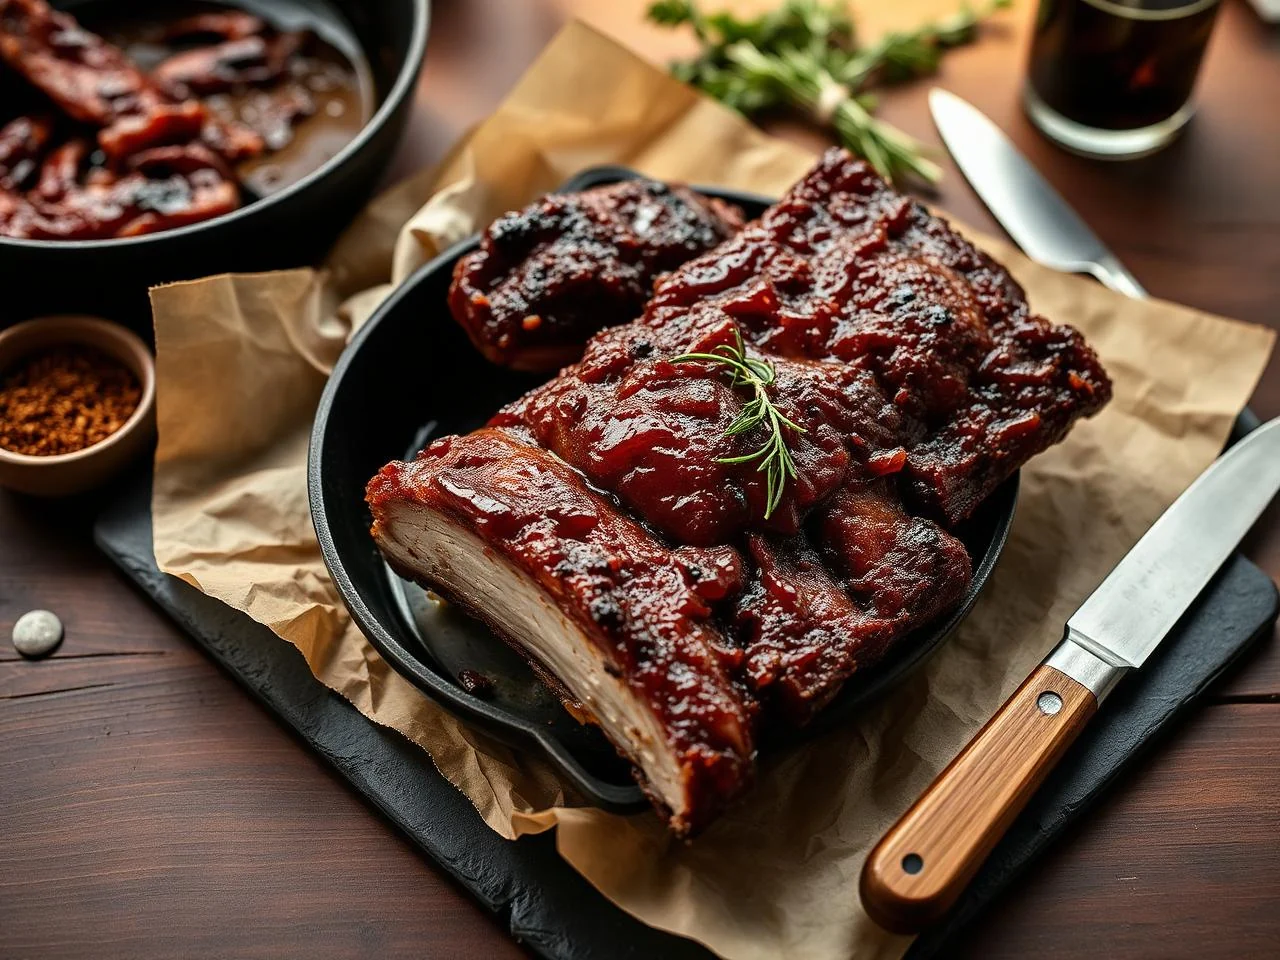
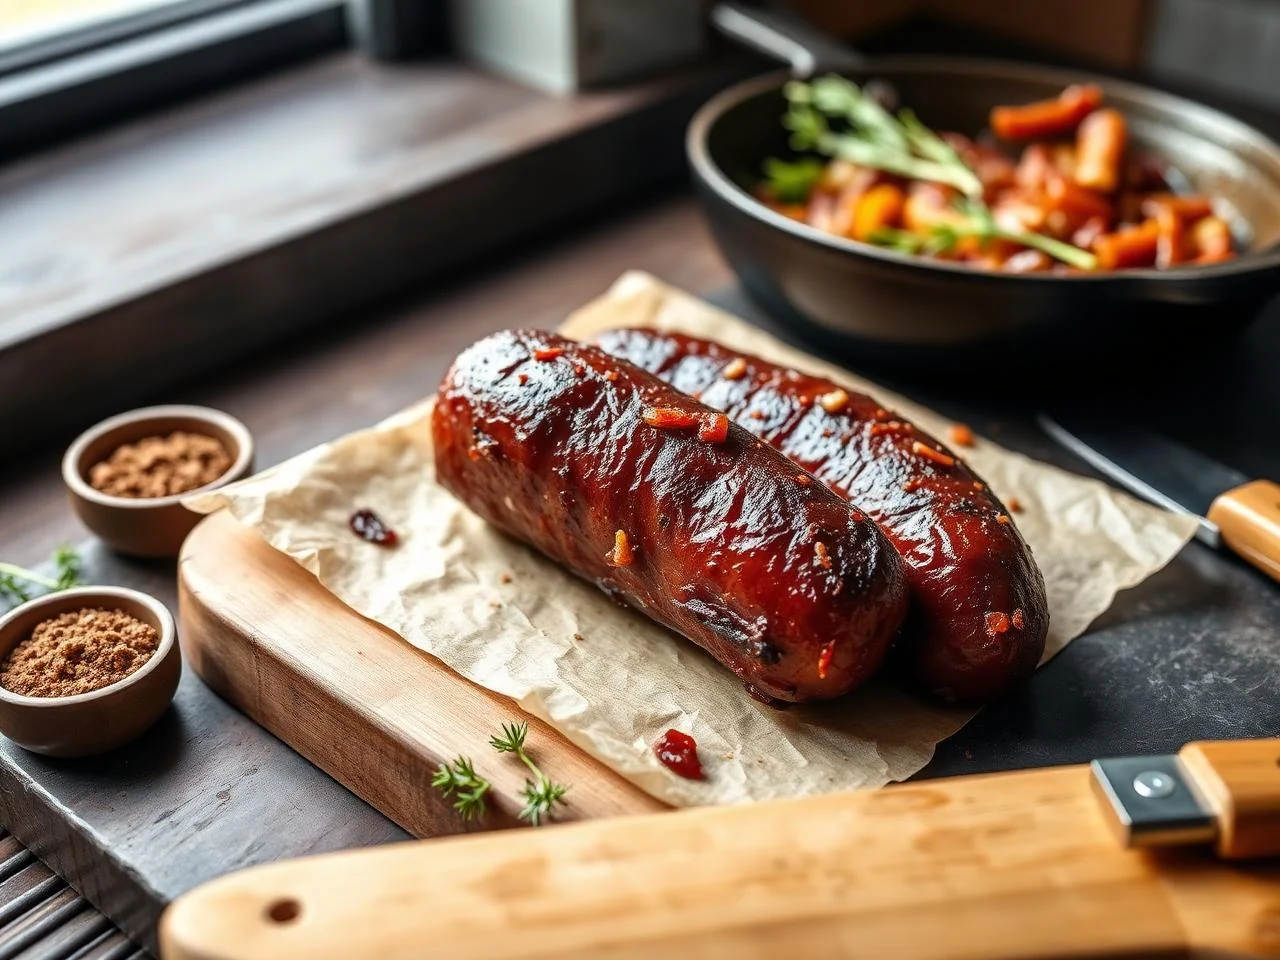
Welcome to Toosimplerecipes

Peppermint Hot Chocolate Bombs Recipe for Cozy Nights

By Lisa Martinez | January 13, 2026
Peppermint Hot Chocolate Bombs Recipe for Cozy Nights

I was standing in my kitchen, the rain drumming against the windows, and a sudden craving for something that could melt the chill straight out of my bones hit me like a bolt of lightning. I grabbed a half‑finished batch of chocolate chips, a bag of peppermint candy canes, and a mug of hot cocoa, and the idea exploded: what if I could trap that cozy, molten goodness inside a little sphere that bursts open with a puff of marshmallows? Most recipes I’d tried either left the chocolate too brittle or the peppermint flavor flat, but I wasn’t about to settle for a mediocre winter treat. I dared myself to create a bomb that would not only melt in your cup but also give you a theatrical reveal—think fireworks, but edible and way sweeter.

Picture this: you drop a glossy, dark sphere into steaming milk, hear a soft crack, and watch a cloud of mini marshmallows rise like a sugary sunrise. The aroma of rich chocolate mingles with a sharp, refreshing peppermint that makes your nose do a little happy dance. The first sip is a velvety cascade that coats your tongue like a warm blanket, while the tiny marshmallows melt into pockets of cloud‑soft sweetness. You can almost hear the sizzle of the chocolate meeting the hot liquid, a sound that says, “We’re about to get seriously cozy.”

Most recipes get this completely wrong. They either skip the crucial step of tempering the chocolate, resulting in a dull, crumbly shell, or they drown the peppermint in a sea of sugar, losing that crisp, winter‑y zing. My version, however, balances the bitterness of high‑quality semi‑sweet chocolate with just enough peppermint to make your taste buds tingle without overwhelming the palate. The secret? A quick melt‑and‑pour technique that creates a glossy, snap‑ready shell, and a surprise interior that stays fluffy until the exact moment you submerge it.

I’m going to be honest — I ate half the batch before anyone else got a chance to try them, and I still can’t stop thinking about that first burst of flavor. I dare you to taste this and not go back for seconds. Ready for the game‑changer? Let me walk you through every single step — by the end, you’ll wonder how you ever made a hot chocolate bomb any other way.

What Makes This Version Stand Out

  • Taste: The marriage of deep, semi‑sweet chocolate with bright peppermint creates a flavor contrast that feels like a hug and a high‑five at the same time. It’s rich without being cloying, and the marshmallow surprise adds a creamy counterpoint.
  • Texture: A crisp, glossy shell that snaps cleanly when it meets hot liquid, followed by a soft, melt‑in‑your‑mouth interior that releases marshmallows like tiny snowflakes.
  • Simplicity: Only six ingredients, all of which you likely have on hand, and a straightforward tempering method that doesn’t require a candy thermometer.
  • Uniqueness: Most hot chocolate bombs rely on pre‑made cocoa mixes; I use a blend of premium chocolate chips and a custom cocoa mix for depth and control.
  • Crowd Reaction: The visual “pop” when the bomb bursts is a guaranteed Instagram moment and a conversation starter at any gathering.
  • Ingredient Quality: Using Ghirardelli semi‑sweet chips and real crushed candy canes elevates the flavor profile from “okay” to “wow, I need more.”
  • Cooking Method: The melt‑and‑pour technique gives you a professional‑looking finish without the need for a tempering machine.
  • Make‑Ahead Potential: Once the shells are formed, you can store them for weeks, making last‑minute holiday entertaining a breeze.

Alright, let's break down exactly what goes into this masterpiece...

Kitchen Hack: When melting chocolate, use a double boiler made from a heat‑proof bowl over a pot of simmering water; this prevents scorching and gives you a silky melt every time.

Inside the Ingredient List

The Flavor Base

The foundation of any great hot chocolate bomb is the chocolate itself. I swear by high‑quality semi‑sweet chocolate chips or melting wafers because they melt evenly and provide a glossy finish. If you skip this and use cheap chocolate, you’ll end up with a dull, grainy shell that cracks prematurely. A good swap is a 70% dark chocolate bar, chopped finely, which adds a deeper cocoa note without sacrificing snap.

The Texture Crew

Mini marshmallows are the surprise element that turns a simple drink into a festive experience. They puff up when the bomb bursts, creating a cloud of sweetness that dissolves into the milk. If you’re allergic to gelatin, try using vegan marshmallows; they behave the same way and keep the texture light. The amount matters—too many and the bomb becomes soggy; too few and the effect is underwhelming.

The Unexpected Star

Crushed candy canes bring the peppermint punch that defines this recipe. The tiny shards distribute flavor evenly, ensuring each sip gets that cool, minty zing. If you don’t have candy canes, peppermint extract (a few drops) works, but you lose the delightful crunch. When crushing, wrap the canes in a towel and give them a good whack with a rolling pin for uniform pieces.

Fun Fact: The peppermint flavor we love in candy canes originated in Europe in the 17th century as a medicinal herb, later becoming a holiday staple due to its refreshing palate‑cleansing properties.

The Final Flourish

A drizzle of melted white chocolate adds a festive sparkle and a subtle sweet contrast to the dark shell. It’s optional, but it turns the bomb into a visual masterpiece worthy of any holiday table. Sprinkles—whether red and white or crushed peppermint—add a pop of color and a tiny crunch that elevates the presentation. If you’re watching sugar, skip the sprinkles or use a dusting of cocoa powder instead.

Everything's prepped? Good. Let's get into the real action...

Peppermint Hot Chocolate Bombs Recipe for Cozy Nights

The Method — Step by Step

  1. Start by setting up a double boiler: fill a saucepan with about an inch of water, bring it to a gentle simmer, and place a heat‑proof bowl on top. Add the semi‑sweet chocolate chips, stirring constantly until fully melted and smooth. You’ll notice the chocolate turning a deep, glossy brown and giving off a fragrant, buttery aroma—that’s your cue that the base is ready.

    Kitchen Hack: Add a teaspoon of vegetable oil to the chocolate; it gives the shell extra shine and makes it easier to release from the molds later.
  2. While the chocolate stays warm, crush the candy canes. Place them in a zip‑top bag, seal it, and gently tap with a rolling pin until you have fine crumbs. This step is crucial because large shards can create uneven pockets of peppermint, leading to a bitter bite. Once crushed, set them aside in a small bowl, and if you’re feeling adventurous, mix a pinch of sea salt to accentuate the mint.

  3. Now, prepare your silicone bomb molds. Using a silicone spatula, spoon a thin layer of melted chocolate into each cavity, swirling to coat the sides evenly. Let the chocolate set for about two minutes, then add a second coat to reinforce the shell. The goal is a smooth, glossy surface that will snap cleanly when it meets hot liquid.

  4. While the second coat is still tacky, sprinkle a generous handful of crushed candy cane crumbs into each half, followed by a spoonful of mini marshmallows. Be careful not to overfill; you want enough room for the marshmallows to expand without bursting the shell. This is the trickiest part—if you pack too tightly, the bomb may crack when you dip it.

    Watch Out: If the chocolate starts to harden before you finish filling, gently re‑warm the mold over the double boiler for a few seconds to keep the shell pliable.
  5. Once each half is filled, carefully place the opposite half on top, aligning the edges. Press gently but firmly to seal the two halves together. The chocolate will act like a glue, and you’ll hear a faint “click” as the seam locks. If any gaps appear, melt a tiny bit more chocolate and brush it over the seam with a pastry brush.

    Kitchen Hack: Freeze the completed bombs for 10 minutes; this firms the chocolate quickly and makes them easier to handle when you move them to a cooling rack.
  6. Transfer the sealed bombs onto a parchment‑lined baking sheet and place them in the refrigerator for at least 30 minutes, or until the chocolate is completely set. You’ll know they’re ready when they feel firm to the touch and the surface is no longer tacky. This chilling step is essential for a clean snap when you drop them into the milk.

  7. While the bombs chill, prepare your hot chocolate base. Heat milk (or a milk‑alternative) in a saucepan over medium heat until just below boiling. Whisk in the hot cocoa mix, letting it dissolve fully, then add a splash of vanilla extract for depth. The mixture should be steaming and fragrant, but not boiling, to avoid scalding the chocolate.

  8. When you’re ready to serve, remove a bomb from the fridge, place it in a large mug, and pour the steaming hot chocolate over it. Watch as the shell melts away, releasing the peppermint‑infused marshmallow cloud. Finish with a drizzle of melted white chocolate and a sprinkle of red and white sprinkles for that holiday sparkle. That sizzle when it hits the pan? Absolute perfection.

That's it — you did it. But hold on, I've got a few more tricks that'll take this to another level...

Insider Tricks for Flawless Results

The Temperature Rule Nobody Follows

Temper the chocolate just enough to be fluid but not so hot that it loses its gloss. Aim for a temperature around 115°F (46°C) for semi‑sweet chips. If you overshoot, the chocolate can develop a dull finish and become prone to blooming (those white specks you hate). A quick tip: dip a thermometer into the melt and pull it out when it reads just below the “soft‑ball” stage. This temperature rule is the secret behind a professional‑grade snap.

Why Your Nose Knows Best

Before you pour the hot chocolate, give it a quick sniff. If you detect a faint burnt scent, the milk is too hot and will cause the chocolate shell to crack. The perfect hot chocolate should smell like a cozy blend of cocoa, vanilla, and a whisper of peppermint. Trust your nose—it's a more reliable gauge than a thermometer for most home cooks.

The 5‑Minute Rest That Changes Everything

After sealing the bomb halves, let them rest at room temperature for five minutes before refrigerating. This short pause lets the chocolate settle, reducing internal stress that can cause cracks later. I once rushed this step and ended up with a batch of bombs that split open prematurely. The extra five minutes are a tiny time investment for a flawless finish.

Marshmallow Distribution Mastery

Instead of dumping a whole cup of marshmallows into each half, spoon them in two layers with a pinch of crushed candy cane between. This creates a layered texture that releases flavor gradually as the bomb melts, rather than an all‑at‑once burst. The result is a smoother mouthfeel and a more balanced peppermint‑marshmallow harmony.

White Chocolate Drizzle Precision

When drizzling white chocolate, use a small pastry bag or a squeeze bottle. A thin, controlled line prevents the white chocolate from pooling and creating a soggy spot on the bomb. If you accidentally over‑drizzle, gently tap the mug on the counter to smooth the excess before the chocolate sets.

Kitchen Hack: Keep a small bowl of ice water nearby while working with the chocolate; dipping the silicone molds briefly can help the shells release cleanly.

Creative Twists and Variations

This recipe is a playground. Here are some of my favorite ways to switch things up:

Mocha Madness

Swap half of the hot cocoa mix for finely ground espresso powder. The result is a deep, coffee‑infused bomb that’s perfect for brunch or a post‑dinner pick‑me‑up. Add a dusting of cocoa powder on top for extra drama.

White Chocolate Raspberry

Replace the semi‑sweet chocolate with white chocolate chips and fold in freeze‑dried raspberry pieces into the interior. The tartness of raspberry cuts through the sweetness, creating a sophisticated flavor profile that feels upscale.

Spicy Chili Peppermint

Add a pinch of cayenne pepper to the chocolate melt and a dash of chili‑infused candy cane crumbs. The subtle heat pairs unexpectedly well with peppermint, delivering a warm‑after‑glow that’s perfect for daring palates.

Nutty Crunch

Stir in chopped toasted hazelnuts or almonds into the marshmallow layer. The nutty crunch adds texture and a buttery flavor that complements both chocolate and peppermint beautifully.

Vegan Velvet

Use dairy‑free dark chocolate and vegan marshmallows, and substitute the hot cocoa mix with a plant‑based version. The end result is a cruelty‑free bomb that still delivers that luxurious melt‑in‑your‑mouth experience.

Storing and Bringing It Back to Life

Fridge Storage

Place the fully set bombs in an airtight container and store them in the refrigerator for up to two weeks. The cool environment keeps the chocolate firm and prevents bloom. If you notice any condensation, pat the bombs dry with a paper towel before resealing.

Freezer Friendly

For longer storage, wrap each bomb individually in parchment paper and then place them in a freezer‑safe zip‑top bag. They’ll stay fresh for up to three months. When you’re ready to use them, transfer to the fridge for 30 minutes to thaw slightly—this prevents a shocking temperature change that could crack the shell.

Best Reheating Method

Heat your milk to just below boiling, then pour it over the bomb. If the chocolate seems sluggish, add a tiny splash (about a tablespoon) of water to the milk before pouring; the steam helps the shell melt back to its original glossy sheen. Stir gently to blend the marshmallows and peppermint evenly, and enjoy the velvety result.

Peppermint Hot Chocolate Bombs Recipe for Cozy Nights

Peppermint Hot Chocolate Bombs Recipe for Cozy Nights

Homemade Recipe

Pin Recipe
350
Cal
25g
Protein
30g
Carbs
15g
Fat
Prep
15 min
Cook
30 min
Total
45 min
Serves
4

Ingredients

4
  • 2 cups semi‑sweet chocolate chips
  • 1 cup hot cocoa mix
  • 1 cup mini marshmallows
  • 6 candy canes, crushed
  • 0.5 cup white chocolate, melted (optional)
  • 2 tbsp sprinkles (red & white)

Directions

  1. Set up a double boiler and melt the semi‑sweet chocolate chips, stirring until smooth and glossy.
  2. Crush candy canes into fine pieces and set aside.
  3. Coat silicone bomb molds with a thin layer of melted chocolate, let set, then add a second coat.
  4. While the second coat is tacky, sprinkle crushed candy cane and a spoonful of mini marshmallows into each half.
  5. Place matching halves together, press gently to seal, and refrigerate for at least 30 minutes.
  6. Heat milk, whisk in hot cocoa mix, and bring to just below boiling.
  7. Place a chilled bomb in a mug and pour the hot chocolate over it, watching the shell melt.
  8. Drizzle melted white chocolate over the top and sprinkle with festive sprinkles before serving.

Common Questions

Yes, a 70% dark chocolate will give a richer flavor, but it may make the shell a bit more bitter. Adjust the amount of hot cocoa mix slightly to balance the taste.

Bloom occurs when chocolate is overheated or stored in a humid environment. Melt it again gently, add a teaspoon of oil, and re‑coat the molds.

Absolutely. Store the sealed bombs in an airtight container in the fridge for up to two weeks or freeze for up to three months.

Not required. Keep the chocolate just melted, not bubbling, and you’ll achieve the right consistency.

Whole milk gives the creamiest texture, but any milk or plant‑based alternative works. Just avoid ultra‑low‑fat milks as they can make the drink thin.

More Recipes