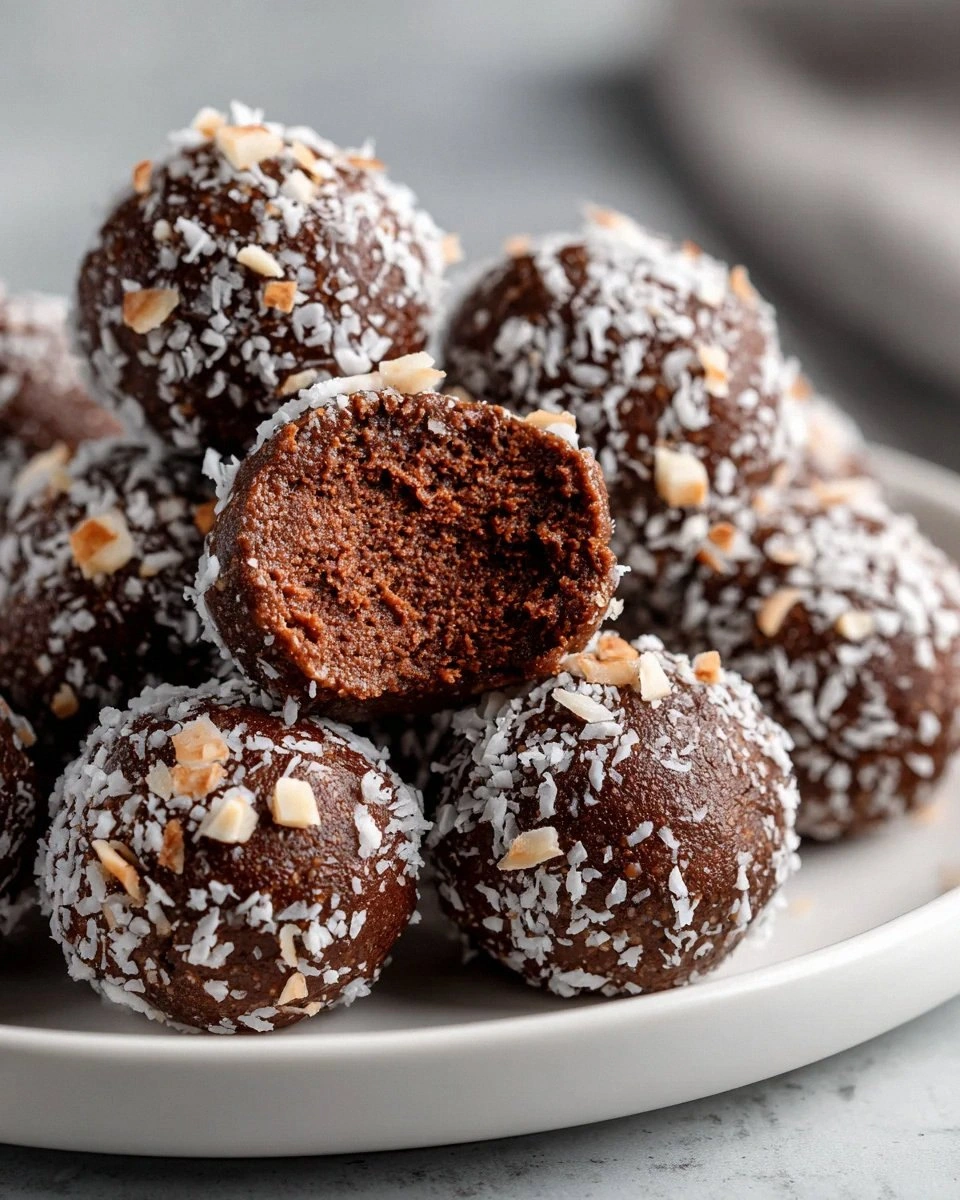
I still remember the night I accidentally created the most addictive chocolate truffles of my life. It was 11:47 PM, I was wearing mismatched socks, and I had exactly three ingredients in my pantry: a can of chickpeas, half a jar of almond butter, and a bag of chocolate chips I'd been hoarding for "emergencies." My best friend had just texted me a dare: "Bet you can't make something actually delicious with chickpeas and chocolate." Challenge accepted, Sarah. Challenge accepted.
What happened next was pure kitchen alchemy. As I stood there in my tiny apartment kitchen, the midnight silence broken only by the hum of my ancient food processor, I discovered something revolutionary. The chickpeas weren't just a healthy swap — they were the secret to creating truffles so creamy, so luxuriously smooth, that they put every expensive chocolate shop version I'd ever tried to shame. The texture was like silk wrapped in velvet, and the flavor? Deep, rich chocolate with subtle nutty undertones that made my taste buds do a happy dance.
Here's the kicker — these truffles require zero special equipment, zero refined sugar, and zero culinary school training. If you can operate a microwave and press a button on your food processor, you can make these. I've since served them at dinner parties where guests refused to believe they were vegan, at potlucks where they disappeared in minutes, and to my chocolate-snob father who asked for the recipe (a first in thirty years). They're that good.
But before we dive into the magic, let me warn you: these truffles are dangerous. Not in the "might poison you" way, but in the "I ate twelve before I realized what I was doing" way. They're bite-sized bombs of chocolate bliss that somehow taste even better the next day, if they last that long. Okay, ready for the game-changer?
What Makes This Version Stand Out
Silky Smooth: The chickpeas create a texture that's honestly criminal — smoother than traditional cream-based truffles, with zero graininess. They're like little chocolate clouds that melt on your tongue, leaving behind this incredible richness that makes you close your eyes involuntarily.
Protein Powerhouse: Each truffle packs about 3 grams of plant protein, which means you can actually feel good about eating them. I've had them for breakfast before a long hike, and they kept me energized without the sugar crash that usually comes with chocolate treats.
Two-Bowl Wonder: Most truffle recipes require heating cream, tempering chocolate, and praying to the dessert gods. This one? You melt chocolate in the microwave, blend everything in a food processor, and roll. That's it. My eight-year-old nephew could make these unsupervised.
Endlessly Adaptable: Want them minty? Add a drop of peppermint extract. Craving something exotic? Stir in some orange zest or a whisper of espresso powder. The base recipe is like a blank canvas waiting for your personal touch.
Crowd Confusion: I love watching people's faces when I tell them these are made with chickpeas. They literally stop mid-chew, look at the truffle like it might be magic, then immediately ask for the recipe. It's my favorite party trick.
Make-Ahead Marvel: These beauties actually improve after a day in the fridge. The flavors meld, the texture sets perfectly, and they develop this incredible depth that makes them taste like they came from a fancy chocolate boutique in Paris.
Alright, let's break down exactly what goes into this masterpiece...
Inside the Ingredient List
The Unexpected Star
Chickpeas are the backbone of this recipe, and I'm not even sorry about it. When blended until completely smooth, they create this incredible creamy base that mimics heavy cream but with added fiber and protein. The key is using canned chickpeas that are well-drained and rinsed — any lingering canning liquid will throw off the flavor. I've tried this with dried chickpeas I cooked myself, and honestly, the canned ones work better. They're softer, more consistent, and save you hours of prep time.
Don't even think about skipping the chickpeas in this recipe. I know what you're thinking — "Maybe I'll just use more nut butter instead." Trust me, I've been there, done that, and ended up with greasy, separated chocolate blobs that tasted like sadness. The chickpeas provide structure, creaminess, and that melt-in-your-mouth quality that makes these truffles absolutely irresistible.
The Flavor Base
Vegan dark chocolate chips are where the magic happens, and quality absolutely matters here. I'm talking about the kind of chocolate that makes you pause and appreciate life when you taste it. Look for chips that are at least 60% cacao — anything less and your truffles will taste like chocolate milk instead of rich, sophisticated treats. My go-to brand melts like a dream and has these complex flavor notes that make people ask, "What kind of chocolate is this?"
The nut or seed butter is your flavor conductor, carrying all the chocolate goodness while adding its own subtle notes. Almond butter creates the most neutral base, letting the chocolate shine, while cashew butter adds this incredible buttery richness. If you're dealing with nut allergies, sunflower seed butter works beautifully — just know it might turn your truffles slightly green (totally safe, just a fun chemical reaction). Whatever you choose, make sure it's the natural kind with no added sugar or oils.
The Texture Crew
Coconut oil is the secret weapon that gives these truffles that authentic snap when you bite into them. It firms up beautifully in the fridge, creating that classic truffle shell that shatters just slightly before giving way to the creamy center. You only need a tablespoon, but it makes all the difference between truffles that feel homemade and ones that could pass for professional. Make sure you're using refined coconut oil unless you want your chocolates tasting like a tropical vacation.
The Final Flourish
This is where you get to play chocolatier. Cacao nibs add this incredible crunch and intense chocolate hit — they're like nature's chocolate chips but with way more personality. Goji berries bring a gorgeous pop of color and this sweet-tart thing that makes the chocolate taste even richer. And don't even get me started on freeze-dried fruits; when crushed and rolled around the outside, they create these beautiful, jewel-like finishes that make your truffles look like they belong in a Parisian chocolate shop window.
Everything's prepped? Good. Let's get into the real action...
The Method — Step by Step
- Start by melting your chocolate chips in 30-second bursts in the microwave, stirring between each interval. This is where patience pays off big time — rush this step and you'll end up with seized chocolate that looks like sad, grainy mud. When there are still a few unmelted pieces left, just keep stirring; the residual heat will finish the job. Your chocolate should be glossy and smooth, like liquid velvet that coats your spoon in the most satisfying way.
- While your chocolate is cooling slightly (just for a minute or two), dump your drained chickpeas into the food processor. Here's the thing — you want to blend them alone first until they look like damp, clumpy sand. This step breaks them down completely so you don't end up with surprise chickpea chunks in your beautiful truffles. Process them for a full minute, scraping down the sides once, until they resemble very fine breadcrumbs.
- Now comes the magic moment: add your nut butter to the chickpeas and blend until it forms a smooth paste. This is where the texture transformation happens — suddenly you'll have this gorgeous, creamy mixture that looks nothing like chickpeas. Let it run for a good two minutes; we're going for baby-bottom smooth here. The mixture should start to form a ball that rolls around the processor bowl.
- Pour in your melted chocolate and watch pure alchemy happen. The warm chocolate will immediately start binding everything together, creating this glossy, irresistible mixture. Blend for about 30 seconds, just until everything is combined and looking like the most luxurious chocolate mousse you've ever seen. Resist the urge to eat it with a spoon — okay, maybe just one taste.
- Add the coconut oil and pulse just to combine. This is your texture insurance policy — it helps the truffles set properly and gives them that professional finish. The mixture should be thick enough to hold its shape when scooped, but soft enough to roll into balls. If it's too soft, pop it in the fridge for 10 minutes; too firm, let it sit at room temperature for a few minutes.
- Transfer your chocolate mixture to a shallow dish and refrigerate for 20-30 minutes. You're looking for the mixture to firm up enough that you can scoop and roll it, but not so hard that it cracks when you try to shape it. Think cold play-dough consistency. I like to check it after 20 minutes — you want it to hold the indent of your finger but still be pliable.
- Time to roll! Use a small cookie scoop or tablespoon to portion out your truffles. Working quickly so the chocolate doesn't melt from your hands, roll each portion into a ball between your palms. They don't need to be perfect — rustic is charming here. If the mixture starts getting too soft, just pop it back in the fridge for a few minutes.
- For the coating, melt your remaining chocolate chips with a tiny bit of coconut oil. This creates what's called "tempering" — giving you that beautiful, shiny finish that cracks perfectly when you bite into it. Dip each truffle into the melted chocolate using a fork, letting the excess drip off before placing on parchment paper.
- While the coating is still wet, sprinkle on your chosen toppings. This is where you get to be artistic — maybe a few cacao nibs on some, shredded coconut on others, or goji berries for pops of color. Work quickly because the chocolate sets fast. Then comes the hardest part: waiting. Let them set in the fridge for at least 30 minutes before devouring.
That's it — you did it. But hold on, I've got a few more tricks that'll take this to another level...
Insider Tricks for Flawless Results
The Temperature Rule Nobody Follows
Here's the thing that separates amateur truffles from professional ones: temperature control. Your chocolate mixture should be cool enough to handle but not cold when you start rolling. Too warm and they'll be sticky nightmares that melt faster than ice cream on hot pavement. Too cold and they'll crack and crumble like old pottery. I aim for about room temperature — if you can hold your finger in the mixture for five seconds without discomfort, you're golden.
But the real secret? Cold hands. Run your hands under cold water for 30 seconds and dry them thoroughly before rolling. This prevents the chocolate from melting as you work, giving you beautiful, smooth spheres instead of lumpy messes. My grandmother taught me this trick, and it's the difference between truffles that look homemade and ones that look like they cost five dollars each at a fancy chocolate shop.
Why Your Nose Knows Best
Quality control is everything with such a simple ingredient list, and your nose is your best tool. Smell your chickpeas before using them — if they have any tinny or sour notes, rinse them again. Check your nut butter for any rancid smells (it happens faster than you think). And please, please taste your chocolate before melting it. Cheap chocolate tastes like wax and sadness, and there's nowhere to hide in this recipe.
I once made a batch using chocolate I'd been saving for "special occasions" only to discover it had bloomed (those white streaks that appear when chocolate gets too warm or cold). The truffles were edible but had this weird, grainy texture that made me want to cry. Now I taste everything first, even if it means opening a fresh bag of chips. Your future self will thank you.
The 5-Minute Rest That Changes Everything
After you roll all your truffles but before you coat them, let them rest in the fridge for exactly five minutes. Not ten, not three — five. This brief chill firms up the surface just enough that when you dip them in melted chocolate, you get this gorgeous, smooth coating without any drips or pools. It's like giving them a quick spa treatment before their final transformation.
I discovered this by accident when I got distracted by a phone call after rolling a batch. When I came back to coat them, they dipped perfectly instead of sliding around and creating chocolate puddles. Now it's my non-negotiable step. Set a timer, walk away, come back to truffle perfection.
The Rolling Technique That Prevents Arm Cramps
Instead of rolling each truffle individually (hello, carpal tunnel), work in batches of six. Scoop all six portions first, then roll them quickly between your palms using a gentle, circular motion. Don't press too hard — let the warmth of your hands do the work. The chocolate will roll into perfect spheres with minimal effort, and you'll finish in a quarter of the time.
Here's another pro tip: if your palms start getting sticky, dust them lightly with cocoa powder. Not flour, not powdered sugar — cocoa powder. It absorbs moisture without affecting the flavor, plus it gives your truffles this beautiful, professional finish that makes them look like they came from a specialty shop.
Creative Twists and Variations
This recipe is a playground. Here are some of my favorite ways to switch things up:
The Espresso Lover's Dream
Add one teaspoon of instant espresso powder to the food processor along with the nut butter. The coffee enhances the chocolate flavor without making them taste like mocha — instead, you get this incredible depth that coffee addicts will recognize but can't quite place. Roll them in crushed espresso beans for extra crunch and visual appeal.
The Tropical Getaway
Swap the almond butter for coconut butter and add half a teaspoon of lime zest to the mixture. Coat with toasted coconut flakes and maybe a few pieces of dried pineapple. They taste like a chocolate-covered vacation, and they're particularly amazing in the dead of winter when you need a tropical escape.
The Spicy Surprise
Add a quarter teaspoon of cayenne pepper and half a teaspoon of cinnamon to the chocolate mixture. The heat is subtle at first, building slowly until you get this pleasant warmth that makes the chocolate taste even richer. Roll them in a mixture of cocoa powder and chili powder for an extra kick. I serve these at dinner parties and love watching people's expressions change as they discover the heat.
The Breakfast of Champions
Stir in two tablespoons of your favorite protein powder (vanilla works great) and a tablespoon of maple syrup. These become legitimate post-workout treats that don't taste healthy at all. I've eaten them after morning runs, and they provide the perfect balance of carbs and protein without any weird aftertaste.
The Holiday Special
Add half a teaspoon of peppermint extract and roll in crushed candy canes. These taste exactly like thin mints but better because they're softer and more intensely chocolatey. I make hundreds of these every December, and people start asking about them in November. They're like Christmas in truffle form.
The Breakfast-Approved Version
Add a tablespoon of strong coffee instead of coconut oil, and roll in crushed cornflakes mixed with a little powdered sugar. They taste like your favorite coffee shop drink but in portable, poppable form. The cornflakes add this incredible crunch that contrasts beautifully with the smooth center.
Storing and Bringing It Back to Life
Fridge Storage
Store your truffles in an airtight container in the refrigerator for up to two weeks, though I can't imagine them lasting that long. Layer them between sheets of parchment paper to prevent them from sticking together, and keep them away from strong-smelling foods (nobody wants onion-scented chocolate). The flavors actually deepen and improve after the first day, so making them ahead is a brilliant move.
Freezer Friendly
These truffles freeze beautifully for up to three months. Flash-freeze them on a baking sheet for an hour, then transfer to a freezer-safe container. When you're ready to serve, let them thaw in the refrigerator for about 30 minutes. They'll taste exactly like fresh-made, and you'll have instant desserts for unexpected guests or midnight cravings.
Best Reheating Method
Here's the thing — you don't actually reheat these. But if they've been in the fridge and you want that perfect, melt-in-your-mouth texture, let them sit at room temperature for 10-15 minutes before serving. They'll soften just enough that the chocolate coating cracks perfectly when you bite into them, revealing that creamy center. It's like a little moment of anticipation before the chocolate bliss hits.