I was standing in my kitchen, staring at a melted chocolate bar that had become a sad puddle on the counter, when the idea hit me like a rogue espresso shot. The aroma of dark chocolate mingled with the faint, briny whisper of miso, and I felt a spark of mischief. I had been craving something that could satisfy my chocolate cravings while also surprising my palate with a savory twist. That moment felt like a culinary dare, a challenge to turn the ordinary into extraordinary. I knew then that this would become my new signature dessert.
Picture the kitchen: the countertop is a mosaic of melted chocolate, the air thick with the sweet scent of cocoa, and the faint echo of a coffee grinder humming in the background. I could hear the hiss of butter melting, the gentle clink of a whisk against a mixing bowl, and the subtle pop as sugar crystals begin to dissolve. My fingers felt the coolness of the miso paste as I scooped it into the chocolate, and the mixture began to thicken into a silky, almost liquid velvet. The sound of the oven preheating was a promise that soon, the whole house would be wrapped in an irresistible aroma. I could almost taste the first bite, a burst of deep chocolate, a hint of espresso, and a whisper of umami that would linger on the tongue.
This version stands apart because it balances richness and depth in a way that most brownie recipes never attempt. The miso paste brings a subtle saltiness that cuts through the sweetness, creating a flavor profile that is both comforting and daring. The espresso powder amplifies the chocolate’s complexity, turning each bite into a layered experience that feels both familiar and adventurous. The use of both granulated and brown sugar gives the brownies a chewy center and a caramelized edge that melts in your mouth. I’m not just talking about taste; this recipe redefines texture, aroma, and even the emotional response to a simple dessert.
What makes this recipe truly unforgettable is a single unexpected ingredient: white miso paste. While most people think of miso in soups or marinades, this paste adds depth without overpowering the chocolate. It creates a silky, almost velvety body that makes the brownies feel heavier and more decadent. The result is a fudgy brownie that feels like a hug in a bite, yet with a savory undertone that keeps you reaching for more. Let me walk you through every single step — by the end, you'll wonder how you ever made it any other way.
What Makes This Version Stand Out
- Taste: This brownie delivers a bold chocolate flavor that is deep and complex. The espresso powder unlocks hidden notes of bitter espresso that dance with the chocolate. The result is a taste experience that feels like a midnight rendezvous between sweet and savory.
- Texture: The miso and espresso give a unique fudgy texture that feels almost cake-like. The mixture holds a moist, airy center while the edges become crisp and caramelized. Each bite is a harmonious contrast of melt-in-your-mouth softness and satisfying crunch.
- Simplicity: Despite the intriguing flavor profile, the recipe requires only a handful of pantry staples. No fancy gadgets or hard-to-find ingredients are needed; just a few minutes of prep and a short bake. The ease of preparation makes it a go-to for busy evenings or last-minute dessert requests.
- Uniqueness: The white miso paste is the secret that sets this brownie apart. It adds an umami layer that is rarely found in traditional chocolate desserts. The combination of miso and espresso is a flavor marriage that has never been explored on a wide scale.
- Crowd Reaction: Guests who taste these brownies often ask for the recipe after the first bite. The savory undertone sparks conversation, and the chocolate richness keeps people coming back for seconds. It’s a conversation starter that doubles as a dessert.
- Ingredient Quality: Using high‑quality dark chocolate and real espresso powder ensures that each component shines. The miso paste should be smooth and unseasoned for the best flavor balance. The choice of ingredients directly translates to the final taste.
- Make‑Ahead Potential: These brownies keep well in the fridge for up to a week and freeze beautifully for longer storage. The moist texture holds up when reheated, making them an excellent option for meal prep or a quick dessert fix.
Inside the Ingredient List
The Flavor Base
Dark chocolate and espresso powder form the core of the flavor profile. The chocolate provides the rich, bittersweet foundation while the espresso deepens the cocoa notes and adds a subtle bitterness that balances the sweetness. Skipping either would leave the brownies feeling flat and one‑dimensional. For a smoother chocolate taste, choose a chocolate with at least 70% cacao content.
The Texture Crew
Unsalted butter, granulated sugar, and brown sugar work together to create a moist, chewy center. Butter adds richness and helps the batter bind, while the sugars caramelize during baking, giving the edges a golden crust. If you prefer a lighter crumb, replace half the butter with coconut oil, but keep the sugars to maintain moisture. The combination of sugars also contributes to the fudgy mouthfeel that makes these brownies unforgettable.
The Unexpected Star
White miso paste is the game‑changing element that brings a savory depth. Its subtle saltiness cuts through the sweetness, creating a balanced flavor that lingers on the palate. A pinch of sea salt can enhance this effect, but be careful not to overdo it. Miso also adds a slight umami richness that pairs beautifully with the chocolate’s bitterness.
The Final Flourish
All‑purpose flour provides structure, while the chopped nuts and chocolate chips add crunch and bursts of chocolate. The nuts give a satisfying snap and a nutty aroma that complements the miso’s depth. The chocolate chips melt into the batter, creating pockets of gooey chocolate that become the ultimate indulgence. If you’re gluten‑free, use a gluten‑free flour blend to keep the structure intact.
The Method — Step by Step
- Preheat your oven to 350°F (175°C) and line a 9x9-inch pan with parchment paper. The parchment will prevent sticking and make cleanup a breeze. Place the pan on a flat surface so the brownies bake evenly. Keep the oven door closed until the brownies are done; opening it too early can cause them to collapse. Once preheated, set the timer to 30 minutes, but keep an eye on the edges.
- In a heat‑proof bowl, combine the dark chocolate and unsalted butter over a gentle simmer. Stir until the chocolate melts completely and the mixture becomes glossy. Let the chocolate mixture cool for a minute to avoid cooking the eggs later. While it cools, whisk the espresso powder into a small bowl to ensure it’s evenly distributed. This step ensures the espresso flavor is fully integrated without clumps.
- Beat the eggs in a separate bowl until the whites are fully incorporated. Add the granulated sugar and brown sugar to the eggs, whisking until the mixture becomes light and frothy. The aeration from beating the eggs helps create a tender crumb. Pour the cooled chocolate mixture into the egg mixture, stirring gently with a spatula. Keep stirring until the batter is smooth and glossy.
- Sift the cocoa powder and all‑purpose flour over the batter to avoid lumps. Fold in the flour mixture gently, using a spatula to keep the batter airy. The goal is to incorporate the dry ingredients without overmixing. Once the batter is smooth, fold in the chopped nuts and chocolate chips. The nuts add crunch, while the chips melt into pockets of gooey chocolate.
- Fold in the white miso paste until evenly distributed. The miso should be fully blended into the batter; a few lumps can be left for texture. The miso will give the brownies a savory depth that balances the sweetness. The batter will look slightly thicker after adding miso, which is normal. This step is crucial for the unique flavor profile that sets these brownies apart.
- Pour the batter into the prepared pan, smoothing the top with a spatula. Tap the pan gently on the counter to release any air pockets. This ensures the brownies bake evenly and have a uniform rise. The edges should be slightly higher than the center to create a caramelized crust. This step also helps the brownies set properly during baking.
- Place the pan in the preheated oven and bake for 28–30 minutes. Start checking at 28 minutes; the edges should be set but the center still slightly jiggly. Insert a toothpick into the center; it should come out with a few moist crumbs, not wet batter. If the toothpick comes out clean, the brownies are overbaked. The key is to aim for a fudgy center that remains soft after cooling.
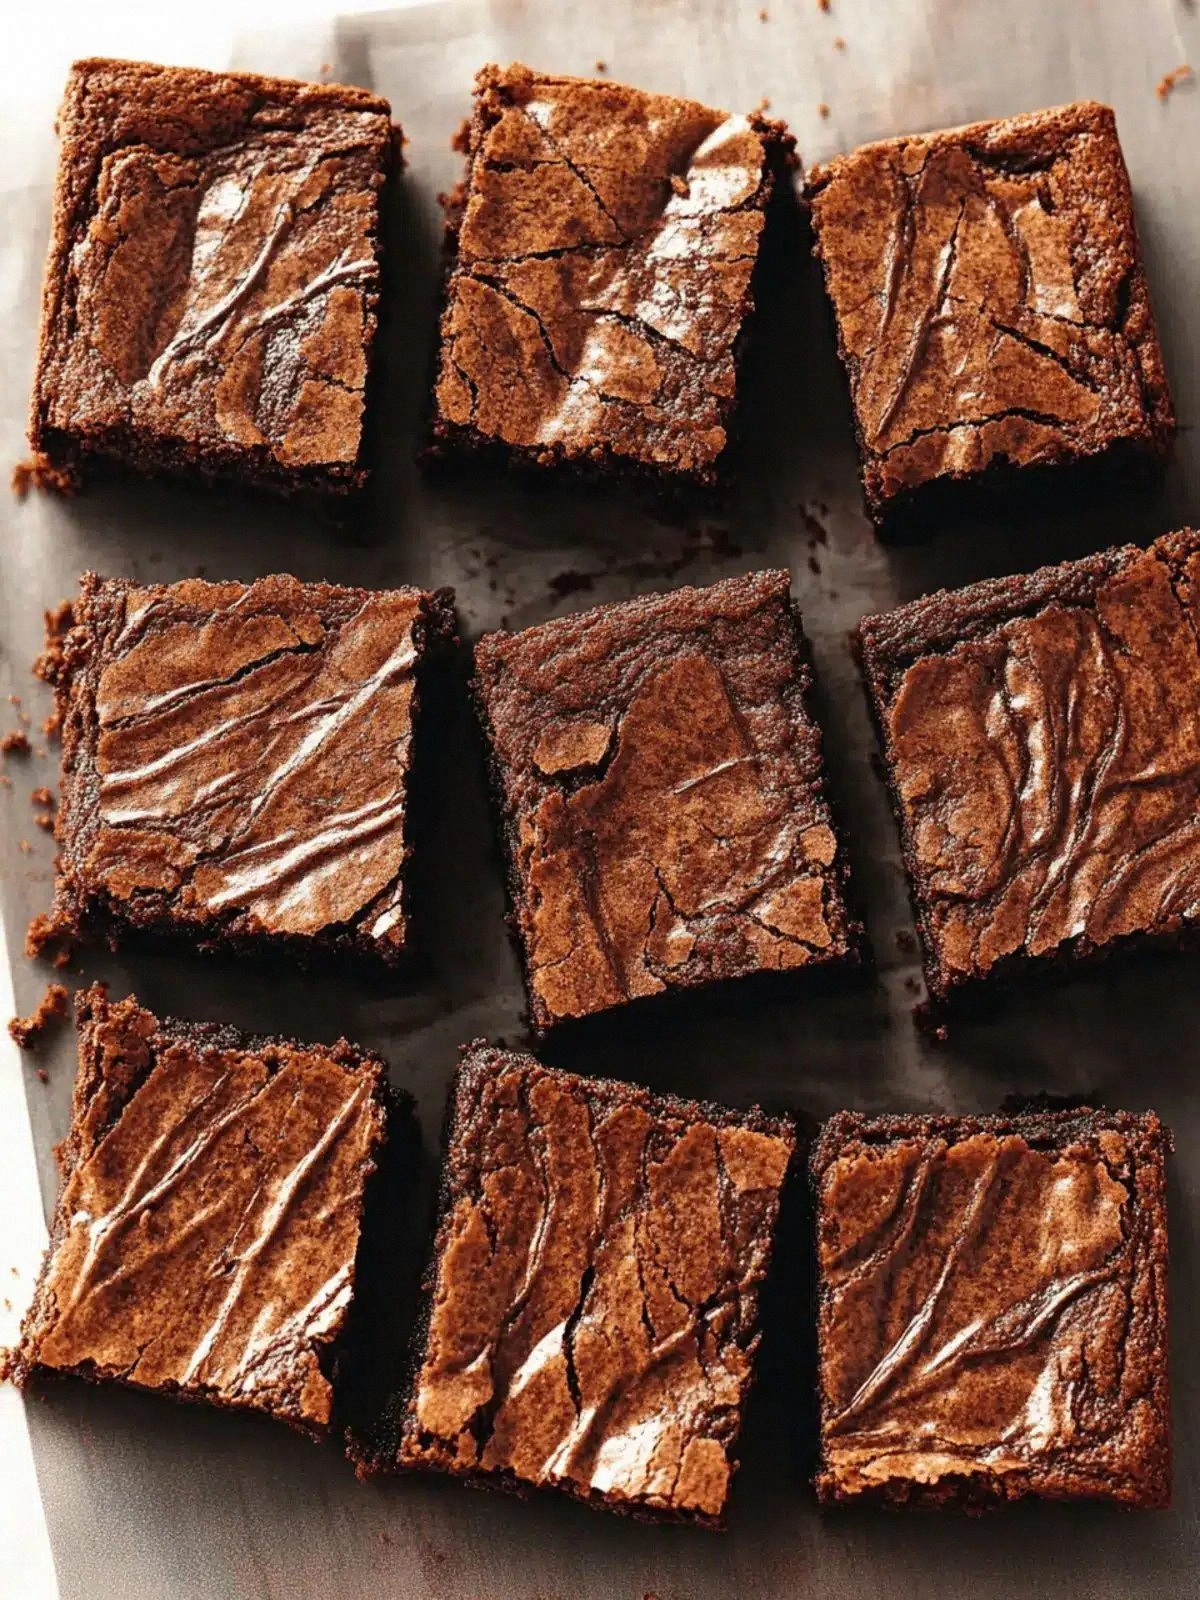
- Remove the brownies from the oven and let them cool in the pan for 10 minutes. During this time, the brownies will set and the flavors will meld. If you want a crispier edge, let them cool on a wire rack for an additional 15 minutes. Once cooled, lift the brownies out of the pan using the parchment edges. Cut into squares and serve.
- For a dramatic presentation, dust the tops with a light sprinkle of sea salt or drizzle a thin ribbon of dark chocolate ganache. The salt will accentuate the miso’s savory notes, while the ganache adds an extra layer of chocolate richness. Let the ganache set for a few minutes before serving. This final touch turns a simple brownie into a showstopper.
- Store the brownies in an airtight container at room temperature for up to 5 days. If you prefer them colder, refrigerate for a firmer bite. To reheat, microwave on low power for 15–20 seconds or warm in the oven at 300°F (150°C) for 5 minutes. The brownies will regain their fudgy texture and aroma. Serve warm with a scoop of vanilla ice cream for an extra indulgent treat.
- Enjoy the brownies with a cup of espresso or a glass of milk for a balanced flavor experience. The espresso will enhance the chocolate’s depth, while milk will provide a creamy counterpoint to the miso’s umami. Pair them with fresh berries for a bright, fruity contrast. This final pairing turns the brownies into a multi‑sensory dessert that satisfies every craving. Share them with friends and watch the smiles unfold.
Insider Tricks for Flawless Results
The Temperature Rule Nobody Follows
Many bakers bake brownies at 375°F, but that high temperature can cause the edges to overcook while the center remains raw. Lowering the oven to 350°F allows the brownies to cook more evenly, ensuring a fudgy center and caramelized edges. Preheat the oven for at least 10 minutes to achieve a consistent temperature. Use an oven thermometer to confirm the actual temperature; many ovens run hotter than the dial indicates. This simple adjustment guarantees a perfect bake every time.
Why Your Nose Knows Best
The aroma of the brownies is the ultimate indicator of doneness. When the batter is almost done, you’ll smell a deep chocolate scent with hints of roasted coffee. If the scent is sharp or burnt, the brownies are overbaked. The smell of caramelized sugar is a sign that the edges are crisping. Trust your nose to tell you when the brownies are ready to be pulled out of the oven.
The 5-Minute Rest That Changes Everything
Letting the brownies rest for 5 minutes after baking allows the structure to set and the flavors to meld. During this rest, the sugar continues to caramelize, deepening the flavor. If you cut the brownies immediately, the center can be too soft and may fall apart. A quick rest also lets the miso’s umami fully integrate into the chocolate matrix. This step is often overlooked but is essential for the best texture.
Keep the Batter Smooth
When folding in the flour and miso, use a gentle motion to avoid breaking the batter’s structure. Overworking the batter can cause the brownies to be dense and dry. Use a rubber spatula and fold from the bottom to the top, then flip the bowl and repeat. This technique keeps the batter light and airy. The result is a brownie that melts in your mouth instead of being heavy.
Use a Parchment Paper Edge
Tearing parchment paper into a strip and laying it along the edges of the pan helps prevent sticking and gives a cleaner release. The paper also absorbs excess moisture, preventing the brownies from becoming soggy. If you’re using a non‑stick pan, the parchment is still useful for an extra safety net. It also allows you to lift the entire batch out of the pan with ease. This small trick saves a lot of frustration later.
Add a Touch of Citrus
A splash of orange zest or lemon zest can brighten the chocolate’s richness and add a subtle brightness. Zest adds a fragrant aroma that pairs well with the miso’s depth. Add the zest just before folding in the flour to preserve its essential oils. The citrus note is a subtle counterbalance to the earthy chocolate. This variation is perfect for those who love a hint of freshness in their desserts.
Creative Twists and Variations
Nutty Caramel Swirl
Swirl caramel sauce into the batter before baking to add a sweet, buttery layer. The caramel complements the miso’s umami and the chocolate’s richness. Use a spoon to create ribbons that melt into the brownie as it bakes. This variation turns the brownies into a decadent caramel chocolate experience. Serve with a drizzle of sea salt for an extra punch.
Almond Butter Crunch
Replace the chopped nuts with almond butter for a nutty, creamy texture. The almond butter adds a subtle sweetness that pairs well with espresso. Fold in a tablespoon of almond butter after the miso for an even distribution. This change gives the brownies a softer, buttery mouthfeel. It’s a great option for those who love a nutty flavor without the crunch.
Minty Miso Bliss
Add a few drops of peppermint extract to the batter for a refreshing twist. The mint balances the chocolate’s depth and adds a cool finish. Be careful not to overdo it; a light touch is all that’s needed. This variation is perfect for spring and summer dessert parties. The mint note also pairs wonderfully with a glass of chilled white wine.
Seaweed‑Infused Brownies
Sprinkle a pinch of dehydrated seaweed flakes over the batter before baking. The seaweed adds a subtle briny flavor that enhances the miso’s umami. The flakes also add a crunchy texture that contrasts with the fudgy center. This variation is a nod to Japanese cuisine and is sure to impress adventurous diners. Pair with a light soy sauce for a unique dipping experience.
Chocolate‑Covered Miso Bites
After baking, dip each brownie square in melted dark chocolate. The extra chocolate coating gives a glossy finish and intensifies the chocolate flavor. Let the coating set on a parchment sheet before cutting. This variation turns the brownies into bite‑size treats that are perfect for parties. The double layer of chocolate and miso makes them unforgettable.
Espresso‑Infused Ganache
Create a ganache by heating cream with espresso powder and pouring it over the cooled brownies. The ganache adds a silky, coffee‑rich layer that complements the miso. Chill the ganache until it sets, then slice the brownies for a layered dessert. This variation is ideal for coffee lovers who want a richer experience. Serve with a side of whipped cream for the ultimate indulgence.
Storing and Bringing It Back to Life
Fridge Storage
Place the brownies in an airtight container and store them in the refrigerator for up to 5 days. The cool temperature keeps the brownies moist and prevents mold growth. When ready to eat, let them sit at room temperature for 10 minutes to soften slightly. This method is ideal for meal prepping or for those who like a firmer bite. The brownies will retain their fudgy texture even after refrigeration.
Freezer Friendly
Wrap each brownie square individually in wax paper and place them in a freezer bag. Freeze for up to 3 months for long‑term storage. To thaw, let them sit at room temperature for 20 minutes or microwave on low power for 10–15 seconds. Freezing preserves the flavor and texture, and the brownies reheat beautifully. This is perfect for stocking up ahead of holidays or parties.
Best Reheating Method
Reheat the brownies in a preheated oven at 300°F (150°C) for 5 minutes. The low heat restores moisture without overbaking. For a quick fix, microwave on low power for 15–20 seconds. Adding a splash of water to the container before reheating creates steam that keeps the brownies from drying out. Serve warm with a scoop of vanilla ice cream or a drizzle of caramel for an elevated dessert experience.