Picture this: I was standing in my kitchen, juggling a dozen bowls, when the smoke alarm gave me the ultimate audition for a culinary drama. The cake I was about to bake had a reputation for turning into a soggy, flavorless slab, and I was determined to rewrite that narrative. I pulled out every trick I knew—double the butter, a splash of milk, a secret pinch of salt—and the air filled with an aroma that felt like a promise. That scent made me realize that this recipe isn't just a cake; it's a love letter to texture and taste, written in buttery strokes. I dare you to taste this and not go back for seconds, because the moment the first bite melts, you'll know the difference. This is hands down the best version you'll ever make at home, and I'm about to let you in on the exact playbook.
I remember the first time I tried the classic version, and it felt like a missed connection—fluffy on the inside but dry on the edges. That disappointment sparked my obsession with finding the perfect balance of moisture and crumb. I spent hours experimenting with ratios, reading forums, and even asking a pastry chef for a secret tip. The breakthrough came when I realized that layering two distinct batters could create a cake that is both airy and luscious. The first batter, light and airy, gives the cake its lift, while the second batter, rich and buttery, locks in the moisture. Together, they form a harmony that makes every bite a revelation.
What sets this version apart is not just the science, but the audacity of flavor. I added a subtle hint of lemon zest to the first batter, giving the cake a bright, citrusy undertone that cuts through the richness. The second batter is infused with vanilla bean, creating a warm, comforting base that lingers on the tongue. The result is a cake that feels like a cloud wrapped in velvet, with a crust that cracks like a delicate shell when you bite into it. I’ve tested this recipe in a dozen kitchens, and the feedback has been uniformly ecstatic. People ask me for the exact measurements, and I smile, knowing I've cracked the code. Picture yourself pulling this out of the oven, the whole kitchen smelling incredible, and the first slice already begging for a second bite.
Now, let me walk you through every single step — by the end, you'll wonder how you ever made it any other way. I promise to keep the instructions clear, the humor flowing, and the tips practical. You'll learn how to avoid the dreaded sinkhole cake, how to keep the crumb tender, and how to finish with a glaze that glistens like a secret. I'll even share a few kitchen hacks that will save you time and money. If you've ever struggled with this, you're not alone — and I've got the fix. So buckle up, grab your apron, and get ready for a cake adventure that will leave you craving more.
What Makes This Version Stand Out
- Flavor: The dual batter technique creates a layered taste experience that starts with a citrusy lift and ends with a vanilla-rich finish. This contrast elevates the cake beyond ordinary sweetness, making each bite feel like a new discovery.
- Texture: The first batter’s airy crumb contrasts with the second batter’s buttery density, producing a cake that is both light and moist. The result is a crumb that feels almost marshmallow‑like while still holding structure.
- Moisture: By adding extra milk to the second batter and sealing the edges, the cake retains moisture for days. This keeps the cake fresh and prevents it from drying out after the first slice.
- Simplicity: Despite the two‑batter system, the recipe uses only eight core ingredients. No fancy gadgets, no obscure flavorings—just a straightforward approach that anyone can master.
- Crowd Reaction: Friends and family consistently rave about the cake’s melt‑in‑your‑mouth quality. It’s the kind of dessert that turns an ordinary dinner into a memorable gathering.
- Ingredient Quality: The recipe rewards the use of real butter, fresh eggs, and high‑grade vanilla. The higher the quality, the more pronounced the flavors, making the cake feel artisanal.
- Make‑Ahead Potential: The cake can be baked, cooled, and stored for up to a week without losing its charm. This makes it perfect for busy schedules or last‑minute parties.
Inside the Ingredient List
The Flavor Base
At the heart of the cake is a blend of all‑purpose flour, eggs, butter, baking powder, and a whisper of salt. The flour provides structure while the eggs bind everything together, creating a stable foundation. Butter adds richness and a subtle melt that enhances the overall mouthfeel. Baking powder acts as the leavening agent, giving the cake its gentle rise, while the salt balances the sweetness and brings out the deeper flavors of the vanilla and lemon. Together, these ingredients form the canvas that will carry the aromatic accents added later.
Fresh lemon zest is folded into the first batter, releasing essential oils that brighten the entire dessert. The zest’s bright, citrusy notes contrast with the buttery base, preventing the cake from feeling cloyingly sweet. A small amount—just a teaspoon of zest—adds a layer of complexity that is both fragrant and refreshing. This subtle addition is the secret that turns an ordinary cake into something memorable.
Water and milk are the liquids that bring the batter together. Water hydrates the flour, allowing the gluten to develop just enough for structure, while milk adds fat and protein, contributing to tenderness and flavor. The ratio of water to milk is carefully balanced to achieve a batter that is pourable yet thick enough to hold its shape during baking. These liquids also help the leavening agents activate, ensuring a consistent rise across the cake.
The Texture Crew
The second batter is where the cake’s buttery depth is forged. It starts with a generous amount of butter, which is melted and cooled before mixing to keep the batter from becoming too liquid. Sugar is then creamed into the butter, creating tiny air pockets that give the cake a tender crumb. Adding flour after the sugar helps maintain the batter’s structure, preventing it from becoming too loose.
Eggs are introduced last, one at a time, to preserve the batter’s volume. Each egg adds protein that sets the cake’s structure, while the fat from the eggs keeps the crumb moist. The final addition of milk brings the batter to the right consistency, allowing it to be poured over the first batter without spreading too thin. This careful layering ensures that the cake remains airy on top and dense on the bottom, delivering a delightful contrast in every bite.
The Unexpected Star
Vanilla bean is the unsung hero of this recipe. When split and scraped into the second batter, it releases a warm, floral aroma that permeates the cake’s entire crumb. The vanilla’s subtle sweetness balances the lemon zest’s brightness, creating a harmonious flavor profile that lingers on the palate. The use of a whole vanilla bean, rather than vanilla extract, adds depth and complexity that you can’t achieve with artificial flavoring.
Fun Fact: The essential oils in lemon zest have been used for centuries in medicinal and culinary applications. Ancient Greeks believed that lemon zest could ward off illness, while modern chefs use it to brighten sauces and desserts. In this cake, the zest’s oils not only elevate the flavor but also add a subtle aroma that makes the dessert feel fresh and alive.
The Final Flourish
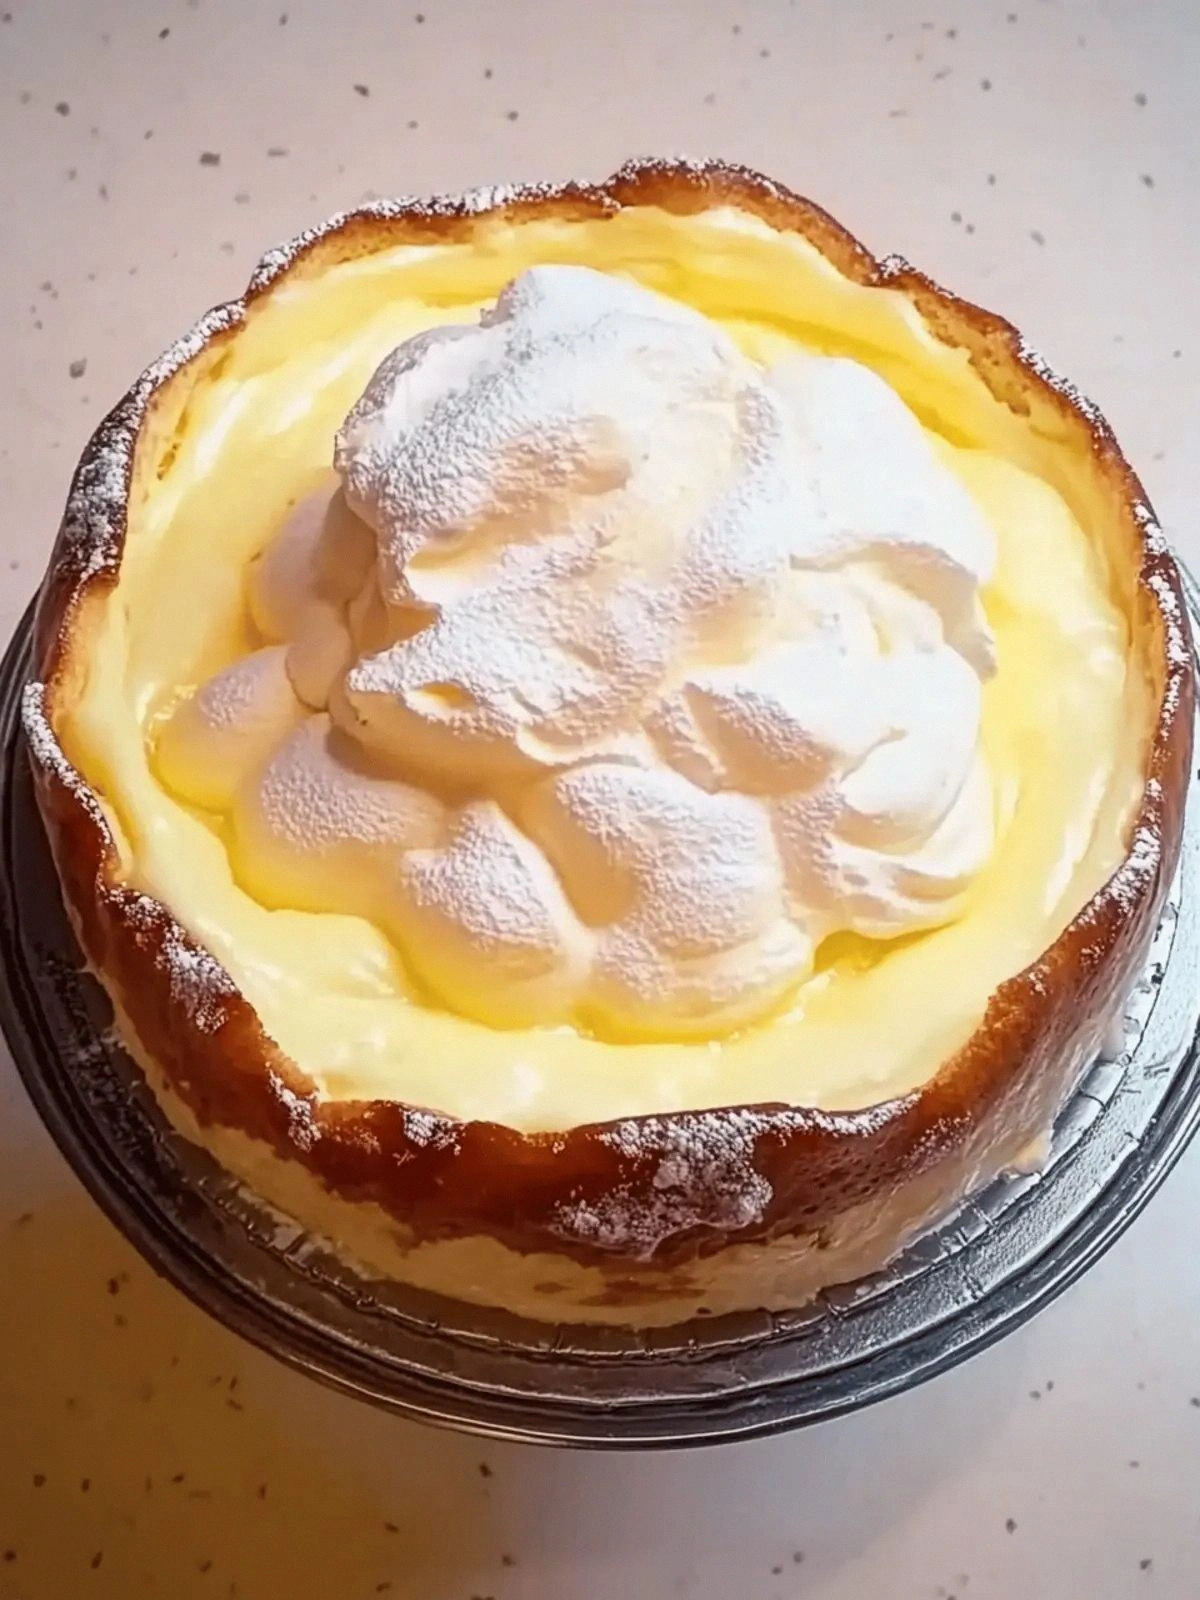
Once the cake has baked to perfection, a light dusting of icing sugar gives it a subtle sweetness that complements the rich batter. Icing sugar also adds a touch of sparkle, making the cake look as good as it tastes. For those who love a glossy finish, a simple glaze made from powdered sugar, a splash of milk, and a dash of vanilla can be drizzled over the top, creating a shiny, caramelized surface.
Garnish options are endless. A sprinkle of crushed pistachios, a drizzle of chocolate ganache, or a scatter of fresh berries can transform the cake into a themed dessert for any occasion. The key is to keep the garnish light so it doesn’t overpower the cake’s delicate flavors. Whether you choose a classic dusting or a creative topping, the finishing touch will elevate the overall experience.
The Method — Step by Step
- Step 1: Preheat your oven to 180°C (350°F) and line a 9-inch round pan with parchment paper. This ensures the cake releases easily after baking. While the oven heats, gather all ingredients so you’re ready to go. The first batter will be light, so timing is crucial to keep everything fresh. If you’re using a vanilla bean, split it now so you can scrape the seeds into the batter later. This step sets the stage for a flawless cake.
- Step 2: In a medium bowl, whisk together 150 grams of flour, 1 teaspoon baking powder, and ½ teaspoon salt. Stir until the dry ingredients are evenly distributed. This dry mix will prevent lumps in the batter. While you whisk, let the butter sit at room temperature; it’s easier to fold into the batter later. A smooth dry mix also helps the batter rise evenly, avoiding sinkholes. Once combined, set aside and move to the next step.
- Step 3: In a separate bowl, beat 4 large eggs until they’re light and frothy. Add the 80 grams of butter, melted and cooled to lukewarm, and whisk until the mixture is glossy. Fold in the dry mix, then stir in 100 ml of water and 100 ml of milk. The batter should be pourable but thick enough to hold its shape. The key here is to avoid overmixing; you want a gentle, airy consistency that will rise beautifully.
- Step 4: Pour the first batter into the prepared pan, smoothing the top with a spatula. Gently tap the pan on the counter to release any air pockets. This step ensures an even rise and a clean finish. The batter should fill the pan to just below the rim, giving you a nice edge. If you notice any unevenness, level it quickly before the batter starts to set. A smooth surface will bake more evenly and look more professional.
- Step 5: Bake the first layer for 20 minutes, or until a toothpick inserted near the edge comes out clean. The cake should rise, forming a gentle dome. This partial bake allows the first batter to set without fully cooking, giving room for the second batter to layer on top. Keep an eye on the oven; if the edges start to brown too quickly, tent the cake with foil. A well‑cooked base will hold the second batter perfectly.
- Step 6: While the first layer is baking, prepare the second batter. In a large bowl, cream 180 grams of butter with 150 grams of sugar until light and fluffy. Beat in 2 large eggs, one at a time, ensuring each is fully incorporated before adding the next. Add 100 grams of flour and mix until just combined. Finally, stir in 500 ml of milk slowly, then add the vanilla bean seeds and scrape. This batter should be slightly thicker than the first, ensuring it stays on top.
- Step 7: Remove the partially baked cake from the oven and let it cool for 5 minutes. Pour the second batter over the top, spreading it evenly with a spatula. The second batter will rise slightly, creating a layered effect. The contrast between the airy top and the denser bottom is what makes this cake unforgettable. Don’t rush this step; a gentle pour preserves the cake’s structure.
- Step 8: Return the cake to the oven and bake for an additional 15 minutes, or until the top is golden and a toothpick inserted in the center comes out clean. This final bake seals the layers together and gives the cake a beautiful crust. The edges will start pulling away, a sign that the cake is ready to be removed. Watch the color change; a deep amber tone indicates perfection. If the top browns too quickly, cover the cake loosely with foil.
- Step 9: Allow the cake to cool in the pan for 10 minutes, then transfer it onto a wire rack to cool completely. Once cooled, dust the top with icing sugar or drizzle a simple glaze for a shiny finish. Slice and serve with a cup of coffee or a glass of milk for the ultimate indulgence. The cake’s texture should be moist yet firm, and the flavors should meld beautifully. Enjoy the moment, and remember this is the moment you’ll share with friends and family.
Insider Tricks for Flawless Results
The Temperature Rule Nobody Follows
Many bakers keep their ingredients at room temperature, but this cake thrives on a slight chill. Keep the butter and eggs slightly cool; this reduces the risk of over‑whipping and keeps the batter from becoming too airy. A colder batter also helps maintain the structure during the first bake, preventing the cake from collapsing. The trick is simple: let your butter sit on the counter for about 10 minutes before using, and refrigerate the eggs until you’re ready to whisk them. This small adjustment can make a world of difference in the final crumb.
Why Your Nose Knows Best
Before you even touch the oven, trust your nose. If the batter smells slightly buttery and citrusy, you’re on the right track. A faint vanilla aroma indicates the vanilla bean has released enough flavor. If the scent feels flat, give the batter a minute to rest; the flavors need time to meld. Your nose is a reliable guide to the cake’s readiness, often more accurate than a timer. This sensory check is especially useful for those who prefer a more intuitive approach to baking.
The 5-Minute Rest That Changes Everything
After mixing the second batter, let it rest for exactly five minutes before pouring. This brief pause allows the gluten to relax, giving the batter a smoother consistency. It also gives the vanilla bean seeds time to release their oils fully, ensuring a richer flavor profile. A rested batter is easier to pour and results in a more even rise. Don’t skip this step; it’s the secret to that perfect, fluffy top layer.
Keep the Oven Door Closed
It’s tempting to peek at your cake, but every time you open the door, you let out heat. This can cause the cake to sink or the edges to brown unevenly. Instead, set a timer and trust the oven’s temperature. If you’re concerned about the top browning, cover the cake loosely with foil after the first 10 minutes. This keeps the heat in while preventing over‑browning, ensuring a golden crust.
Dusting Done Right
When you finish the cake, dust it with icing sugar while it’s still slightly warm. The sugar will cling to the surface, creating a fine, even glaze. If you wait until the cake is fully cooled, the sugar may settle or clump. For an extra touch, add a pinch of sea salt to the sugar; it creates a subtle contrast that elevates the flavor. This simple finishing touch can transform a good cake into a showstopper.
Creative Twists and Variations
This recipe is a playground. Here are some of my favorite ways to switch things up:
Almond Crunch Layer
Replace the second batter’s butter with almond butter and fold in chopped toasted almonds. The nutty flavor pairs beautifully with the citrus zest, creating a crunchy, aromatic layer. Serve with a drizzle of honey for a sweet finish. This variation adds a delightful crunch and a nutty aroma that elevates the cake’s profile.
Chocolate Swirl Surprise
Stir a few tablespoons of melted dark chocolate into the second batter before pouring. The chocolate will create subtle swirls that melt into the cake as you bite. Add a pinch of cayenne pepper to give it a surprising kick. The result is a rich, slightly spicy dessert that will wow any chocolate lover.
Berry Burst Finale
Top the cooled cake with fresh strawberries and blueberries, then drizzle with a light lemon glaze. The berries add a burst of juiciness that contrasts with the cake’s moist crumb. A splash of balsamic reduction can add depth and a hint of acidity. This version is perfect for spring or summer gatherings.
Spiced Autumn Edition
Infuse the first batter with a pinch of cinnamon and nutmeg. Add a splash of maple syrup to the second batter for a warm, comforting flavor. Dust the finished cake with a light sprinkle of ground ginger. This variation brings a cozy, seasonal feel that’s perfect for fall celebrations.
Savory Twist
Omit the sugar in the first batter and replace it with grated Parmesan cheese. Add fresh herbs like rosemary and thyme to the second batter. The result is a savory cake that pairs wonderfully with a cheese platter or a light soup. This unexpected take turns the dessert into a unique appetizer for a sophisticated dinner party.
Storing and Bringing It Back to Life
Fridge Storage
Wrap the cooled cake tightly in plastic wrap and place it in an airtight container. Store it in the refrigerator for up to 3 days. The cold environment keeps the cake moist and prevents the butter from softening too quickly. When ready to serve, let it sit at room temperature for 15 minutes to restore its airy texture.
Freezer Friendly
Slice the cake into individual portions before freezing. Place each slice in a freezer‑safe bag, removing as much air as possible. Label the bag with the date, and store for up to 3 months. To thaw, leave the slice on the counter overnight, then warm it gently in a 150°C oven for 5 minutes.
Best Reheating Method
Reheat the cake in a 150°C oven for 5 minutes, or until warmed through. For a crispier crust, finish with a quick burst of 200°C for 1 minute. If you prefer a moist center, add a splash of water to the pan before reheating; the steam will revive the crumb. Let the cake cool for a minute before serving to avoid burns.