I was standing in my kitchen, staring at a burnt pie crust that looked like a crumbled cookie, when my friend texted me a dare: “Make the best veggie tart you can.” I laughed, because I had never taken a pie crust seriously, but I knew the kitchen was about to get a little more adventurous. I grabbed a pre‑made crust from the freezer, because time was a luxury I didn’t have, and decided that this would be the turning point of my cooking journey. That night, the smell of sizzling vegetables turned into the aroma of victory, and I realized that a simple tart could become a holiday centerpiece.
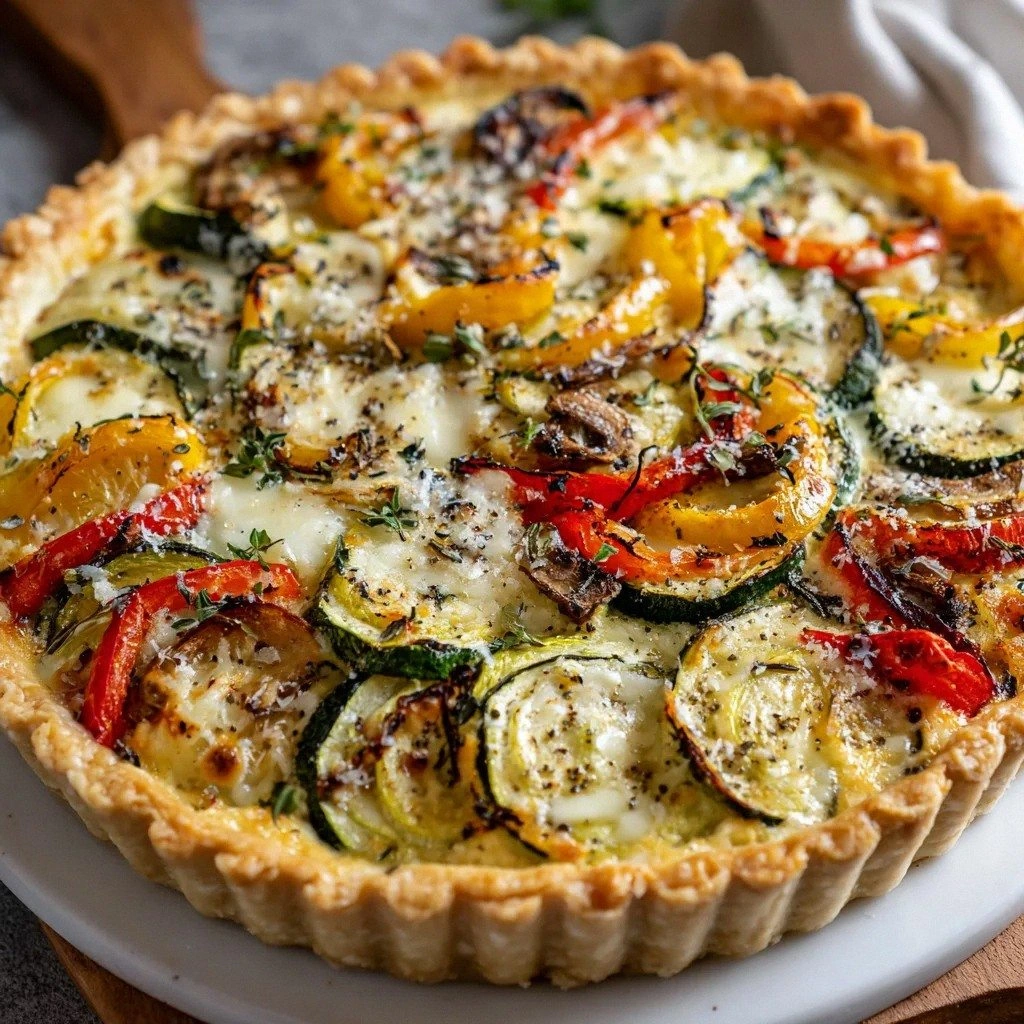
Picture this: a golden crust that cracks like a brittle shell when you lift the slice, the crunch of fresh zucchini and bell pepper that echoes like a crisp winter morning, and the creamy ricotta that melts in your mouth like a soft snowflake. The sound of the oven timer ticking is the soundtrack of anticipation, and the sight of the bubbling mozzarella on top is a promise of gooey delight. The taste is a harmonious blend of earthy vegetables, salty parmesan, and the subtle warmth of oregano, all wrapped in a buttery shell. You can almost hear the sigh of relief when you take a bite, because the tart is not only filling but also a comforting hug on a plate.
What sets this version apart from the countless other veggie tarts you’ll find online is the way each component is chosen to play a specific role. I’ve eliminated the usual heaviness of heavy creams and replaced it with ricotta, which keeps the tart light yet rich. The pre‑made crust is a game‑changer because it saves time while still delivering a flaky base. The blend of zucchini, carrots, and bell pepper adds not only color but also a sweet, natural sweetness that balances the savory cheeses. Finally, the finishing sprinkle of parmesan gives that nutty finish that lingers on the palate.
And there’s a little secret I’m about to reveal: a splash of lemon zest added to the vegetable mixture before baking. It brightens the whole dish and gives a subtle citrus lift that makes the tart feel fresh and celebratory. I dare you to taste this and not go back for seconds. Let me walk you through every single step—by the end, you’ll wonder how you ever made it any other way.
What Makes This Version Stand Out
- Flavor: The combination of ricotta and mozzarella creates a creamy, yet airy mouthfeel that doesn’t feel heavy, unlike traditional cheese‑filled pies.
- Texture: The pre‑made crust is thin enough to be flaky but thick enough to hold the filling without becoming soggy.
- Time: You can have a ready‑to‑bake crust in the freezer and finish the tart in less than 45 minutes, making it perfect for last‑minute holiday gatherings.
- Color: The mix of green zucchini, orange carrot, and red bell pepper turns the tart into a visual feast that looks as good as it tastes.
- Nutrition: With a balanced mix of protein from ricotta and mozzarella and fiber from the vegetables, this dish is both wholesome and indulgent.
- Versatility: Swap out vegetables for seasonal favorites—pumpkin in fall, asparagus in spring—and the recipe still shines.
- Make‑Ahead: The assembled tart can be refrigerated for up to 24 hours or frozen for up to a week, making it ideal for meal prep.
Inside the Ingredient List
The Flavor Base
Pre‑made pie crust: The crust is the silent hero of this tart. It holds the filling together and provides a buttery, flaky foundation that contrasts with the creamy interior. If you skip it, the filling will collapse and the dish will become soggy. For the best results, let the crust sit at room temperature for 10 minutes before rolling it out.
The Texture Crew
Mixed seasonal vegetables: Think zucchini, bell peppers, and carrots. They add crunch, color, and a natural sweetness that lifts the dish. If you use only one type of vegetable, you’ll miss the layered texture that makes each bite interesting. A quick blanch before adding them to the filling will keep the vegetables crisp and bright.
The Unexpected Star
Ricotta cheese: This creamy cheese gives the tart a rich texture without the heaviness of cream. It also helps bind the filling together, giving the tart a smooth, custard‑like consistency. If you’re allergic to dairy, you can substitute a plant‑based ricotta, but the flavor profile will shift slightly.
The Final Flourish
Grated Parmesan cheese, dried oregano, salt, and pepper: These seasonings elevate the dish from simple to sophisticated. The parmesan adds a nutty finish, while oregano brings warmth and depth. Salt and pepper are essential for balancing the flavors, so taste as you go. If you prefer a spicy kick, add a pinch of crushed red pepper flakes.
Everything's prepped? Good. Let's get into the real action...
The Method — Step by Step
- Preheat your oven to 375°F (190°C). While the oven warms, roll out the pre‑made pie crust onto a parchment‑lined baking sheet. The crust should be about 1/8 inch thick. This ensures a crisp base that won’t buckle under the filling.
- In a large skillet, heat a splash of olive oil over medium heat. Add the diced zucchini, carrots, and bell peppers. Sauté for 5 minutes until they’re just tender but still hold their shape. The vegetables should still have a slight bite, not become mushy.
- Transfer the sautéed vegetables to a mixing bowl. Add the ricotta, shredded mozzarella, grated parmesan, dried oregano, salt, and pepper. Stir until the cheeses melt into a creamy, cohesive mixture. The filling should look silky and hold together when scooped.
- Fold the large eggs into the filling mixture. Whisk until fully incorporated. The eggs act as a binder, ensuring the tart holds its shape when sliced. Be careful not to over‑whisk; you want a gentle, velvety texture.
- Spread the filling evenly over the crust, leaving a small border around the edges. The filling should be about 1 inch thick. This thickness is key to achieving a balanced bite—neither too watery nor too dry.
- Bake in the preheated oven for 30 minutes, or until the crust is golden brown and the filling is set. The top should have a slight puff and a hint of browning. When you lift a slice, the edges should pull away cleanly, indicating a well‑baked tart.
- Remove the tart from the oven and let it cool on a rack for 10 minutes before slicing. This resting period allows the filling to set fully, making it easier to cut clean, crisp slices.
That's it — you did it. But hold on, I've got a few more tricks that'll take this to another level. The secret sauce? A light drizzle of balsamic glaze right before serving. It adds a tangy sweetness that pairs beautifully with the savory cheeses.
Insider Tricks for Flawless Results
The Temperature Rule Nobody Follows
Many home bakers bake at a lower temperature, thinking it will prevent burning. I’ve learned that 375°F is the sweet spot for a flaky crust and a set filling. If you go lower, the crust won’t brown properly, and the filling may remain runny. Conversely, going higher can scorch the top before the center cooks.
Why Your Nose Knows Best
When you open the oven door, the aroma should be buttery with a hint of roasted vegetables. If the smell is too metallic, you’ve overcooked the crust. Trust your senses; the scent is your best judge.
The 5-Minute Rest That Changes Everything
After baking, let the tart sit for at least five minutes before cutting. This pause allows the filling to set and the flavors to meld. Cutting too early can cause the cheese to ooze out, ruining the presentation.
The Secret Ingredient
A pinch of lemon zest added to the vegetable mixture before baking brightens the entire dish. The citrus note lifts the earthiness of the vegetables and balances the richness of the cheeses. It’s a simple addition that makes a big difference.
The Final Touch
Just before serving, drizzle a small amount of balsamic glaze over the top. The glaze caramelizes slightly when it meets the warm cheese, creating a glossy finish that’s Instagram‑ready. It also adds a subtle sweet‑tangy flavor that complements the savory elements.
Creative Twists and Variations
This recipe is a playground. Here are some of my favorite ways to switch things up:
Pumpkin Spice Tart
Swap zucchini and carrots for diced pumpkin and add a teaspoon of pumpkin pie spice. The warm, sweet flavors make this tart a perfect fall treat that will win over even the most skeptical diners.
Mediterranean Delight
Replace bell peppers with sun‑dried tomatoes and add a handful of Kalamata olives. Toss in a pinch of dried thyme, and you’ll have a tart that transports you to a sun‑kissed coast.
Cheesy Spinach Surprise
Stir in a cup of fresh spinach and a handful of crumbled feta cheese. The spinach adds a subtle earthiness while the feta gives a tangy bite that contrasts nicely with the creamy ricotta.
Spicy Jalapeño Kick
Add diced jalapeños and a dash of cayenne pepper to the vegetable mix. The heat will awaken the palate and pair wonderfully with the mild cheeses.
Herb‑Infused Tart
Replace dried oregano with fresh basil and thyme. The fresh herbs will give the tart a bright, aromatic quality that feels like spring.
Storing and Bringing It Back to Life
Fridge Storage
Cool the tart completely, then cover tightly with plastic wrap and store in the refrigerator for up to 24 hours. The flavors will meld, and the crust will stay crisp. When ready to serve, let it sit at room temperature for 10 minutes before slicing.
Freezer Friendly
Wrap the cooled tart in parchment paper, then place in a freezer bag. It will keep for up to 2 weeks. When you’re ready to enjoy it, thaw in the refrigerator overnight, then bake at 375°F for 15 minutes to re‑crisp the crust.
Best Reheating Method
For a quick reheat, microwave on medium for 30 seconds, then finish under the broiler for 2 minutes to restore crispness. Alternatively, bake at 375°F for 10 minutes. A tiny splash of water before reheating steams the filling back to a silky texture.