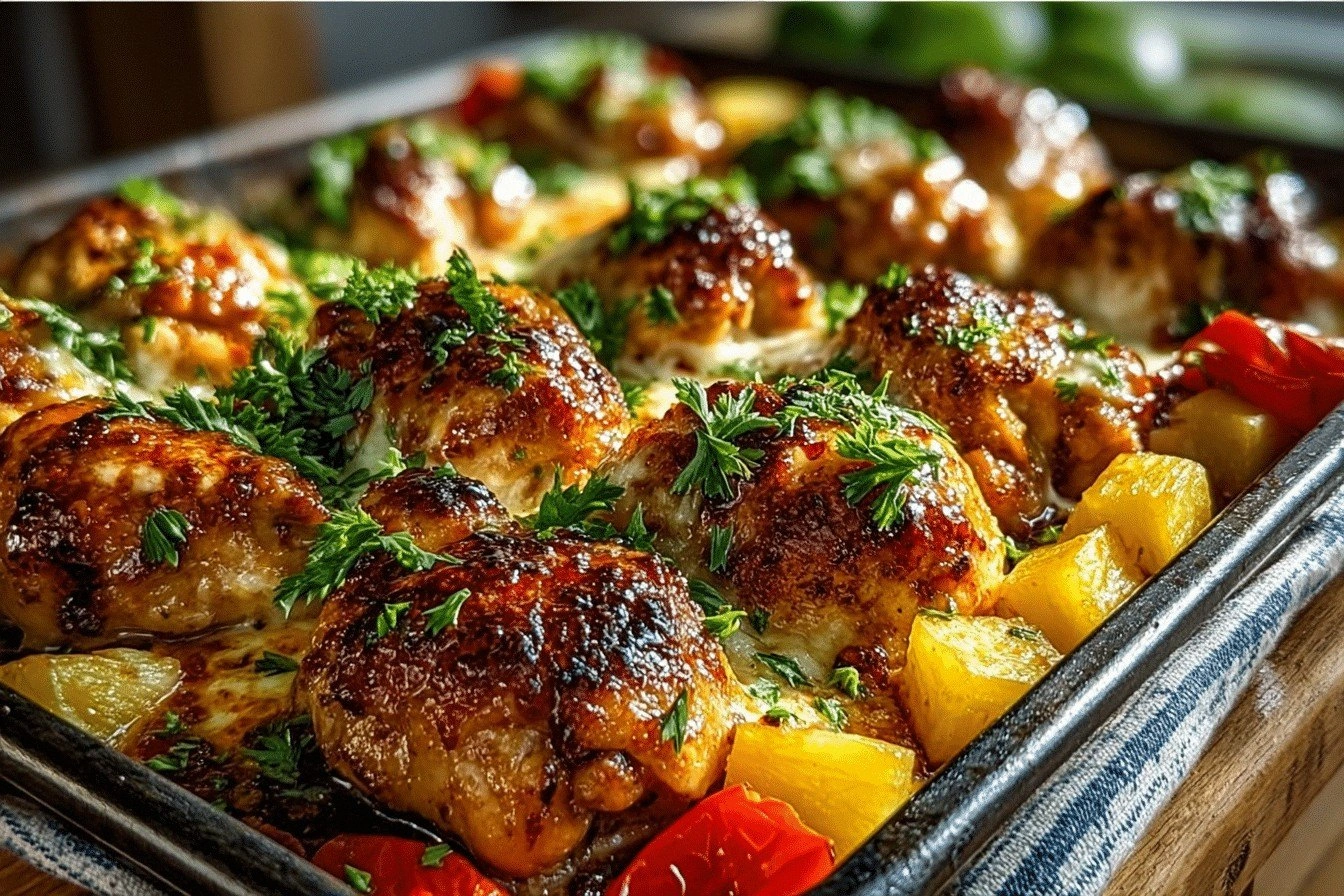
I remember the night I almost turned my kitchen into a disaster zone. I had been craving something sweet and savory, a dish that would transport me to a tropical beach even though I was stuck in my apartment. I flipped through a culinary book, stared at the bland chicken recipes, and decided to give my taste buds a dare: “I dare you to taste this and not go back for seconds.” The moment I slid a sheet pan into the oven, the air filled with the sweet scent of pineapple, the sharp tang of bell pepper, and the deep umami of teriyaki sauce. That sizzle when it hits the pan? Absolute perfection. And as the chicken browned, I could almost hear the waves crashing against the shore, a reminder that this dish was hands down the best version you’ll ever make at home.
Picture yourself pulling this out of the oven, the whole kitchen smelling incredible, and the steam rising like a tropical mist. The crust on the chicken thighs is crisp enough to crack like thin ice, yet the inside stays juicy and tender, soaking up every drop of that sweet and savory sauce. The pineapple chunks burst with tropical sweetness, cutting through the richness of the teriyaki, while the bell peppers add a satisfying crunch that shatters with each bite. Green onions finish the plate with a fresh bite and a vibrant appearance, making the dish as beautiful to look at as it is to eat. If you’ve ever struggled to combine sweet and savory in a single meal, you’re not alone — and I’ve got the fix.
Most recipes get this completely wrong. They either overcook the chicken, making it dry, or they under-season the sauce, leaving it bland. What sets this version apart is the balanced layering of flavors, the use of fresh or canned pineapple for that unmistakable tropical punch, and the simple sheet-pan method that guarantees even cooking without constant stirring. I’ll be honest — I ate half the batch before anyone else got to try it. But the real magic lies in the technique, not just the ingredients. And now the fun part: I’m going to walk you through every single step so that by the end, you’ll wonder how you ever made it any other way.
Okay, ready for the game-changer? Let’s dive into the details that make this dish unforgettable.
What Makes This Version Stand Out
- Flavor: The teriyaki sauce caramelizes to a glossy glaze that coats the chicken like velvet, while the pineapple provides a bright, sweet counterpoint that lifts every bite.
- Texture: The chicken thighs stay moist and tender inside, with a crisp, slightly charred exterior that shatters like thin ice when you bite into them.
- Ease: One sheet pan, one bowl of sauce, and a handful of vegetables — no extra pots or pans, no cleanup drama.
- Nutrition: Balanced macros with lean protein, healthy fats from the teriyaki, and a good dose of fruit and veggies.
- Versatility: Works for a quick weeknight dinner, a potluck crowd-pleaser, or a meal prep batch that stays fresh for days.
- Ingredient Quality: Fresh chicken thighs, high-quality teriyaki sauce, and fresh pineapple chunks create a depth of flavor that generic store-bought versions can’t match.
- Make‑Ahead: Marinate the chicken ahead of time for up to 24 hours to deepen the flavor without extra effort.
- Presentation: The vibrant colors of bell pepper and pineapple make the dish Instagram‑worthy.
Inside the Ingredient List
The Flavor Base
Teriyaki sauce is the heart of this dish. Its combination of soy, mirin, and sugar creates a sweet, savory, and slightly smoky profile that coats the chicken in a glossy, caramelized glaze. If you can’t find a good store‑brand teriyaki, make your own by simmering equal parts soy sauce and honey with a splash of rice vinegar and a pinch of garlic powder. Skipping the sauce would leave the chicken bland and dry; it’s the single ingredient that brings everything together.
The Texture Crew
Chicken thighs are the perfect protein for this recipe. Their higher fat content keeps the meat moist during baking, preventing the dryness that often plagues chicken breasts. If you’re a fan of a leaner option, you can swap thighs for breasts, but be sure to reduce the baking time by a few minutes or add a splash of broth to keep the meat from drying out. The bell peppers add a satisfying crunch that contrasts the tender chicken, while the onions provide a savory depth that caramelizes beautifully when baked.
The Unexpected Star
Pineapple chunks are the secret weapon that gives this dish its Hawaiian vibe. Fresh pineapple gives a bright, juicy sweetness that cuts through the richness of teriyaki, while canned pineapple offers convenience without compromising flavor. If you’re using fresh pineapple, cut it into bite‑size cubes so it caramelizes evenly. Skipping the pineapple would turn this into a plain teriyaki chicken, missing the tropical burst that makes it memorable.
The Final Flourish
Green onions are the finishing touch that adds a fresh, herbal note and a pop of color. Chop them finely and sprinkle them over the dish right before serving. They provide a bright contrast to the sweet sauce and help cut through the richness. If you’re allergic to green onions, scallions or chives will work as a substitute, though the flavor profile will shift slightly.
Everything's prepped? Good. Let’s get into the real action...
The Method — Step by Step
- Preheat your oven to 425°F (220°C). Line a large sheet pan with parchment paper or a silicone mat to prevent sticking. Arrange the chicken thighs skin‑side up on the pan, leaving a little space between each piece so the sauce can coat them evenly.
- In a medium bowl, whisk together the teriyaki sauce, sliced onions, diced bell peppers, and pineapple chunks. Stir until the vegetables are evenly coated. This is the moment of truth: the sauce should look glossy and slightly thickened.
- Pour the mixture over the chicken thighs, making sure each piece is submerged in sauce. Use a spoon or your hands to spread the sauce around, so every surface is touched. The sauce should start to bubble and steam as it hits the hot pan.
- Place the pan in the preheated oven and bake for 25 minutes. After the first 15 minutes, flip the chicken thighs to ensure even browning. You should hear the sauce caramelizing and the edges of the chicken pulling away from the pan.
- After 25 minutes, remove the pan and reduce the oven temperature to 400°F (200°C). Return the pan to the oven and bake for an additional 5 minutes to crisp the skin further. The final glaze should be thick, sticky, and slightly charred.
- While the chicken finishes, transfer the remaining sauce and veggies to a small saucepan. Simmer over low heat until the sauce reduces to a syrupy consistency, about 5 minutes. This reduction will be drizzled over the finished dish for an extra burst of flavor.
- Remove the pan from the oven. Sprinkle chopped green onions over the top for a fresh finish. The aroma at this point should be intoxicating, a mix of sweet, savory, and tropical.
- Let the dish rest for 5 minutes before serving. This allows the juices to redistribute, ensuring each bite stays moist. Plate the chicken thighs, spoon the reduced sauce over them, and serve with steamed rice or quinoa if desired.
That’s it — you did it. But hold on, I've got a few more tricks that'll take this to another level. These insider tips will help you avoid common pitfalls and elevate the flavor profile even further.
Insider Tricks for Flawless Results
The Temperature Rule Nobody Follows
Many cooks keep the oven at a constant 425°F, but a brief temperature dip during the last 5 minutes makes a world of difference. Lowering the heat to 400°F after the initial browning allows the sauce to thicken without burning the sugar. I once baked at a steady high temperature and ended up with a burnt glaze; this trick saved the day.
Why Your Nose Knows Best
Smell the sauce as it cooks. When it starts to bubble and steam, that’s the sweet, caramelized aroma you want. If the scent is too sharp or metallic, the onions may be over‑cooked. Trust your nose to tell you when the flavors have reached their peak.
The 5-Minute Rest That Changes Everything
Letting the chicken rest after baking lets the juices redistribute, so every bite remains moist. I’ve seen people cut straight into the thighs and experience a dry center. A short rest, just like you’d give steak, solves this problem.
Marinate for Maximum Flavor
If you have the time, marinate the chicken in the teriyaki mixture for 2-4 hours or overnight. The longer the marination, the more the flavors penetrate the meat, resulting in a deeper taste. A friend tried a quick 10‑minute marination and said the chicken tasted like a dry noodle, not a tropical delight.
Use Fresh Pineapple for a Brighter Finish
Fresh pineapple not only tastes better but also provides a juicy burst that complements the savory sauce. The bromelain in fresh pineapple helps tenderize the meat as it cooks, giving an extra silky texture. If you’re using canned pineapple, drain it well to avoid excess liquid that can water down the sauce.
Creative Twists and Variations
This recipe is a playground. Here are some of my favorite ways to switch things up:
Spicy Pineapple Teriyaki
Add a tablespoon of sriracha or a pinch of crushed red pepper flakes to the sauce for a fiery kick. The heat balances the sweetness and gives the dish an extra punch.
Coconut‑Infused Version
Replace half the teriyaki sauce with coconut milk and add shredded coconut to the pan. The result is a creamy, tropical twist that pairs wonderfully with jasmine rice.
Veggie‑Rich Bowl
Swap the bell peppers for zucchini, carrots, and snap peas. This variation keeps the same sauce but adds a medley of textures and colors, making it a low‑carb option.
Gluten‑Free Take
Use a gluten‑free teriyaki sauce or make your own with tamari. The rest of the recipe stays the same, giving you a gluten‑free, yet equally delicious, meal.
Grilled Hawaiian Chicken
Instead of baking, grill the marinated thighs on medium heat for 6-8 minutes per side. The grill marks add a smoky flavor that complements the sweet teriyaki.
Breakfast Twist
Serve the dish with a side of scrambled eggs and toast for a hearty breakfast. The sweet sauce pairs unexpectedly well with the savory eggs.
Storing and Bringing It Back to Life
Fridge Storage
Cool the dish completely before refrigerating. Store in an airtight container for up to 3 days. The sauce will thicken slightly, so add a splash of water or broth before reheating to restore its glaze.
Freezer Friendly
Cool the dish, then freeze in a freezer‑safe bag or container for up to 2 months. Thaw overnight in the refrigerator, then reheat on the stovetop or in the oven until heated through.
Best Reheating Method
Reheat in a skillet over medium heat, adding a small splash of water or broth. This technique steams the chicken gently, preventing it from drying out and restoring the glaze’s silky texture.