I was standing in the kitchen, eyes glued to the counter, when the disaster unfolded—an over‑cooked peach pie that had turned into a sticky, caramelized mess, and the kitchen smelled like a burnt sugar apocalypse. The moment that tasted like regret, I knew I had to reinvent the way I approached peaches. I pulled out my pantry, grabbed a handful of rolled oats, a drizzle of honey, and the last ripe peach I could find, and I whispered to the batter, “You’re about to become the star of the show.”
Picture this: the bright, golden hue of fresh peaches glinting in the light, the subtle sweetness of honey mingling with the earthy aroma of oats, the gentle crackle of cinnamon as it’s folded into the mixture, and that unmistakable scent of vanilla wafting from the bowl. The texture feels almost velvety against the tongue, the oats providing a comforting chew, while the coconut and nuts give a delightful crunch. The sound of the oven timer ticking, the soft hiss of steam escaping, and the faint clink of the silicone cups as they’re arranged—every element is a sensory symphony that makes the kitchen feel like a summer garden.
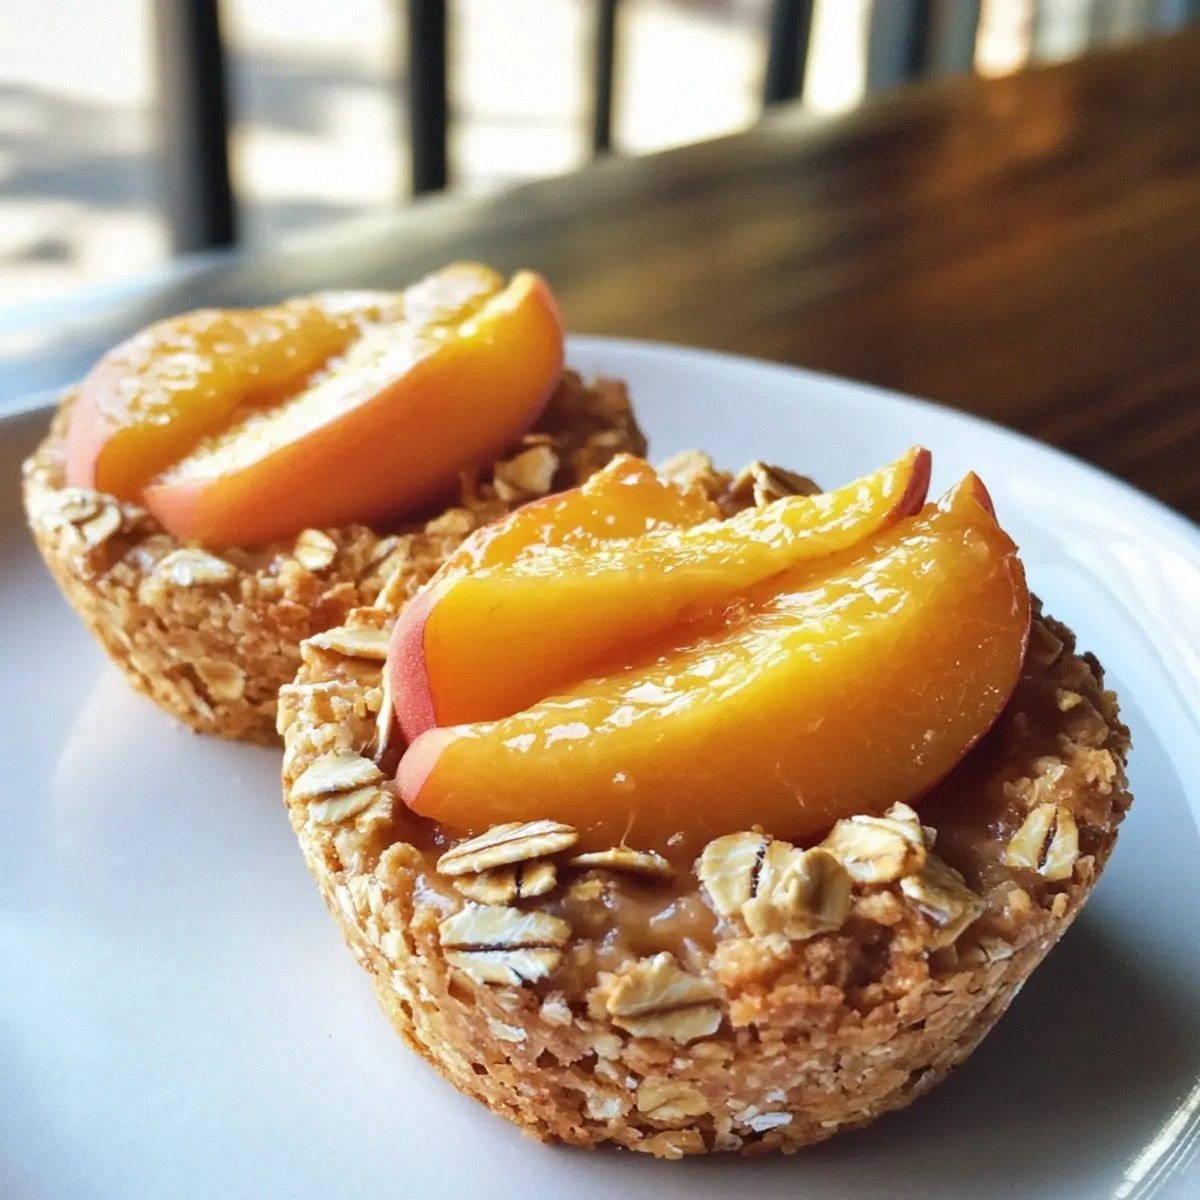
What makes this version stand out is that it’s not just a peach dessert; it’s a balanced, wholesome treat that feels indulgent without the guilt. The oats anchor the dish with a hearty, nutty base, while the Greek yogurt adds creamy tang and protein. The honey (or maple syrup) sweetens naturally, and the flaxseed brings omega‑3s and a silky texture. The chocolate chips provide a luxurious finish that melts in your mouth, and the shredded coconut adds a tropical whisper. This recipe is hands down the best version you'll ever make at home because it blends nutrition, flavor, and convenience into one bite‑size marvel.
I’ll be honest—when I first baked a batch, I ate half before anyone else got a chance, and the kitchen smelled like summer in every bite. Most recipes get this completely wrong by over‑baking or under‑seasoning, but here, the peaches stay juicy, the oats stay tender, and the chocolate chips just melt into a silky drizzle. I dare you to taste this and not go back for seconds. Picture yourself pulling this out of the oven, the whole kitchen smelling incredible, and you’ll wonder how you ever made it any other way.
What Makes This Version Stand Out
- Flavor: The combination of sweet peaches, honey, and vanilla creates a layered taste profile that feels both comforting and sophisticated. The subtle heat from cinnamon adds depth without overpowering.
- Texture: Rolled oats give a chewy bite, while the coconut and nuts introduce a satisfying crunch. The Greek yogurt keeps the cups moist and airy.
- Nutrition: Packed with protein from Greek yogurt and flaxseed, fiber from oats, and healthy fats from nuts and coconut, these cups are a balanced snack for any time of day.
- Convenience: No baking sheet, no mess, just drop the cups in the silicone mold, bake, and you have a ready‑to‑grab treat. It’s perfect for busy mornings or a midday pick‑me‑up.
- Make‑ahead Potential: Once baked, they keep well in the fridge for up to five days, and you can freeze them for later enjoyment. They thaw quickly and taste just as fresh.
- Crowd Reaction: Friends who’ve tried these cups rave about how they taste like a peach‑filled pastry but are lighter and healthier. They’re a conversation starter at potlucks and family gatherings.
- Ingredient Quality: Using fresh, ripe peaches and real honey or maple syrup elevates the dish. The choice of high‑quality oats and nuts makes a noticeable difference in flavor and mouthfeel.
- Cooking Method: Baking at a moderate temperature preserves the natural sugars in the peaches, creating a caramelized glaze without burning.
Alright, let’s break down exactly what goes into this masterpiece…
Inside the Ingredient List
The Flavor Base
Rolled oats form the backbone of these cups, offering a hearty, nutty flavor that balances the sweetness of peaches. The oats absorb the honey and yogurt, creating a cohesive texture that feels like a soft cake. If you skip the oats, the cups will become too dense and lose their signature chew.
The Sweetness & Moisture Crew
Honey or maple syrup brings natural sweetness and a glossy finish to the batter. The Greek yogurt adds creaminess, protein, and a subtle tang that cuts through the peach’s natural sugars. Together, they keep the cups moist and tender during baking.
The Unexpected Star
Ground flaxseed is the unsung hero that boosts omega‑3 fatty acids and adds a slight nutty flavor. It also helps bind the mixture, giving the cups a better structure. If you’re avoiding flaxseed, you can substitute with chia seeds, but the texture will be slightly different.
The Final Flourish
Dark chocolate chips, shredded coconut, and chopped nuts are the finishing touches that add flavor, color, and crunch. The chocolate chips melt into a decadent drizzle, the coconut gives a tropical note, and the nuts provide a satisfying bite. Skipping any of these will alter the flavor profile but won’t ruin the overall experience.
Everything’s prepped? Good. Let’s get into the real action…
The Method — Step by Step
- Preheat your oven to 350°F (175°C) and line a silicone muffin tin with four cups. This low temperature ensures the peaches caramelize gently without burning. While the oven warms, set a large mixing bowl on the counter and add the rolled oats, baking powder, cinnamon, vanilla extract, and salt. Stir until the dry ingredients are evenly distributed; this step prevents clumps and ensures a uniform flavor throughout.
- In a separate bowl, whisk together the egg, Greek yogurt, honey (or maple syrup), and ground flaxseed until the mixture is smooth and slightly thick. The flaxseed will act as a binder, giving the cups a better rise. If you’re watching the clock, this should take about 2 minutes—just enough to combine everything without over‑mixing.
- Pour the wet mixture into the dry ingredients and stir gently until just combined. You’ll notice a thick batter that clings to the spoon—do not over‑mix; it’s a sign that the oats are ready to absorb the liquids. At this point, add the chopped nuts and shredded coconut, folding them in with a spatula to distribute evenly. The nuts add crunch, while the coconut brings a subtle tropical note.
- Slice the peaches into small, bite‑sized pieces, removing the pits carefully. If you’re short on time, you can dice them while the oven preheats. Gently fold the peach pieces into the batter, being careful not to break them apart. The peaches should be evenly distributed, giving each cup a burst of fruit with every bite.
- Spoon the batter into the prepared silicone cups, filling each about three‑quarters full. This allows room for the cups to rise slightly during baking. If you notice any gaps, you can top them with a few more peach slices for a decorative touch. The batter should look glossy, indicating the right moisture level.
- Place the tin in the oven and bake for 25–30 minutes. The cups should rise to a golden‑brown top, and the edges will start pulling away from the silicone mold. A good test is to gently press the top; if it springs back, they’re done. The aroma that fills the kitchen will be a sweet, nutty, and slightly caramelized perfume that will make your stomach growl.
- Once baked, remove the cups from the oven and let them cool in the tin for 5 minutes before transferring them to a wire rack. This short rest allows the structure to set, preventing the cups from crumbling. While they’re cooling, you can drizzle a little extra honey or sprinkle a pinch more cinnamon if you like a sweeter finish.
- Serve warm or at room temperature. If you prefer a cooler treat, store them in an airtight container in the refrigerator for up to five days. For an indulgent twist, top each cup with a dollop of vanilla Greek yogurt or a drizzle of dark chocolate sauce before serving.
That's it — you did it. But hold on, I've got a few more tricks that'll take this to another level…
Insider Tricks for Flawless Results
The Temperature Rule Nobody Follows
Baking at a slightly lower temperature (350°F instead of 375°F) ensures that the peaches caramelize evenly without burning. I once tried 375°F, and the tops darkened too quickly, leaving the insides undercooked. Adjusting the temperature is a small tweak that makes a big difference in the final texture.
Why Your Nose Knows Best
Before you pull the cups out of the oven, trust your nose. A sweet, nutty aroma signals that the batter has cooked through. If the scent is still raw or overly buttery, give them a few more minutes. This instinctive check saves you from over‑baked cups.
The 5‑Minute Rest That Changes Everything
Letting the cups rest in the tin for five minutes after baking is essential. It allows the interior to set, preventing the cups from collapsing when you remove them. This simple pause is a secret step that professional bakers swear by.
Use a Silicone Mold for Easy Release
Silicone cups make removal painless. If you prefer a firmer crust, you can line the cups with parchment paper for a few seconds before filling. This prevents sticking and gives the cups a clean, professional look.
Add a Dash of Salt for Sweetness Balance
The small pinch of salt amplifies the sweetness of the peaches and honey without making the cups taste salty. It’s a classic technique in baking that enhances flavor complexity. Don’t skip it; it’s the secret to a well‑balanced dessert.
Keep Your Bowl Clean
If you’re reusing the mixing bowl, rinse it immediately after use. Stale batter can stick and make the next batch gritty. A quick rinse saves you from a messy cleanup and ensures each cup tastes fresh.
Creative Twists and Variations
This recipe is a playground. Here are some of my favorite ways to switch things up:
Maple‑Glazed Apple Cups
Swap peaches for diced apples and use maple syrup instead of honey. Add a pinch of nutmeg for warmth. These cups become a cozy fall treat that pairs perfectly with a cup of coffee.
Berry‑Burst Oat Cups
Replace peaches with a mix of fresh blueberries and sliced strawberries. Reduce the honey slightly to avoid excess sweetness. The berries give a tart contrast that makes each bite refreshing.
Chocolate‑Nut Crunch Cups
Add an extra 1/4 cup of dark chocolate chips and double the chopped nuts. Omit the coconut for a denser, chocolate‑rich texture. These cups are a decadent dessert that satisfies the sweet tooth.
Coconut‑Lemon Burst
Incorporate 1/4 cup of shredded coconut and a tablespoon of lemon zest into the batter. The citrus brightens the flavor, while the coconut adds a tropical edge. Serve with a dollop of coconut yogurt for an extra kick.
Spiced Chai Oat Cups
Add 1/2 teaspoon of ground cardamom and a pinch of ginger to the dry mix. Replace vanilla with chai spice blend. These cups carry a warm, aromatic profile perfect for chilly evenings.
Almond‑Honey Power Cups
Use almond flour instead of oats for a gluten‑free version, and double the honey for extra sweetness. Sprinkle sliced almonds on top before baking. The result is a nutty, crunchy delight that’s great for a quick energy boost.
Storing and Bringing It Back to Life
Fridge Storage
Place the cooled cups in an airtight container and store them in the refrigerator for up to five days. The oats and yogurt keep them moist, preventing them from drying out. When ready to eat, let them sit at room temperature for 10 minutes for a softer bite.
Freezer Friendly
For longer storage, wrap each cup individually in parchment paper and place them in a freezer bag. They’ll keep well for up to three months. When you’re ready to enjoy, thaw them overnight in the fridge and warm them in a 350°F oven for 5 minutes.
Best Reheating Method
Add a tiny splash of water or a drizzle of milk to the cups before reheating. This steams them back to perfection, keeping the texture moist and preventing them from becoming dry or rubbery. Microwave on medium power for 30 seconds or bake at 350°F for 5 minutes.