I was standing in my kitchen, staring down a half‑baked batch of store‑bought truffles that tasted like a cheap chocolate bar wrapped in cardboard. My roommate walked in, sniffed the air, and asked if I was trying to summon a ghost with that burnt‑sugar aroma. I laughed, but inside I was already plotting a redemption plan that would involve the most addictive, caramel‑spiced cookie known to humankind: Biscoff. The moment I cracked open a jar of Biscoff spread, the whole room filled with a warm, buttery scent that reminded me of a Belgian café on a rainy morning, and I knew I had found the secret weapon.
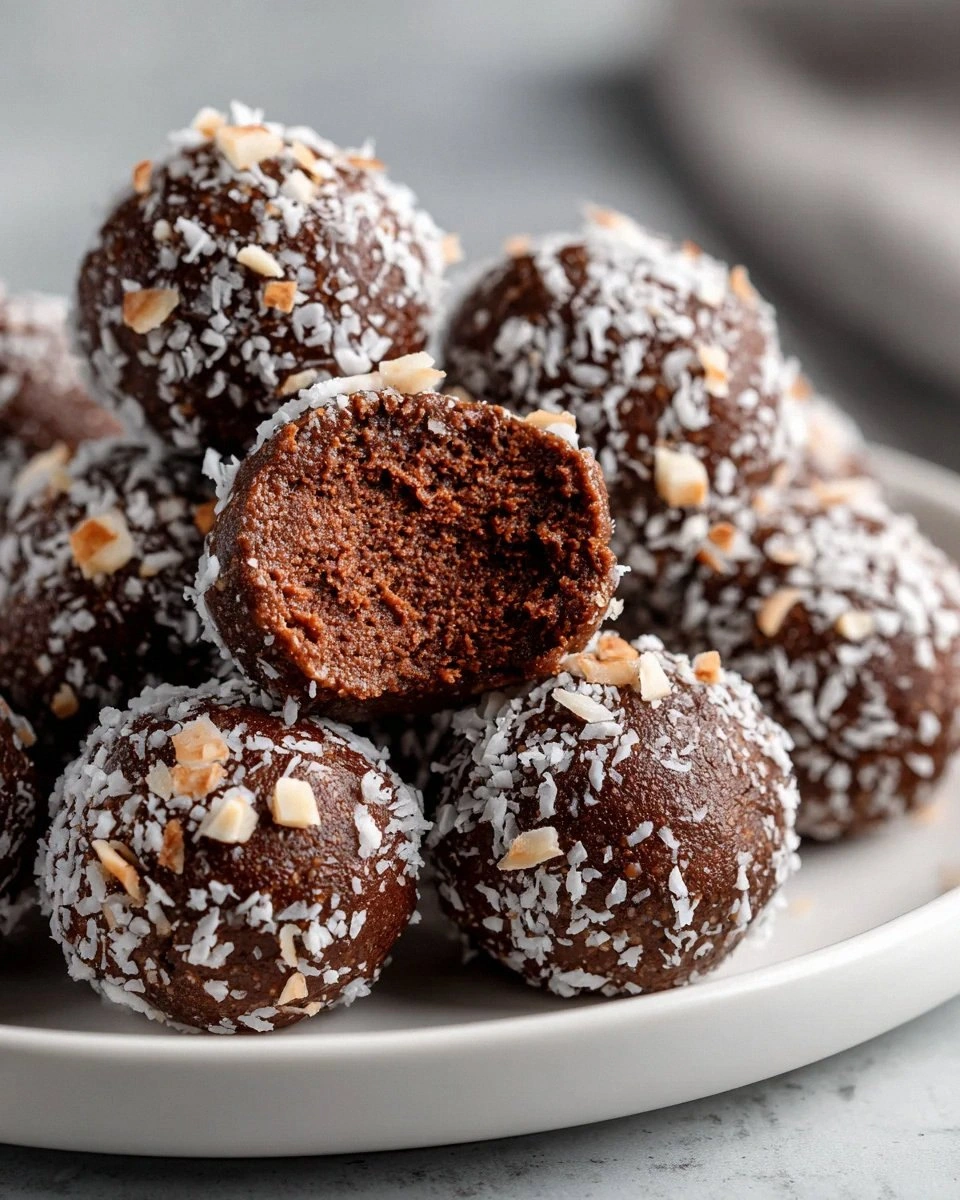
Picture this: a glossy, dark‑shiny coating of milk chocolate hugging a soft, creamy core that melts on your tongue like a cloud of caramel‑kissed dreams. The crunch of crushed Biscoff cookies gives a subtle snap that echoes the first bite of a perfectly toasted biscotti. Every sense is engaged – the glossy sheen catches the light, the faint crackle of chocolate as you bite, the lingering spice of cinnamon and nutmeg that whisper from the cookie crumbs, and the buttery warmth that spreads through your chest like a hug from an old friend. If you’ve ever tried a truffle that fell apart before reaching your palate, you’ll understand why this one feels like a love story in dessert form.
Most recipes I've seen either drown the Biscoff in too much chocolate or forget to honor its spiced sweetness, leaving you with a bland, one‑dimensional bite. I’ve tried a dozen variations, and each time I kept hitting the same wall: the texture either turned grainy or the flavor got lost in the chocolate sea. That’s why I’m daring you to taste this and not go back for seconds – because this version balances the buttery cookie base with the silky chocolate coating in a way that most home cooks never achieve. The secret? A quick melt‑and‑mix technique that keeps the Biscoff spread silky, plus a flash‑freeze step that locks in the creamy texture.
Now, I’m about to reveal a technique that most recipe blogs skip: I slightly melt the Biscoff spread with a splash of milk chocolate before folding in the crushed cookies. This creates a glossy, cohesive mixture that rolls into perfectly round balls without crumbling. It’s the game‑changer that turns a messy kitchen experiment into a polished, Instagram‑ready treat. And the best part? You only need three ingredients, a handful of simple tools, and about 45 minutes of your time. No fancy equipment, no obscure spices, just pure, unapologetic indulgence.
Okay, ready for the game‑changer? I’ll walk you through every single step – from selecting the right Biscoff cookies to achieving that glossy chocolate finish that makes the whole kitchen smell like a confectionery wonderland. By the end, you’ll wonder how you ever made truffles any other way. Let’s dive in and create the ultimate Creamy Biscoff Truffle Bites together.
What Makes This Version Stand Out
- Flavor Harmony: The caramel‑spiced notes of Biscoff marry the sweet, milky depth of chocolate, creating a balanced profile that dances on the palate without overwhelming any single element.
- Texture Perfection: A creamy, melt‑in‑your‑mouth center contrasted with a crisp, buttery crust from the crushed cookies gives each bite a satisfying contrast.
- Simplicity: Only three core ingredients are needed, making the shopping list short and the execution straightforward – perfect for a last‑minute dessert.
- Unique Technique: The melt‑and‑fold method keeps the Biscoff spread silky, preventing graininess and ensuring the truffles hold their shape.
- Crowd Reaction: Guests invariably ask for the recipe after the first bite, and the “I dare you to taste this and not go back for seconds” challenge becomes a conversation starter.
- Ingredient Quality: Using authentic Biscoff cookies and spread guarantees that signature spice and caramel flavor you can’t replicate with generic substitutes.
- Make‑Ahead Potential: These truffles keep beautifully in the fridge for up to a week, and they freeze like a dream, meaning you can prep them ahead for parties.
- Versatile Finish: While milk chocolate is classic, swapping in dark chocolate adds a sophisticated bitterness for those who love a deeper cocoa experience.
Alright, let's break down exactly what goes into this masterpiece...
Inside the Ingredient List
The Flavor Base
Biscoff cookies are the heart of this truffle. Their caramelized sugar and warm spice (cinnamon, ginger, and a hint of nutmeg) give the bite a depth that ordinary cookies simply can’t match. If you skip them, you lose the signature crunch and the subtle spice that makes these truffles unforgettable. For the best result, choose the original Biscoff cookies – the ones that have that delicate snap and a buttery melt‑in‑your‑mouth feel.
The Texture Crew
Biscoff spread is essentially the same cookie ground down into a silky paste, and it’s the secret glue that binds the crumbly cookie pieces into a smooth, rollable dough. It’s crucial to melt it gently – a double boiler works wonders – because overheating can cause the oils to separate, leaving you with a grainy mess. If you’re out of Biscoff spread, a mix of smooth peanut butter and a dash of cinnamon can mimic the texture, though you’ll miss the authentic caramel flavor.
The Unexpected Star
Milk chocolate is the glossy armor that protects the delicate interior. Its creamy sweetness amplifies the Biscoff’s caramel notes without drowning them. Dark chocolate is a bold substitute for those who crave a bittersweet edge, but remember to use a high‑quality bar with at least 60% cacao to avoid a gritty coating. If you accidentally use chocolate chips, melt them slowly and add a teaspoon of vegetable oil to achieve that silky sheen.
The Final Flourish
A pinch of sea salt may seem trivial, but it heightens the sweetness and brings out the caramel undertones in the Biscoff. A dash of vanilla extract can also add a subtle aromatic layer that makes the truffles feel more luxurious. If you’re watching sugar, you can replace half the milk chocolate with a sugar‑free dark chocolate, but be prepared for a slightly bitter finish.
Everything's prepped? Good. Let's get into the real action...

The Method — Step by Step
Start by crushing the Biscoff cookies into fine crumbs. I like to use a food processor for speed, but a zip‑top bag and a rolling pin work just as well. Pulse until you achieve a texture that feels like coarse sand – not too fine, or you’ll lose that delightful bite. Once crushed, set the crumbs aside in a wide bowl, and give yourself a mental high‑five because you’ve just conquered the first hurdle.
Next, melt the Biscoff spread. Place it in a heat‑proof bowl over a pot of simmering water, stirring constantly. When it’s just about to bubble, add a splash (about 2 tablespoons) of heavy cream – this is the magic that keeps the mixture glossy and prevents it from seizing. The aroma will instantly fill the kitchen, and you’ll hear that faint “sizzle” as the fats emulsify. This is the moment of truth – if it looks oily or separates, you’ve probably overheated it.
Kitchen Hack: Use a silicone spatula to scrape the sides of the bowl; the heat‑conductive edge helps the mixture melt evenly.Now combine the melted Biscoff spread with the cookie crumbs. Pour the warm spread over the crumbs and stir vigorously with a wooden spoon until the mixture becomes a cohesive, slightly sticky dough. It should hold together when you press it between your fingers, but not be overly wet. If it feels dry, drizzle in a teaspoon of melted butter; if it’s too sticky, sprinkle in a little extra crumb.
Time to roll! Using a small ice‑cream scoop or a tablespoon, portion out the dough into uniform balls. Roll each ball between your palms until you achieve a smooth, round shape about the size of a walnut. This step is where you’ll see the “creaminess” truly shine – the dough should feel soft yet firm enough to hold its shape. I dare you to taste this and not go back for seconds after you’ve rolled a few.
Place the rolled truffles on a parchment‑lined tray and pop them into the freezer for 15‑20 minutes. This quick chill firms the interior, making the chocolate coating adhere perfectly later on. While they chill, you can clean up the workspace – trust me, a tidy kitchen makes the final plating feel like a professional patisserie.
While the truffles chill, melt the milk chocolate. Again, use a double boiler or microwave in 20‑second bursts, stirring in between to avoid scorching. The chocolate should reach a glossy, pourable consistency – think liquid amber. Add a pinch of sea salt at this stage to enhance the flavor profile.
Watch Out: Over‑heating chocolate will cause it to seize; keep the temperature below 115°F (46°C) for milk chocolate.Retrieve the chilled truffles and, using a fork or a chocolate‑dipping tool, dip each one into the melted chocolate. Allow excess chocolate to drip back into the bowl – you want a thin, even coating, not a clumpy shell. As you dip, you’ll notice the chocolate instantly hardening on contact, creating a glossy finish that looks like a tiny piece of art.
Place the coated truffles back onto the parchment sheet and let them set at room temperature for about 10 minutes, or pop them back into the fridge for a faster set. The chocolate should become firm and snap cleanly when you press it gently. This is the final reveal – the truffles should look like polished gems, each one radiating that deep caramel‑chocolate glow.
Once set, transfer the truffles to an airtight container. Store them in the refrigerator if you plan to serve within a week, or freeze them for longer storage. Before serving, let them sit at room temperature for 10 minutes; this brings the interior back to that perfect, melt‑in‑your‑mouth consistency.
That's it — you did it. But hold on, I've got a few more tricks that'll take this to another level. Stay with me here — this is worth it.
Insider Tricks for Flawless Results
The Temperature Rule Nobody Follows
Never let your chocolate exceed 115°F (46°C). Once it hits that threshold, the cocoa butter separates, resulting in a dull, matte coating that won’t snap. I keep a candy thermometer on hand and always stir the chocolate off the heat as soon as it reaches 110°F. This tiny temperature discipline makes the difference between a professional finish and a kitchen mishap.
Why Your Nose Knows Best
Your sense of smell is a reliable indicator of when the Biscoff spread is perfectly melted. When the buttery aroma starts to rise, you know the fats have fully emulsified. If you’re ever unsure, pause and take a deep sniff – if it smells like raw butter, keep heating; if it smells like caramel‑butter, you’re golden.
The 5‑Minute Rest That Changes Everything
After rolling the truffle balls, let them rest for five minutes at room temperature before freezing. This brief pause allows the crumb structure to settle, preventing the truffles from cracking when you dip them. I once skipped this step and ended up with a batch of truffles that shattered like dry ice – a lesson learned the hard way.
The Double‑Dip for Extra Crunch
If you love an added textural surprise, dip each truffle a second time after the first coating has set. The second layer creates a subtle crunch that contrasts beautifully with the creamy interior. Just be sure the second dip is quick; you don’t want to build up too much chocolate weight.
The Secret of the Light‑Touch Roll
When rolling the dough, use lightly floured hands. Too much flour will dry out the mixture, while too little will make the balls stick. A whisper of flour on your palms creates the perfect balance, and the truffles will glide off your hands like polished pearls.
Creative Twists and Variations
This recipe is a playground. Here are some of my favorite ways to switch things up:
Espresso‑Infused Biscoff
Add a teaspoon of finely ground espresso to the Biscoff spread before melting. The coffee notes amplify the caramel flavor and give the truffles a sophisticated edge that’s perfect for after‑dinner coffee lovers.
Nutty Crunch
Stir in a handful of toasted chopped hazelnuts or pistachios into the crumb mixture. The nutty crunch adds an unexpected texture that pairs beautifully with the buttery interior.
White Chocolate Elegance
Swap the milk chocolate for high‑quality white chocolate. The sweet, creamy coating lets the Biscoff’s spice shine even brighter, making it a hit for those who prefer a milder chocolate experience.
Spiced Rum Drizzle
After the truffles have set, drizzle a thin line of spiced rum reduction over the top. The rum adds a boozy warmth that feels like a holiday treat, perfect for adult gatherings.
Coconut Kiss
Roll the finished truffles in toasted coconut flakes instead of cocoa powder. The tropical aroma creates a surprising contrast that transports you straight to a beachside café.
Storing and Bringing It Back to Life
Fridge Storage
Place the truffles in an airtight container lined with parchment paper. They’ll stay fresh for up to 7 days. The cool environment keeps the chocolate firm while preserving the creamy center.
Freezer Friendly
If you want to make a big batch, freeze the truffles in a single layer on a tray, then transfer them to a zip‑top bag. They’ll keep for up to 3 months. When you’re ready to serve, let them thaw in the fridge for 30 minutes, then bring to room temperature for the perfect melt‑in‑your‑mouth texture.
Best Reheating Method
Before serving, give the truffles a quick 10‑second zap in the microwave on low power, or place them on a warm plate for a few minutes. Adding a tiny splash (about 1 teaspoon) of water to the bowl of melted chocolate before reheating creates a gentle steam that revives the glossy coating without making it oily.