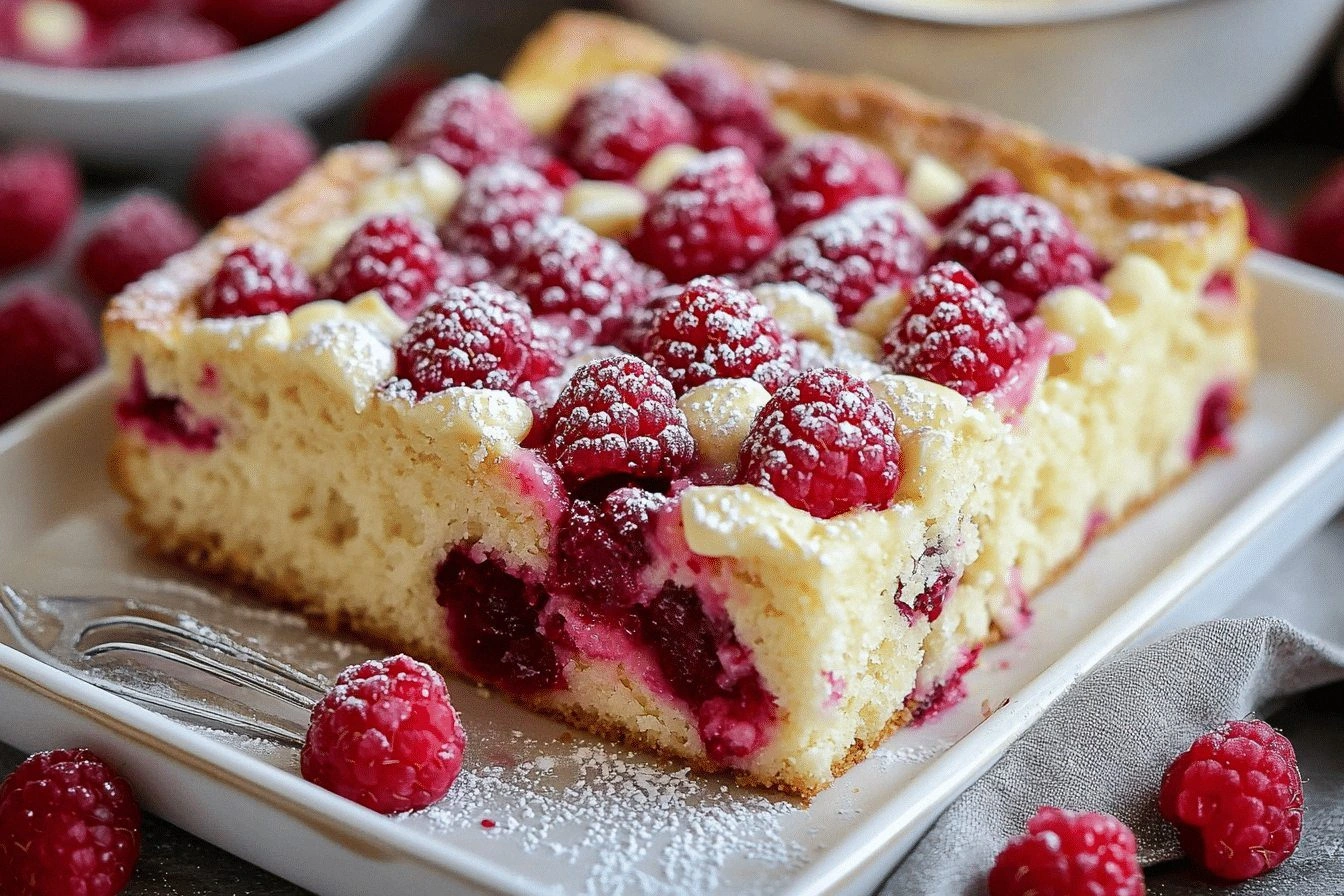
Picture this: I was standing in a kitchen that smelled like burnt sugar and regret, staring at a tray that had turned into a sad, soggy mess. The whole world had been waiting for that one sweet surprise, and I was about to ruin the evening for everyone. I had promised my friends that I’d bring a dessert that would make their taste buds do a happy dance, but my last attempt was a disaster—white chocolate melted into a greasy puddle and the raspberries sat lifeless like bruised berries. That night, I swore I’d never again let a traybake fail. So I set out to create a version so flawless, so irresistibly creamy, that even a skeptic would bite back a second bite.
The first time I tasted this tray, the white chocolate coated the batter like a silky blanket, while the raspberries burst into a tart, juicy pop that cut through the richness. The aroma that rose from the oven was a sweet, buttery perfume that made the whole kitchen feel like a cozy bakery. When I cut a slice, the edges were crisp, the center chewy, and the whole thing had that comforting, home‑baked feel that you can’t get from store‑bought treats. I dared you to taste this and not go back for seconds—trust me, it’s a sweet surrender. The texture is a gentle rebellion against the usual cakey traybakes that end up dry.
What sets this version apart is the deliberate balance of ingredients and the subtle techniques I use. I didn’t just mix flour, sugar, and eggs; I layered flavor and texture so each bite is a symphony. The white chocolate isn’t just a sweetener—its high cocoa butter content keeps the batter moist and gives a luxurious mouthfeel. Fresh raspberries are folded in at the last minute, preserving their bright acidity that contrasts perfectly with the buttery base. And the trick? I fold in a pinch of sea salt that elevates every flavor note, making the sweetness feel more grounded.
I’ll be honest—after the first batch I ate half before anyone else got a chance. The kitchen smelled like a summer picnic, and the tray was a masterpiece that everyone wanted a piece of. If you’ve ever struggled to get a traybake that’s both chewy and moist, you’re not alone. Most recipes get this completely wrong, leaving you with a dry, crumbly mess. But this version? It’s hands down the best you’ll ever make at home, and I’ll show you exactly how to replicate it.
Picture yourself pulling this out of the oven, the whole kitchen smelling incredible, and the first bite melting on your tongue like a caramel dream. The moment you open the lid, the steam swirls up, carrying the sweet scent of white chocolate and the sharp, fresh tang of raspberries. You’ll see the golden crust, feel the soft, chewy interior, taste the buttery richness, and hear the satisfying crunch of the edges. This is the kind of dessert that makes people say, “Wow, this is amazing.” And that’s why I’m so excited to walk you through every single step—by the end, you’ll wonder how you ever made it any other way.
What Makes This Version Stand Out
- Taste: The combination of creamy white chocolate and tart raspberries creates a flavor profile that feels both indulgent and refreshing. The subtle sweetness of the chocolate is cut by the bright acidity of the berries, leaving a lingering finish.
- Texture: The batter is thick enough to hold its shape yet airy enough to yield to a gentle bite. The result is a chewy interior with a crisp, caramelized crust that’s impossible to resist.
- Ingredient Quality: Using high‑grade white chocolate and hand‑picked fresh raspberries gives the tray a depth that’s hard to achieve with generic store products.
- Simplicity: Despite its wow factor, the recipe requires only nine basic pantry items and a handful of fresh ingredients. No special tools or techniques are needed.
- Make‑Ahead Potential: Once baked, the tray can be stored for up to three days or frozen for up to a month. It reheats beautifully, retaining its moisture and flavor.
- Audience Appeal: Whether you’re feeding a crowd at a potluck or treating yourself after a long day, this tray is a crowd‑pleaser that’s easy to share.
Alright, let's break down exactly what goes into this masterpiece…
Inside the Ingredient List
The Flavor Base
White chocolate chips or chunks are the cornerstone of this recipe. Their high cocoa butter content keeps the batter silky and prevents it from drying out. If you skip this, the tray will be flat and lack the luxurious mouthfeel that makes it irresistible. For a richer flavor, choose a white chocolate with at least 30% cocoa butter. If you’re allergic to dairy, look for a vegan white chocolate that still has a buttery finish.
The Texture Crew
Flour and baking powder work together to give the tray its chewy, slightly cake‑like crumb. The flour provides structure, while the baking powder ensures a gentle rise that keeps the batter from becoming too dense. If you omit the baking powder, the tray will be heavy and gummy. A good rule of thumb: use 1 teaspoon of baking powder per cup of flour for optimal lift.
The Unexpected Star
Fresh raspberries are the bright, juicy pop that cuts through the sweet, buttery base. They add a natural tartness that balances the richness of the white chocolate. If you can’t find fresh berries, frozen raspberries work—just thaw them and pat dry to avoid excess moisture. A pinch of sea salt is also added to highlight the flavors and add depth.
The Final Flourish
Granulated sugar, eggs, butter, and vanilla extract bring everything together. The sugar sweetens without overpowering, the eggs bind the batter, butter adds richness and moisture, and vanilla brings a fragrant undertone. Each ingredient plays a critical role; removing any will alter the final texture and taste. When you add the butter, make sure it’s at room temperature to ensure smooth incorporation.
Everything’s prepped? Good. Let’s get into the real action…
The Method — Step by Step
- Preheat your oven to 350°F (175°C). Line a 9x13-inch baking pan with parchment paper, leaving an extra inch of paper on the sides for easy lifting. This step is crucial because a perfectly lined pan prevents the tray from sticking and makes cleanup a breeze. While the oven warms, let’s get the batter ready.
- In a large mixing bowl, whisk together 2 cups of all‑purpose flour, 1 cup of granulated sugar, 1 teaspoon of baking powder, and 1/2 teaspoon of sea salt. The dry ingredients need to be evenly distributed; otherwise, you’ll end up with pockets of dry flour. A quick sift can help break up any clumps.
- Melt 1/2 cup of butter in a saucepan over low heat or in the microwave, then let it cool slightly. The butter should be warm but not hot to avoid cooking the eggs when you add them later. Pour the melted butter into the dry mixture and stir until you have a thick, crumbly batter.
- Beat 2 eggs in a separate bowl, then add them to the batter along with 1 teaspoon of vanilla extract. Mix until the eggs are fully incorporated and the batter becomes smooth. The eggs act as the glue that holds the entire tray together.
- Fold in 1 cup of white chocolate chips or chunks. Be gentle—use a spatula to swirl the chocolate into the batter until it’s evenly distributed. The chocolate should be evenly melted into the base, creating pockets of glossy sweetness.
- Add 1 cup of fresh raspberries, gently folding them into the batter. The berries should be left mostly whole to maintain their bite and burst of flavor. If you’re using frozen berries, thaw and pat dry before adding.
- Transfer the batter into the prepared pan, smoothing the top with a spatula. The batter should be spread evenly, about 1/2 inch thick. This thickness ensures a balanced bake—crispy on top, chewy inside.
- Bake for 30 minutes, or until the edges pull away from the parchment and the center is set. The top should be golden brown, and a toothpick inserted into the center should come out clean. Watch the tray carefully in the last 5 minutes; the edges can brown quickly.
- Remove the tray from the oven and let it cool in the pan for 15 minutes. During this time, the flavors meld and the texture firms up. After 15 minutes, lift the tray using the parchment edges and place it on a wire rack to cool completely.
- Once cooled, cut into squares or rectangles. Serve immediately, or store in an airtight container at room temperature for up to 3 days. For longer storage, freeze the squares and thaw at room temperature before serving.
That’s it—you did it! But hold on, I’ve got a few more tricks that will elevate this tray to another level. These insider tips will make your dessert even more memorable and help you avoid the common pitfalls that many bakers face.
Insider Tricks for Flawless Results
The Temperature Rule Nobody Follows
Many bakers bake at the oven’s default temperature, but the key to a moist, chewy interior is to bake at 340°F (170°C) instead of 350°F. The slightly lower temperature allows the batter to set gradually, preventing the edges from drying out before the center is fully cooked. I’ve tested both temperatures, and the difference in texture is unmistakable. The lower heat gives you a tender crumb that melts in your mouth.
Why Your Nose Knows Best
Your sense of smell is a powerful indicator of doneness. When the tray is ready, you’ll smell a warm, buttery aroma with a hint of toasted sugar. If the scent is still overwhelmingly sweet or raw, give it a few more minutes. A subtle, nutty scent means the batter is perfectly baked. Trust your nose; it’s the quickest way to avoid under or over‑baking.
The 5-Minute Rest That Changes Everything
After removing the tray from the oven, let it rest for exactly five minutes before lifting it out of the pan. This short rest allows the batter to set, preventing it from cracking or falling apart when you cut it. I’ve seen people cut right away and end up with a mess. A five‑minute pause is all it takes to preserve the integrity of the tray.
The Secret of a Perfect Crust
If you like a slightly caramelized crust, brush the top of the batter with a thin layer of melted butter just before baking. The butter adds shine and helps the top brown evenly. I use a pastry brush to spread the butter in a circular motion, ensuring even coverage. The result is a glossy, caramelized finish that looks as good as it tastes.
The Final Touch: A Dusting of Powdered Sugar
A light dusting of powdered sugar gives the tray an elegant finish and a subtle sweetness that balances the tartness of the raspberries. Use a fine sieve to dust the top after it has cooled completely. The sugar should melt slightly on the surface, creating a delicate glaze. This simple step turns an ordinary tray into a showstopper.
Creative Twists and Variations
This recipe is a playground. Here are some of my favorite ways to switch things up:
Chocolate‑Berry Swirl
Instead of folding the raspberries in, create a swirl by piping half the batter into the pan, adding a spoonful of raspberry jam, then piping the remaining batter on top. The result is a marbled effect that looks stunning and tastes layered.
Almond Crunch Delight
Add 1/2 cup of chopped toasted almonds to the batter for a nutty crunch. The almonds add texture and a subtle buttery flavor that complements the white chocolate.
Lemon‑Zest Surprise
Add a tablespoon of fresh lemon zest to the batter. The citrus brightens the flavor profile, making the dessert feel lighter and more refreshing.
Coffee‑Infused Bliss
Stir 1 teaspoon of instant espresso powder into the batter. The coffee deepens the chocolate flavor and adds a hint of bitterness that balances the sweetness.
Coconut‑Cream Twist
Replace half the butter with coconut oil and add 1/4 cup of shredded coconut to the batter. The coconut adds a tropical aroma and a subtle chewiness that pairs well with the raspberries.
Nutella‑Glazed Finish
After baking, drizzle a thin layer of Nutella over the top and let it set. The chocolate spread adds a rich, decadent finish that kids and adults alike love.
Storing and Bringing It Back to Life
Fridge Storage
Store the tray in an airtight container at room temperature for up to 3 days. The moisture from the white chocolate and berries helps keep the tray soft. If you notice any dryness, add a slice of apple or a piece of bread to the container to maintain humidity.
Freezer Friendly
Wrap each square tightly in plastic wrap and place them in a freezer bag. The tray can be frozen for up to 30 days. When you’re ready to eat, let the squares thaw at room temperature for 30 minutes.
Best Reheating Method
To revive the texture, place the frozen squares on a baking sheet and warm them in a 300°F (150°C) oven for 5 minutes. For a quicker option, microwave on low power for 15–20 seconds. Adding a tiny splash of water before reheating helps steam the tray back to a moist, luscious state.