I still remember the night I accidentally set the kitchen on fire while trying to make a quick dinner. A handful of chicken breasts, a splash of soy sauce, and a reckless dash of garlic had me convinced that teriyaki was the cure for my culinary woes. The kitchen was filled with a smoky, caramelized aroma that made my eyes water, yet the taste was a revelation: sweet, salty, and utterly comforting. That disaster turned into a culinary epiphany, and I vowed to create a version that would never backfire again. From that moment, I refined every step until the sauce glistened like liquid velvet on the chicken.
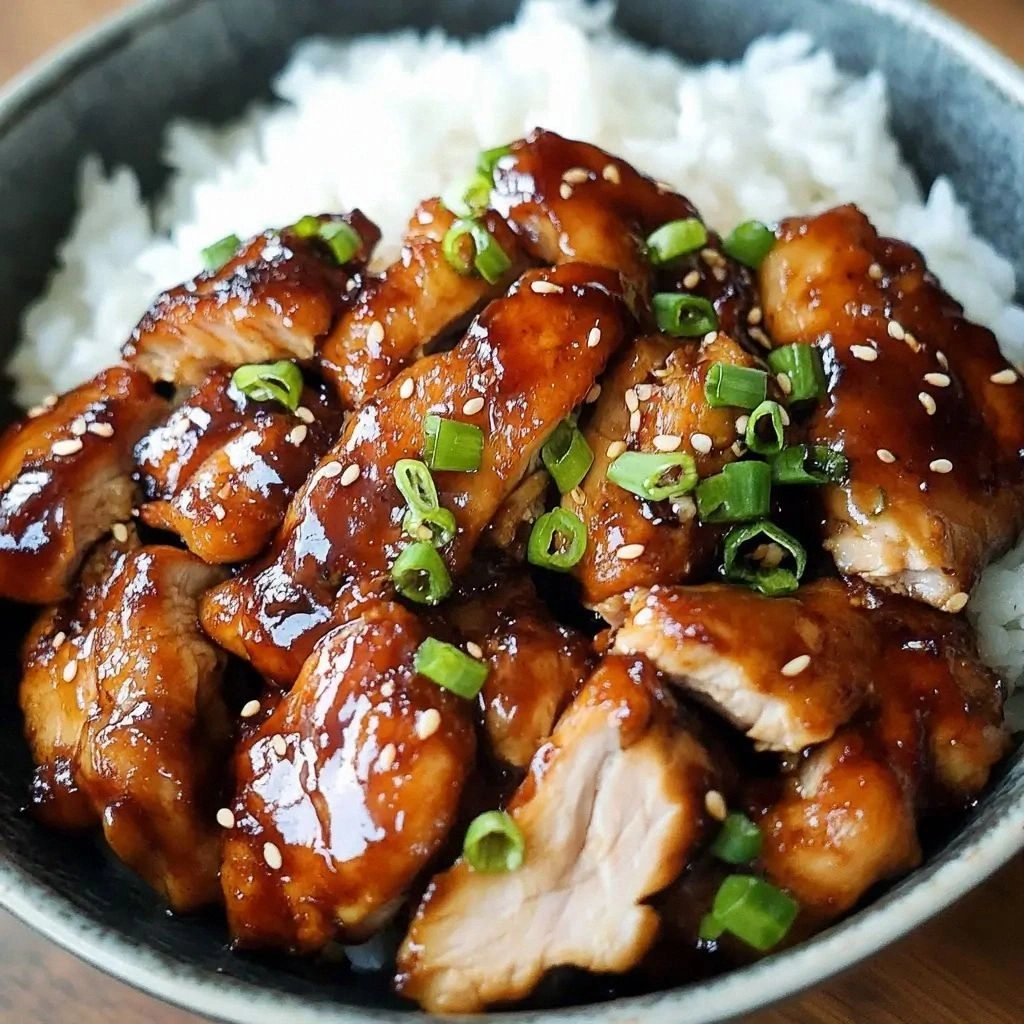
Picture this: the sizzle that erupts when the hot oil meets the first piece of chicken, the steam curling like a fragrant cloud, and the aroma of fresh ginger and garlic that instantly transports you to a bustling Japanese street market. The sound of the pan is a rhythmic drumbeat that signals the start of something delicious. As the chicken browns, the sugars in the brown sugar caramelize, turning the surface into a glossy, caramelized glaze. The heat draws out the juices, creating a tender bite that melts in your mouth. Every element—the texture, the color, the scent—contributes to a sensory experience that feels both comforting and adventurous.
What sets this recipe apart is that it is engineered to be foolproof, yet it delivers a depth of flavor that would make a Michelin‑star chef nod in approval. It balances the umami of soy sauce with the subtle sweetness of brown sugar, the sharp bite of ginger, and the nutty whisper of toasted sesame oil. The sauce’s viscosity is achieved through a perfect cornstarch slurry that coats the chicken without becoming gummy. The optional dark soy sauce adds a luxurious mahogany hue that makes the dish visually stunning. Together, these elements create a dish that is both approachable for beginners and sophisticated enough for seasoned cooks.
I’ll be honest—after tasting the first batch, I ate half the chicken before anyone else could even touch a fork. I dare you to taste this and not go back for seconds. The next time you sit down to a meal, imagine the kitchen filling with a sweet, savory perfume that invites everyone to gather around. Let me walk you through every single step—by the end, you’ll wonder how you ever made it any other way.
What Makes This Version Stand Out
- Flavor: The sauce balances sweetness, saltiness, and umami in a single glaze that coats each piece of chicken like a silky coat of velvet. Every bite delivers a burst of depth that feels both comforting and exciting.
- Texture: The chicken stays moist inside while the exterior crisps up into a caramelized crust that shatters like thin ice when you bite. The sauce’s glossy consistency adheres without becoming sticky.
- Visual Appeal: The optional dark soy sauce gives the glaze a deep mahogany color that makes the dish look restaurant‑ready. It’s a visual cue that the flavor is rich and well‑balanced.
- Ingredient Quality: Using fresh ginger and garlic, toasted sesame oil, and a splash of rice vinegar or mirin ensures authenticity and elevates the dish beyond a generic takeout copy.
- Time Efficiency: Prep takes just 15 minutes while the cooking time is 30 minutes, making it a perfect weeknight dinner that doesn’t compromise on flavor.
- Make‑Ahead Potential: The sauce can be prepared in advance and stored in the fridge for up to 48 hours, allowing you to assemble the dish quickly when guests arrive.
- Versatility: The recipe can be adapted for different proteins (shrimp, tofu) or served over rice, noodles, or steamed vegetables, making it a versatile staple in your culinary repertoire.
Inside the Ingredient List
The Flavor Base
Soy sauce is the backbone of teriyaki flavor, providing a salty umami that anchors the entire sauce. A ⅓ cup of regular soy sauce delivers the right balance of saltiness without overpowering the other components. If you prefer a lower sodium version, opt for low‑sodium soy or tamari, but adjust the quantity slightly to maintain the flavor profile. The sauce’s depth comes from the fermentation process, which brings a subtle complexity that a simple salt‑water mixture can never match.
Dark soy sauce adds a richer, sweeter undertone and deepens the glaze’s color. While optional, a tablespoon of dark soy creates that restaurant‑style mahogany hue that makes the dish visually stunning. If you can’t find dark soy, a splash of hoisin or a dash of molasses can mimic the sweetness, though the color may differ slightly. This ingredient is a quick way to elevate the dish from good to unforgettable.
Rice vinegar or mirin provides the necessary acidity to cut through the sweetness and richness of the sauce. Mirin’s inherent sweetness balances the saltiness, while rice vinegar offers a cleaner, tangier finish. Using either ingredient adds a bright note that lifts the overall flavor. The choice between the two depends on your taste preference and what you have on hand.
The Sweet & Savory Layer
Brown sugar is the sweetener that caramelizes beautifully during cooking, creating a glossy glaze that clings to the chicken. The molasses content in brown sugar gives a subtle depth that white sugar can’t provide. Light brown sugar offers a milder sweetness, while dark brown sugar intensifies the flavor and color. Adjust the amount to match your desired sweetness level, but remember that sugar also helps with browning.
Sesame oil, especially toasted sesame, introduces a nutty aroma that is quintessential to Asian cuisine. A teaspoon is enough to infuse the dish with its distinctive flavor without overpowering the other components. Adding it toward the end of the sauce preparation preserves its delicate aroma, as high heat can burn it. This final touch turns an ordinary glaze into a memorable experience.
The Aromatics
Fresh ginger, grated to a fine consistency, offers a warm, zesty kick that balances the richness of the sauce. Its sharpness cuts through the sweetness and brings a bright, clean finish. If fresh ginger isn’t available, ground ginger can substitute, but the flavor will be less vibrant. A teaspoon is ample for the entire batch, ensuring each bite has a subtle zing.
Garlic, minced finely, adds depth and a savory undertone that complements the soy sauce. Fresh garlic is preferred for its bright, aromatic profile, but garlic powder can be used in a pinch. The key is to mince it finely so it releases maximum flavor without becoming bitter. Together with ginger, garlic creates a fragrant base that elevates the dish.
The Final Flourish
Cornstarch, mixed with a small amount of cold water to create a slurry, thickens the sauce into a glossy glaze that clings to the chicken. Stirring it into the sauce at the right moment prevents clumping and ensures a smooth consistency. A half tablespoon is enough for the entire batch, keeping the sauce silky without becoming gummy. This step is crucial for that signature teriyaki finish.
White sesame seeds and green onions serve as optional garnishes that add texture and a burst of freshness. Toasting the sesame seeds brings out their nutty flavor, while finely chopped green onions add a bright, mild oniony note. These garnishes are not essential but elevate the dish’s presentation and flavor profile. Sprinkle them over the finished chicken for an extra layer of delight.
Everything’s prepped? Good. Let’s get into the real action.
The Method — Step by Step
- First, cut the chicken into bite‑sized pieces, ensuring they are of similar size for even cooking. Pat the pieces dry with paper towels to remove excess moisture; this helps the chicken brown nicely. Season lightly with salt and pepper, but avoid over‑salting as the soy sauce will add plenty of saltiness. This step is the foundation for a uniformly cooked dish.
- Heat the vegetable oil in a large skillet over medium‑high heat. Once the oil shimmers, add the chicken in a single layer, making sure not to crowd the pan. Let the pieces sear untouched for 2-3 minutes until a golden crust forms on the bottom. Flip the chicken and sear the other side for an additional 2 minutes, creating a caramelized surface that locks in juices.
- While the chicken sears, combine the soy sauce, dark soy sauce, brown sugar, ginger, garlic, sesame oil, and rice vinegar (or mirin) in a small bowl. Whisk until the sugar dissolves completely, creating a smooth sauce base. This mixture will become the star of the dish, so ensure all flavors are well blended.
- Once the chicken has a nice sear, pour the sauce mixture over the pan. Reduce the heat to medium and let the mixture simmer gently for 5 minutes, allowing the flavors to meld. Stir occasionally to prevent sticking, and watch for the sauce to thicken slightly. This is where the magic begins.
- Prepare the cornstarch slurry by mixing ½ tablespoon cornstarch with a splash of cold water until smooth. Add the slurry to the simmering sauce, stirring constantly. The sauce should thicken to a glossy glaze that coats the chicken evenly. This step ensures the sauce has the right consistency.
- Reduce the heat to low and let the chicken simmer in the glaze for another 5 minutes. The sauce should coat each piece, turning the chicken into a glossy, caramelized masterpiece. The chicken should still be slightly pink in the center, indicating it’s cooked through but still juicy.
- Remove the skillet from the heat and transfer the chicken onto a serving platter. Sprinkle toasted white sesame seeds and finely chopped green onions over the top. These garnishes add texture, flavor, and a pop of color that completes the dish. Let the chicken rest for a minute so the glaze sets.
- Serve immediately over steamed rice, sautéed vegetables, or noodles. The sauce’s sweetness pairs wonderfully with the neutral backdrop of rice, allowing the flavors to shine. This dish is best enjoyed fresh, but leftovers can be reheated with a splash of water to restore moisture.
That’s it — you did it. But hold on, I’ve got a few more tricks that’ll take this to another level.
Insider Tricks for Flawless Results
The Temperature Rule Nobody Follows
Many cooks think high heat is always better, but for teriyaki chicken, medium‑high heat is essential for a caramelized crust without burning the sugars. Start the pan at medium‑high, then reduce to medium once the chicken is seared. This gradual heat change ensures the sugars in the sauce caramelize evenly, creating a glossy glaze without scorching. A quick test: if the sauce starts to smoke, lower the heat immediately.
Why Your Nose Knows Best
The aroma of fresh ginger and garlic is a powerful indicator that your sauce is developing the right flavor profile. If the scent feels too sharp, let it simmer a little longer to mellow the aromatics. A faint, sweet scent from the brown sugar indicates the sauce is caramelizing properly. Trust your nose; it’s a reliable guide to flavor perfection.
The 5‑Minute Rest That Changes Everything
After cooking, let the chicken rest for 5 minutes before slicing. This allows the juices to redistribute, ensuring each bite remains moist. Resting also gives the glaze time to set, making the coating cling better to the meat. Skipping this step often results in a dry, unevenly glazed dish.
Use a Splatter Guard
The sauce can splatter when added to hot chicken, creating a mess and a potential burn hazard. Using a splatter guard or a lid with a vent keeps the kitchen clean and protects your hands. It also helps the sauce simmer evenly, preventing uneven caramelization.
Pre‑Season the Chicken
Seasoning the chicken before searing locks in moisture and flavor. A light sprinkle of salt and pepper before cooking prevents the meat from drying out. If you prefer a milder flavor, add a pinch of sugar to the seasoning mix to enhance the caramelization.
Stirring Technique
Stirring the sauce at the right moment prevents the sugars from sticking to the pan. Use a wooden spoon to gently stir, keeping the sauce from clinging and burning. A steady, gentle stir also ensures the cornstarch slurry distributes evenly, giving a smooth glaze.
Creative Twists and Variations
This recipe is a playground. Here are some of my favorite ways to switch things up:
Spicy Sriracha Teriyaki
Add a tablespoon of sriracha to the sauce for a fiery kick that balances the sweetness. The heat from the sriracha complements the umami of soy sauce, creating a layered flavor profile. This version is perfect for those who love a little heat in their meals. Serve over rice for a comforting spicy dinner.
Citrus Twist
Replace half the soy sauce with orange or lime juice to introduce a bright citrus note. The acidity cuts through the sweetness, creating a refreshing balance. This variation works wonderfully with shrimp or tofu for a lighter meal. Garnish with fresh cilantro for an extra burst of flavor.
Miso‑Infused Teriyaki
Stir in a tablespoon of white miso paste into the sauce for a deep, earthy umami. Miso adds a savory depth that enhances the overall flavor profile. This version pairs beautifully with broccoli or bok choy for a balanced plate. It’s a great way to incorporate fermented foods into your diet.
Gluten‑Free Teriyaki
Use tamari or coconut aminos instead of regular soy sauce for a gluten‑free version. The flavor remains similar, but the dish is safe for those with gluten sensitivities. Pair this with cauliflower rice for a low‑carb option. The result is a satisfying, healthy meal.
Teriyaki Tofu
Swap the chicken for firm tofu, pressing it to remove excess moisture before searing. The tofu absorbs the sauce beautifully, creating a vegetarian alternative that still delivers on flavor. Cook the tofu until golden, then add the sauce as usual. This version is perfect for a plant‑based dinner.
Asian‑Inspired Stir‑Fry
Combine the teriyaki sauce with sliced bell peppers, snap peas, and onions in a wok for a quick stir‑fry. The sauce adds a sweet, savory glaze that coats the vegetables. Serve over rice or noodles for a complete meal. This variation is great for using up leftover veggies.
Storing and Bringing It Back to Life
Fridge Storage
Store leftover teriyaki chicken in an airtight container in the refrigerator for up to 3 days. The glaze will thicken slightly as it cools, but it remains flavorful. When reheating, add a splash of water or broth to loosen the glaze and restore moisture. This method keeps the chicken tender and juicy.
Freezer Friendly
Freeze the cooked chicken in a single layer on a parchment‑lined tray before transferring to a freezer bag. This prevents clumping and makes portioning easier. Store for up to 2 months. When ready to eat, thaw overnight in the refrigerator and reheat with a splash of water to maintain the glaze.
Best Reheating Method
Reheat the chicken in a skillet over low heat, adding a teaspoon of water or broth to loosen the glaze. Stir gently to coat all pieces evenly. Heat until warmed through, about 5 minutes. This method preserves the sauce’s glossy texture and ensures a juicy bite.