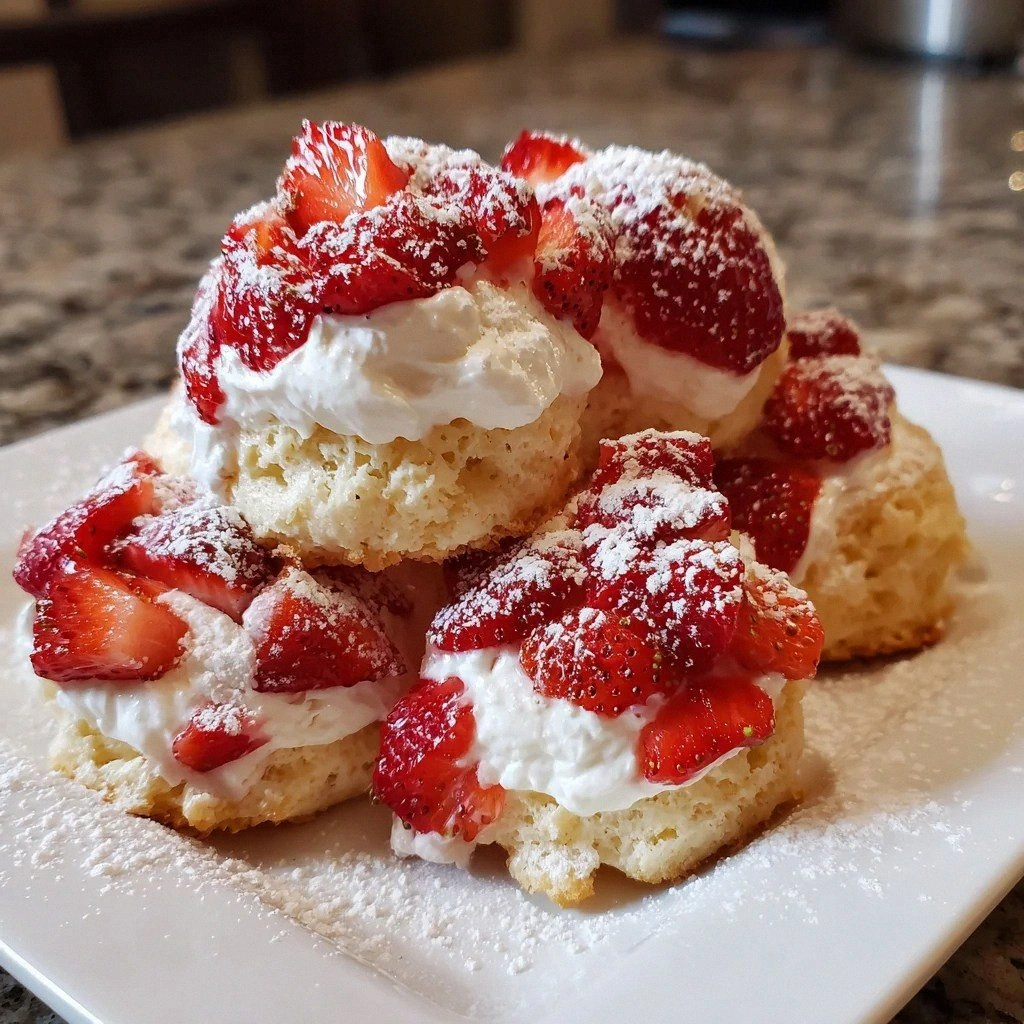
I'll be honest — the first time I attempted strawberry shortcake bites, I ended up with a tray of sad, soggy blobs that looked like they'd melted under interrogation. My friends still call them "the strawberry casualties of 2019." Fast forward through three summers, two broken whisks, and one minor oven fire, and I've finally cracked the code to the most addictive, pop-in-your-mouth strawberry shortcake bites you'll ever make at home. These little beauties have crispy edges that shatter like thin ice, giving way to tender, buttery centers studded with jammy strawberry gems that burst with summer sunshine in every bite.
Picture this: it's 2 a.m., I'm in my pajamas, standing over the kitchen counter like a dessert-obsessed goblin, popping these warm bites straight from the baking sheet. The smell of vanilla and caramelized berries wraps around me like a cozy blanket, and I can't stop. I won't stop. The outside has that perfect shortcake crunch, the inside stays cloud-soft, and the strawberries? Oh, they've transformed into ruby jewels of concentrated flavor that make store-bought versions taste like cardboard impersonators. I dare you to taste these and not go back for seconds, thirds, and maybe breakfast the next morning.
Most recipes get strawberry shortcake completely wrong. They treat it like some delicate princess that needs coddling, resulting in bland, cakey disappointments that collapse under the weight of their own mediocrity. Not here. We're building flavor like construction workers on a mission — layering butter, sugar, and strawberry essence into every molecule. The game-changer? Cold butter worked into the flour like you're making the world's most rebellious pie crust, creating flaky pockets that catch strawberry syrup like edible treasure chests. Stay with me here — this is worth it.
Okay, ready for the game-changer? These mini treats deliver all the glory of traditional strawberry shortcake but in party-perfect portions that won't leave you comatose on the couch. They're designed for real life: quick enough for Tuesday night cravings, impressive enough for your snobby foodie friends, and sturdy enough to survive a picnic basket adventure. Let me walk you through every single step — by the end, you'll wonder how you ever made it any other way.
What Makes This Version Stand Out
Flaky Factor: We're using the biscuit method on steroids — cold butter cut into flour creates layers so delicate they make croissants jealous. Each bite delivers a thousand buttery shards that dissolve on your tongue like edible snowflakes, while the interior stays tender and moist. It's the textural equivalent of wearing silk pajamas while eating clouds.
Strawberry Intensity: Instead of just folding in plain berries, we macerate them first with sugar and a touch of balsamic vinegar. This concentrates their flavor into syrupy ruby bombs that taste like strawberry essence injected with pure summer. The result? Fruit that actually tastes like strawberries instead of those watery imposters from the grocery store.
Size Matters: Bite-sized portions mean maximum crispy edge-to-soft center ratio. Every piece gets those caramelized golden edges that provide the perfect contrast to the tender interior. Plus, you can eat six and still feel virtuous because "they're so tiny!"
Make-Ahead Magic: These little champions freeze beautifully. Make a double batch, freeze them on a tray, then store in bags for instant dessert emergencies. Future you will thank present you when 2 a.m. cravings strike or unexpected guests show up. Just bake from frozen and add five extra minutes — pure magic.
Crowd Psychology: There's something about miniature food that makes people lose their minds. Serve these at a party and watch grown adults turn into competitive vultures, hovering around the platter and timing their grabs. I've seen friendships tested over the last bite.
Ingredient Integrity: No artificial flavors, no weird stabilizers, no "strawberry-flavored" nonsense. Just real butter, real cream, real berries. It's amazing how many recipes try to cut corners and end up tasting like disappointment and regret.
Technique Triumph: Most people overwork their dough, resulting in tough little hockey pucks. We treat ours like a delicate flower — mixing just until it comes together, then letting it rest. The result is so tender it practically melts on your tongue. Alright, let's break down exactly what goes into this masterpiece...
Inside the Ingredient List
The Flavor Base
All-purpose flour might seem boring, but it's the backbone that holds everything together. I use a moderate-protein flour because it gives enough structure without turning our bites into doorstops. The key is keeping it cold — warm flour absorbs butter too quickly, killing those precious flaky layers we're working so hard to create. If you only have self-rising flour, skip the baking powder but know you're playing with fire because the salt ratios are different.
Granulated sugar does more than sweeten — it creates tiny air pockets as it melts, contributing to that tender crumb we're after. I use regular white sugar because brown sugar would make these taste like strawberry coffee cake, which is delicious but not what we're making. The sugar also helps draw moisture from the strawberries during maceration, creating that syrupy elixir of the gods. Don't even think about cutting back — these are dessert, not diet food.
The Texture Crew
Baking powder is your rise-and-shine friend that creates lift without the fuss of yeast. Make sure it's fresh — if it's been sitting in your pantry since the Obama administration, treat yourself to a new can. The reaction starts as soon as it hits liquid, so work quickly once you add the cream. I once used expired baking powder and ended up with strawberry shortcake hockey pucks that could've been used as weapons.
Cold unsalted butter is the diva of this operation. It needs to stay cold enough that your hands don't melt it while you work, but not so hard that you can't cut it into the flour. I cube mine and pop it in the freezer while I prep everything else. The butter creates steam pockets as it melts in the oven, giving us those glorious layers. If you've only got salted butter, reduce the added salt by half.
The Unexpected Star
Fresh strawberries are non-negotiable. Frozen ones turn into sad, mushy casualties that bleed pink tears all over your beautiful dough. Look for berries that smell like summer and have that deep red color that promises flavor bombs. I like smaller berries because they distribute better throughout the bites. Pro tip: taste one before committing — if it tastes like water, your shortcake will too.
Heavy cream brings everything together with its luxurious fat content. Don't substitute milk or half-and-half unless you want sad, dry bites that taste like regret. The cream's fat coats the flour proteins, limiting gluten development and keeping things tender. Plus, it helps create that gorgeous golden exterior that makes people weak in the knees.
The Final Flourish
Vanilla extract might seem optional, but it's like adding a warm hug to your flavor profile. Use the good stuff — imitation vanilla tastes like chemicals and broken dreams. Just a teaspoon enhances the strawberry flavor without announcing itself. It's the supporting actor that makes the star shine brighter. If you're feeling fancy, scrape in some vanilla bean seeds for those beautiful black specks.
Powdered sugar for dusting isn't just for looks — it melts slightly on the warm bites, creating a whisper-thin glaze that adds just enough sweetness. A little goes a long way, and you can always add more if you've got a serious sweet tooth. It's also great for hiding any imperfections if your bites come out looking like abstract art.
Everything's prepped? Good. Let's get into the real action...
The Method — Step by Step
- Start by macerating your strawberries because this is where the magic begins. Dice them into small pieces — think blueberry-sized — and toss them with two tablespoons of sugar and a whisper of balsamic vinegar. Let them sit while you prep everything else. You'll watch them transform from firm fruit into ruby jewels swimming in their own syrupy elixir. That sizzle when the sugar hits the berries? Absolute perfection. This step concentrates the flavor and prevents your bites from becoming soggy strawberry cemeteries.
- Whisk together your dry ingredients like you're conducting a tiny flour orchestra. Combine the flour, remaining sugar, baking powder, and salt in a large bowl. Use a whisk to break up any lumps — this isn't just mixing, it's aerating. You want everything distributed evenly because nobody likes biting into a pocket of baking powder. I like to whisk for a full thirty seconds while mentally preparing myself for the butter-cutting workout ahead.
- Now comes the fun part — incorporating the butter. Use a pastry cutter, two knives, or your fingertips to cut the cold butter into the flour. You're aiming for pea-sized pieces that look like coarse crumbs with some larger flakes. This is the moment of truth where flaky layers are born or die. Work quickly because warm hands are the enemy of good pastry. If your kitchen is hot, chill the bowl for ten minutes first.
- Time to bring in the cream — but don't just dump it in! Make a well in the center of your flour mixture and pour in about three-quarters of the cream. Use a fork to gently incorporate, pulling flour from the sides. The dough should look shaggy and barely come together. Add more cream a tablespoon at a time until it holds when squeezed. This next part? Pure magic. Don't overmix or you'll activate the gluten and end up with strawberry-flavored rubber.
- Fold in the macerated strawberries with the gentle touch of a pastry surgeon. Use a spatula and fold rather than stirring to prevent crushing the berries. You want them distributed throughout, but not so thoroughly mixed that everything turns pink. Those pockets of concentrated strawberry goodness are what make people close their eyes in bliss when they bite in. If the dough seems too wet, sprinkle in a tablespoon of flour.
- Turn the dough onto a lightly floured surface and pat it into a rectangle about three-quarters of an inch thick. Use your fingertips rather than a rolling pin — this keeps the butter cold and prevents overworking. The dough will be sticky and seem like a disaster, but trust the process. Fold it in thirds like a letter, then pat it out again. This creates those coveted layers that make professional bakers weep with joy.
- Use a small biscuit cutter or shot glass to cut out your bites. Place them on a parchment-lined baking sheet with space between for expansion. Gather the scraps gently, pat them together, and cut more — but know that second-generation bites will be slightly tougher. Embrace the rustic charm. If you've ever struggled with tough biscuits, you're not alone — and I've got the fix.
- Brush the tops with a little cream and sprinkle with coarse sugar for that professional bakery shine. This creates a crisp, golden crust that shatters like caramelized glass. Don't skip this step — it's the difference between homemade and "holy grail" status. The sugar also helps balance the tart berries in the most harmonious way.
- Bake in a preheated 400°F oven for 12-15 minutes, but start checking at 10 minutes. You're looking for golden-brown tops and bottoms that sound hollow when tapped. The edges should be caramelized and slightly darker than the centers. Don't walk away from the oven here — they go from perfect to burnt in the blink of an eye. When they're done, they'll smell like strawberry fields had a baby with a French bakery.
- Let them cool for five minutes on the pan — this is the hardest part because they smell incredible. Transfer to a wire rack and dust with powdered sugar while still slightly warm. The sugar will melt into a whisper-thin glaze. Serve them warm if you want to change someone's life, or at room temperature if you're feeling patient. Either way, prepare for people to lose their minds.
That's it — you did it. But hold on, I've got a few more tricks that'll take this to another level...
Insider Tricks for Flawless Results
The Temperature Rule Nobody Follows
Here's the thing that separates the amateurs from the legends: temperature control is everything. Your ingredients should be cold enough that your fingers ache slightly when you work with them. I keep a bowl of ice water nearby and dip my hands if they get too warm. The butter should stay in solid pieces until it hits the oven — that's what creates steam pockets for lift. If your kitchen is warmer than 75°F, consider working in batches and chilling the dough between steps. I learned this the hard way after a summer batch that spread into sad, flat puddles.
Why Your Nose Knows Best
Don't trust the timer — trust your nose. When these bites are perfectly done, your kitchen will smell like a strawberry fairytale exploded in the best way possible. It's a warm, sweet aroma with caramel undertones that makes neighbors knock on your door. If you smell even a hint of burning, get them out immediately. The edges should be deep golden, not brown — brown means bitter, and bitter means you've ruined Christmas (or at least dessert).
The 5-Minute Rest That Changes Everything
I know you're tempted to dig in immediately, but those five minutes of cooling time are crucial. The starches are still setting, the flavors are melding, and the texture is reaching its peak. It's like letting a steak rest — patience pays off in spades. During this time, the exterior firms up while the interior stays tender. Break this rule and you'll burn your mouth while the centers collapse into mush. Good things come to those who wait, and great things come to those who wait five minutes.
Storage Secrets of the Pros
If you somehow have leftovers (I've heard this happens to other people), store them in a paper towel-lined container at room temperature for up to two days. The paper towel absorbs excess moisture and keeps the exterior crisp. Never refrigerate — cold is the enemy of texture, turning your beautiful bites into sad, soggy shadows of their former glory. For longer storage, freeze them on a tray, then transfer to bags. Reheat in a 350°F oven for 5-7 minutes and they'll taste freshly baked.
Creative Twists and Variations
This recipe is a playground. Here are some of my favorite ways to switch things up:
Balsamic Berry Blast
Add a tablespoon of aged balsamic to the macerating berries. It sounds weird until you taste it — the balsamic concentrates down into a complex, almost wine-like flavor that makes grown foodies weep. The acidity balances the sweetness and adds depth that makes people ask "what's your secret?" Just don't tell them it's vinegar or they'll look at you like you've lost your mind.
Lemon Verbena Dream
Throw a few lemon verbena leaves into the cream while you prep everything else. Let it steep for 30 minutes, then strain before using. The subtle citrus note plays beautifully with strawberries, creating a sophisticated flavor profile that tastes like summer in the Hamptons. If you can't find lemon verbena, lemon zest works too, but verbena is worth tracking down.
Chocolate Chunk Chaos
Fold in some chopped dark chocolate along with the strawberries. Use good quality chocolate — at least 70% — because life is too short for waxy chocolate. The chocolate melts into little pockets of decadence that create flavor fireworks with the berries. This version is particularly deadly when served warm, when the chocolate is still molten and the strawberries are jammy.
Coconut Cream Paradise
Replace half the cream with full-fat coconut milk and add shredded coconut to the dough. The coconut toasts as it bakes, creating little crispy bits that add texture and tropical flavor. It's like strawberry shortcake went on vacation to Hawaii and came back with a tan and stories you'll never believe.
Black Pepper Surprise
Add a few cracks of fresh black pepper to the strawberry mixture. The heat enhances the berry flavor in ways that defy explanation — it's not spicy, just more strawberry somehow. This is my secret weapon for converting skeptics who think strawberry shortcake is boring. The pepper adds complexity without being identifiable, making people scratch their heads and reach for another bite.
Almond Extract Elegance
Replace the vanilla with half almond extract. The combination of strawberry and almond is classic for a reason — they complement each other like old friends who finish each other's sentences. Just go easy — almond extract is potent stuff, and too much will make your bites taste like cherry cough drops. A quarter teaspoon is plenty for the whole batch.
Storing and Bringing It Back to Life
Fridge Storage
First rule: these never go in the fridge unless you enjoy eating strawberry-scented sponges. The cold kills the texture faster than you can say "leftovers." Keep them at room temperature in an airtight container with a paper towel to absorb moisture. They'll stay good for 2-3 days, though I've never seen them last more than 24 hours in any household with functioning taste buds.
Freezer Friendly
These freeze beautifully if you do it right. Arrange them in a single layer on a baking sheet and freeze until solid, then transfer to freezer bags. They'll keep for up to three months, though I question your self-control if you can resist them that long. Bake from frozen at 375°F for 15-18 minutes. The centers might take a bit longer to heat through, but the edges get even crispier this way.
Best Reheating Method
Skip the microwave unless you enjoy rubbery disappointment. Instead, pop them in a 350°F oven for 5-7 minutes until warmed through. If they seem dry, place a small oven-safe dish of water on the rack below — the steam will revive them without making them soggy. For the ultimate indulgence, split them and add a scoop of vanilla ice cream. The contrast of warm cake and cold ice cream creates a dessert that might be illegal in some states.