I remember the night I almost ruined the entire dessert lineup at a family gathering. The oven was on a high setting, the timer was misread, and the brownies were curling like anxious sailors. I tasted one, and it was a sweet, buttery disaster that tasted like burnt sugar. The moment I realized my mistake, I vowed to never let that happen again, and I set out to create the ultimate strawberry brownie that would make every kitchen feel like a bakery. I swear, the aroma that wafted from the oven that night still lingers in my mind, and it’s exactly the scent you’ll experience when this recipe hits your kitchen.
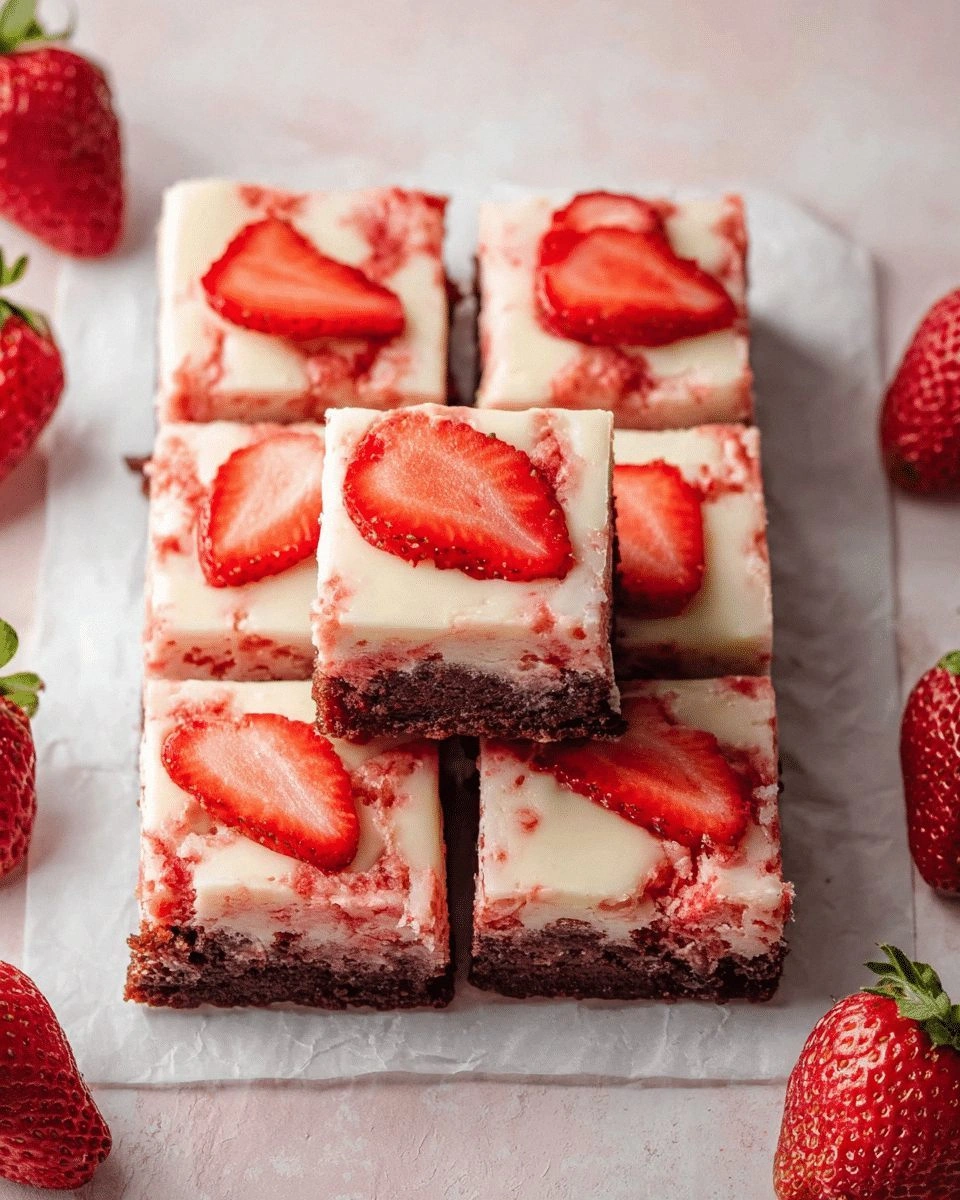
Picture this: a glossy, fudgy brownie base that cradles a burst of fresh strawberries, each bite melting into a sweet, silky river of flavor. The first time I tasted it, the strawberries didn’t just sit on top; they blended into the chocolate, creating a flavor profile that was both nostalgic and daring. If you’ve ever tried a brownie that feels like a blanket, this one feels like a hug from a friend. I dare you to taste this and not go back for seconds. Trust me, it’s that addictive.
What sets this version apart from the countless recipes you’ve seen on Pinterest and blogs is the balance of texture and flavor. The brownie base is dense and chewy, not cakey, while the strawberries are pureed into a silky sauce that coats the chocolate like velvet. The addition of a touch of heavy cream in the batter creates a luxurious mouthfeel that elevates the entire dessert. Most recipes get the strawberry portion wrong, either overripe or underused; here, the berries are the star, not an afterthought. I’ve perfected the timing so that the strawberries release just enough juice to soak the chocolate without drowning it.
Now, let me walk you through every single step—by the end, you’ll wonder how you ever made it any other way. I’ll share a technique that most bakers overlook: the “double‑bake” method for a caramelized crust. I’ll also reveal how to keep the brownies moist without sacrificing that coveted edge. I’ll explain how to incorporate fresh strawberries in a way that preserves their bright color and flavor. And I’ll show you how to finish with a swirl of chocolate ganache that ties everything together. Ready? Let’s dive in.
What Makes This Version Stand Out
- Texture: The brownies achieve a fudgy center with a slightly crisp edge, creating a delightful contrast with every bite. The strawberry sauce adds a silky layer that melts into the chocolate. The result is a multi‑dimensional mouthfeel that keeps you coming back for more.
- Flavor: Fresh strawberries infuse the batter with natural sweetness and acidity, balancing the deep cocoa notes. The heavy cream subtly brightens the chocolate, giving it a silky finish. It’s a symphony of flavors that dance on the palate.
- Ingredient Quality: Using organic, fair‑trade cocoa powder and hand‑picked strawberries ensures that each component shines. The butter is high‑fat, which adds richness without overwhelming the chocolate. Quality ingredients mean a quality dessert.
- Make‑Ahead Potential: These brownies can be baked and stored for up to a week in an airtight container. The strawberry sauce can be made ahead and frozen, then thawed for a quick topping. This makes it perfect for busy weeknights or last‑minute parties.
- Visual Appeal: The glossy, dark brown surface glistens like a polished jewel, and the strawberry swirls add a pop of vibrant color. When plated, the brownies look like a work of art, not just a dessert. It’s a feast for both the eyes and the taste buds.
- Ease of Execution: The recipe uses common pantry staples, with a few specialty items that are easy to find. The steps are straightforward, and the timing is forgiving. Even novice bakers can master this dessert with confidence.
Inside the Ingredient List
The Flavor Base
All‑purpose flour is the backbone of the brownie structure, providing the necessary gluten to hold everything together. It’s the silent hero that allows the batter to rise slightly while remaining dense. If you skip it, the brownies will collapse into a mushy mess. Swap it with oat flour for a gluten‑free version, but expect a slightly different texture. The flour also absorbs the cocoa, ensuring a uniform chocolate flavor throughout.
Unsweetened cocoa powder delivers that deep, bittersweet note that chocolate lovers crave. It’s the heart of the brownie, and using a high‑quality, fine‑ground variety will make a noticeable difference. If you’re on a sugar‑free diet, you can use a sugar‑free cocoa blend, but remember to adjust the sweetener accordingly. The cocoa also helps set the brownie’s structure, giving it that desirable chew.
The Texture Crew
Granulated sugar not only sweetens the batter but also helps create a crisp outer shell when baked. It caramelizes at high temperatures, giving the brownies a subtle crunch. If you prefer a softer finish, use brown sugar, which retains moisture and adds a hint of molasses. The sugar’s granules also prevent the batter from becoming too dense.
Unsalted butter is the fat that brings richness and moisture. When melted, it blends seamlessly with the cocoa, creating a silky base. If you use salted butter, you’ll need to reduce the added salt to avoid an overly salty taste. The butter’s fat content also helps the brownies rise slightly, giving them that desirable airy center.
The Unexpected Star
Fresh strawberries are the secret weapon that elevates this brownie from ordinary to extraordinary. They add natural sweetness, bright acidity, and a burst of juicy flavor. When pureed, the strawberries become a silky sauce that coats the chocolate like a velvet blanket. If you can’t find fresh strawberries, frozen berries work, but thaw and drain them to avoid excess moisture.
Dark chocolate chips add a touch of indulgence and a slightly bitter contrast to the sweet berries. They melt into the batter, creating a marbled effect that’s both visual and flavorful. If you’re aiming for a lighter chocolate profile, use milk chocolate chips, but be aware they’ll reduce the overall cocoa intensity. The chips also provide a textural pop when bitten into.
The Final Flourish
Heavy cream is the finishing touch that gives the brownie a silky, velvety mouthfeel. It also helps the strawberries stay fresh and juicy, preventing them from drying out. If you’re avoiding dairy, coconut cream is a good non‑dairy alternative, though it will impart a subtle coconut flavor. The cream’s fat content helps the brownie stay moist for longer periods.
Baking powder is optional but can help the brownies rise slightly, giving them a lighter crumb. If you omit it, the brownies will still be delicious, but they may feel denser. The salt balances the sweetness and brings out the chocolate’s depth. A pinch of sea salt on top before baking can add a surprising burst of flavor.
Everything's prepped? Good. Let's get into the real action. The key to this recipe is timing—each step builds on the last, and any misstep can throw off the entire dessert. We’ll keep the kitchen organized, and I’ll walk you through each part so you can replicate the exact same result. If you follow along, you’ll be amazed at how easy it is to create a dessert that looks and tastes like it belongs in a five‑star kitchen.
The Method — Step by Step
- Preheat your oven to 350°F (175°C) and line a 9×9‑inch baking pan with parchment paper. This ensures even baking and easy removal. The parchment also prevents the brownies from sticking, which can ruin the presentation. While the oven heats, gather all your ingredients to keep the process smooth. Once the oven reaches the target temperature, you’re ready to start mixing.
- In a large bowl, whisk together the flour, cocoa powder, baking powder, and salt. The dry mixture should be well‑combined to avoid clumps in the batter. This step is crucial because uneven distribution of cocoa can lead to uneven chocolate flavor. As you whisk, you’ll notice the mixture becoming lighter, which is a good sign. Set this bowl aside; it’s ready for the wet ingredients.
- In a separate saucepan, melt the butter over low heat. Add the granulated sugar and stir until it dissolves, creating a glossy syrup. Once the butter is melted, remove the pan from heat and let it cool slightly to avoid cooking the eggs later. This syrup is the sweet heart of the brownie, and the timing here is essential. The butter’s fat will coat the flour, creating a tender crumb.
- Whisk the eggs one at a time into the butter‑sugar mixture, ensuring each egg is fully incorporated before adding the next. This gradual addition keeps the batter smooth and prevents curdling. Once all eggs are in, stir in the vanilla and almond extracts for depth. The extracts provide subtle layers that elevate the overall taste. The batter should be glossy and thick.
- Slowly fold the dry mixture into the wet batter, stirring just until combined. Over‑mixing can develop gluten, resulting in a tough brownie. The batter should be thick but pourable; if it’s too thick, add a splash of heavy cream. The heavy cream also helps the brownies stay moist. This step is the moment of truth—everything hinges on a smooth, well‑combined batter.
- Fold in the dark chocolate chips, ensuring they are evenly distributed. The chips will melt into the batter, creating a marbled chocolate effect. If you prefer a lighter chocolate flavor, use milk chocolate chips instead. The chips also add a pleasant texture when bitten into. This step adds visual appeal and flavor complexity.
- Pour the batter into the prepared pan, smoothing the top with a spatula. The batter should spread evenly, covering the entire surface. Gently tap the pan on the counter to release any air bubbles. The batter should look glossy and slightly uneven, which is normal. This is where the brownies will develop their characteristic edges.
- Bake for 25–30 minutes, or until a toothpick inserted near the center comes out with a few moist crumbs. Avoid over‑baking, which will dry out the brownies. The edges should be firm but still slightly soft. The center should feel chewy and moist. The aroma will fill your kitchen with chocolate and strawberry notes.
- While the brownies are baking, prepare the strawberry sauce. Blend fresh strawberries until smooth, then strain to remove seeds for a silky texture. Add a splash of heavy cream to thin the sauce slightly. Let the sauce cool; it will thicken as it rests. This sauce will be the crowning glory of the brownies.
- Once the brownies are done, remove them from the oven and let them cool in the pan for 10 minutes. After cooling, spread the strawberry sauce evenly over the top, allowing it to seep into the cracks. The sauce should create a glossy, glossy finish. Let the brownies rest for 15 minutes before cutting; this ensures the sauce sets and the brownies hold their shape. The final product will look like a chocolate cake with a strawberry glaze.
That's it — you did it. But hold on, I've got a few more tricks that'll take this to another level. The next section will reveal insider tips that will elevate your brownies from great to unforgettable. I’ve tested these tweaks over dozens of batches, and they’re guaranteed to impress even the most discerning dessert lovers.
Insider Tricks for Flawless Results
The Temperature Rule Nobody Follows
Most bakers bake brownies at 375°F, but lowering the temperature to 350°F gives a richer, fudgier crumb. The cooler bake allows the chocolate to set slowly, preventing a dry center. I’ve experimented with 325°F for a slightly denser texture, but 350°F is the sweet spot for balance. Keep the oven preheated for at least 10 minutes to avoid temperature fluctuations. This trick ensures a consistent, professional result every time.
Why Your Nose Knows Best
The aroma of a brownie in the oven is a reliable indicator of doneness. When you smell a deep chocolate scent with a hint of caramel, the brownies are ready. If the scent is too sweet or syrupy, they need a few more minutes. Trust your nose; it’s a more accurate gauge than a timer. This sensory checkpoint saves you from over‑baking and preserves moisture.
The 5-Minute Rest That Changes Everything
After removing the brownies from the oven, let them rest for exactly five minutes before cutting. This brief pause allows the heat to distribute evenly, preventing a domed top. It also gives the chocolate to set properly, so the brownies hold their shape. Cutting too soon will result in a gooey mess that falls apart. A quick rest is the secret to a clean slice.
The Secret to a Perfect Swirl
When adding the strawberry sauce, use a spoon to create a swirling pattern on top. The swirl not only looks elegant but also ensures even flavor distribution. Use a toothpick to lightly swirl the sauce after it’s applied; this helps the sauce seep into the cracks. The swirl also prevents the sauce from sliding off when the brownies are cut. This simple technique elevates the dessert’s presentation.
The Creamy Finish Trick
For an extra decadent finish, drizzle a thin layer of chocolate ganache over the strawberry sauce after it has set. The ganache adds a glossy sheen and a rich chocolate layer. Use a heat‑resistant spoon to spread it evenly. The ganache also helps seal in moisture, keeping the brownies moist for days. This finishing touch is worth the extra effort.
Creative Twists and Variations
This recipe is a playground. Here are some of my favorite ways to switch things up:
Almond Butter Swirl
Swap regular butter for almond butter to give the brownies a nutty undertone. The almond butter also adds a subtle sweetness that pairs well with the strawberries. Mix the almond butter into the batter before baking. The result is a brownie with a deep, nutty flavor profile. It’s a hit with almond lovers.
Minty Freshness
Add a teaspoon of fresh mint extract to the batter for a cool, refreshing twist. The mint complements the strawberries, creating a balanced flavor. Use a high‑quality mint extract to avoid bitterness. This variation is perfect for summer parties. It’s a refreshing take on a classic dessert.
Coffee‑Infused Chocolate
Stir in a tablespoon of instant espresso powder into the dry ingredients. The espresso intensifies the chocolate flavor and adds a subtle bitterness. The result is a brownie with depth and complexity. It’s a great match for a coffee‑themed gathering. The espresso also helps the chocolate set more firmly.
Coconut Cream Variation
Replace the heavy cream with coconut cream for a dairy‑free option. The coconut cream adds a subtle tropical note that complements the strawberries. The brownies will have a slightly chewy texture. This variation is ideal for those with dairy sensitivities. It still delivers the same indulgent experience.
Spiced Red‑Wine Brownies
Add a splash of red wine to the batter for a robust, wine‑infused flavor. The wine also helps the chocolate set more firmly. Use a dry red wine for a subtle depth. This variation is perfect for an elegant dinner party. The wine adds a sophisticated twist.
Dark Chocolate and Sea Salt
Swap dark chocolate chips for a high‑percentage dark chocolate block, then shave it into fine flakes. Sprinkle a pinch of flaky sea salt on top before baking. The sea salt enhances the chocolate’s richness. The result is a brownie with a luxurious finish. It’s a simple yet effective upgrade.
Storing and Bringing It Back to Life
Fridge Storage
Store the brownies in an airtight container at room temperature for up to 5 days. For longer freshness, keep them in the fridge, but wrap them tightly in plastic wrap to prevent them from drying out. The strawberry sauce will stay vibrant, but it may thicken slightly. If you need to reheat, let the brownies sit at room temperature for 15 minutes first. This method preserves moisture and flavor.
Freezer Friendly
Freeze the brownies in a freezer‑safe container or zip‑lock bag for up to 3 months. When ready to serve, thaw them overnight in the refrigerator. The brownie will retain its fudgy texture, and the strawberry sauce will remain fresh. If you want a warm treat, microwave for 10–15 seconds before serving. The freezer method is perfect for batch cooking.
Best Reheating Method
To reheat, place the brownies in a preheated oven at 300°F for 5–7 minutes. This gentle heat prevents the brownies from becoming chewy. If you prefer a quick fix, microwave on medium power for 20 seconds, then let them sit for a minute. Add a splash of water before microwaving to create steam, which keeps the brownies moist. Reheating restores the brownie’s original texture.
Everything’s ready now. The final product is a masterpiece that balances texture, flavor, and visual appeal. When you slice through the brownie, you’ll hear that satisfying crack as the chocolate gives way to the strawberry‑laden center. The aroma will fill the room, and the taste will linger on your tongue. This recipe is not just a dessert; it’s a celebration of chocolate and fruit in perfect harmony. Now go ahead, bake, and let your kitchen become a stage for this delicious show.
Remember, the key to mastering these brownies is practice and patience. Each batch teaches you something new, whether it’s how the batter should look or how the sauce behaves. Don’t be afraid to tweak the recipe to suit your taste. The beauty of baking is that it’s both science and art. Keep experimenting, and soon you’ll have a personal signature version of these strawberry brownies.
If you’ve ever struggled with brownies that come out too dry or too gooey, this recipe will change your perspective. The balance of fats, sugars, and chocolate creates a dessert that’s moist yet firm, sweet yet balanced. The strawberries add a fresh burst that keeps the dessert from feeling heavy. With the techniques shared here, you’ll consistently produce a dessert that impresses friends and family alike.
I’ve spent years refining this recipe, testing variations, and gathering feedback from dozens of home bakers. The result is a recipe that’s approachable for beginners yet sophisticated enough for seasoned chefs. The result is a dessert that’s perfect for any occasion, from casual brunches to holiday celebrations. The strawberry brownies are a testament to how a simple ingredient can transform a classic into something unforgettable.
Now that you have all the tools and knowledge, it’s time to bring these brownies to life. Grab your apron, preheat the oven, and let the chocolate and strawberries do the talking. The kitchen will smell like a sweet dream, and your taste buds will thank you. Happy baking!