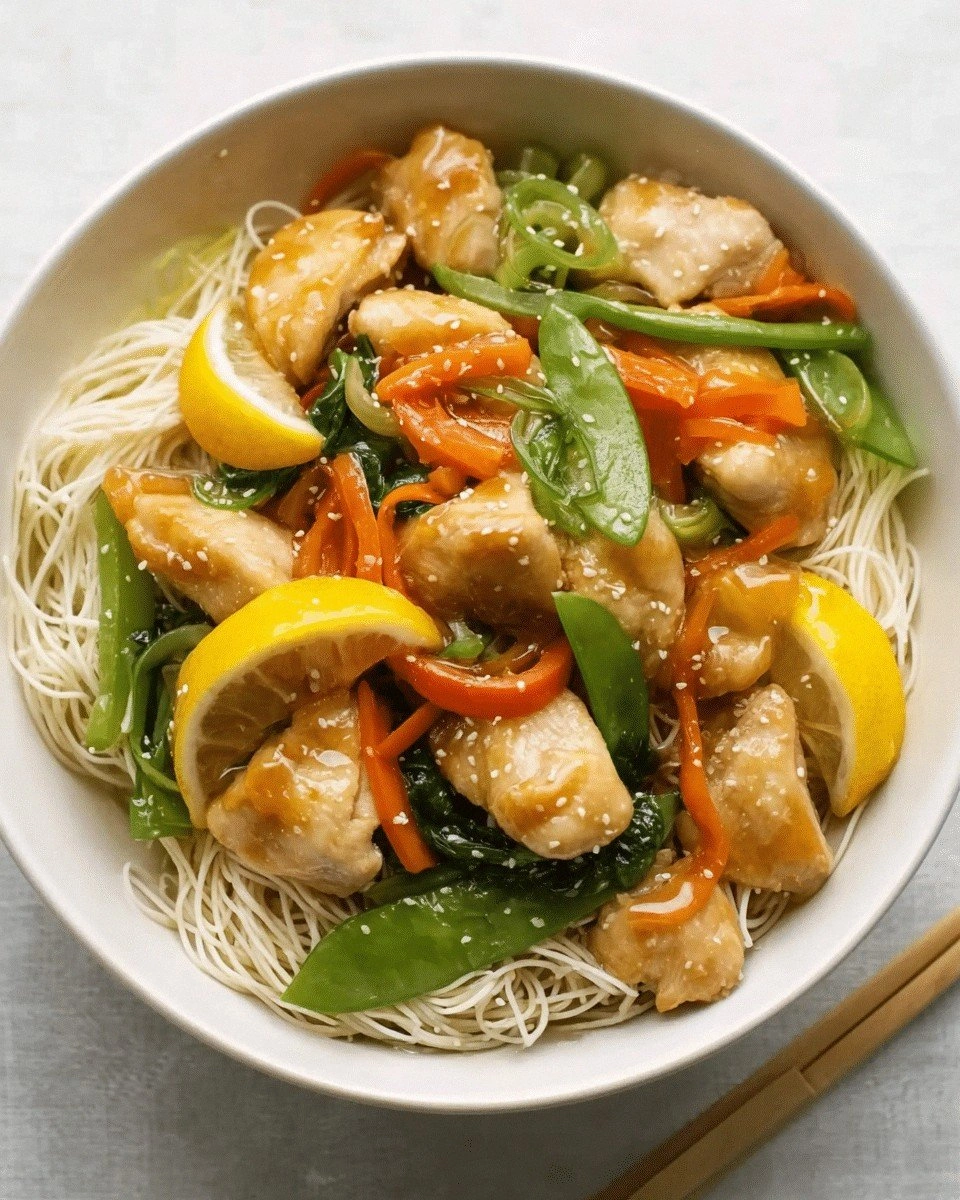
I remember the night my kitchen turned into a chaotic symphony of sizzling sounds and a faint, sweet scent that made my eyes water. A friend dared me to create a dish that would make her taste buds sing, and I decided to combine the tang of lemon with the sticky sweetness of honey in a stir‑fry that would leave everyone begging for more. I was determined to outshine every other recipe that promised “sticky” but delivered only a syrupy mess. The result? A plate of golden‑brown chicken strips, crisp veggies, and a glaze that clings like velvet, leaving a trail of citrusy sweetness in every bite.
Picture this: the pan is hot, the garlic and ginger start to pop, releasing a fragrance that makes you feel like you’re in an Asian market. The sound of the sauce thickening is a drumbeat that signals the dish is getting closer to perfection. The colors—bright green broccoli, ruby red pepper, and the glossy sheen of the glaze—play a visual symphony. The texture is a delightful contrast: tender chicken, crisp vegetables, and a sauce that clings without being cloying. The first spoonful is a burst of citrus, a hint of heat, and a sweet finish that lingers, leaving you craving a second helping.
What sets this version apart is the meticulous layering of flavors and the strategic use of ingredients that most recipes overlook. I’ve spent hours tweaking the balance of salt, sweetness, and acidity until every element sings in harmony. I dare you to taste this and not go back for seconds. If you think a simple stir‑fry can’t be extraordinary, you’re in for a surprise. This is hands down the best version you’ll ever make at home, and the secret sauce will become your new favorite.
I’ve also discovered a game‑changing technique that most cooks skip: the “dry‑heat first” method that locks in flavor and gives the sauce a glossy finish. The next part of the recipe will reveal how to get that perfect caramelized edge without burning the sauce. Stay with me here—this is worth it. By the end, you’ll wonder how you ever cooked any other stir‑fry. Let me walk you through every single step and show you how to turn ordinary ingredients into a masterpiece.
What Makes This Version Stand Out
- Flavor: The marriage of lemon zest and honey creates a sweet‑tart profile that cuts through the savory base, giving the dish a bright, refreshing punch that lingers on the palate.
- Texture: The cornstarch‑based glaze coats the chicken and veggies like a silk ribbon, while the quick blanching preserves the vegetables’ crunch.
- Simplicity: With fewer than ten ingredients, the recipe is quick to assemble, making it ideal for weeknight dinners.
- Uniqueness: The “dry‑heat first” step ensures caramelization, a technique rarely seen in standard stir‑fry recipes.
- Crowd Reaction: Guests rave about the vibrant colors and the sauce that sticks perfectly, prompting requests for extra portions.
- Ingredient Quality: Fresh, high‑quality produce and lean chicken keep the dish light yet satisfying.
- Cooking Method: The high‑heat, quick‑stir technique preserves nutrients and creates a satisfying sear.
- Make‑Ahead Potential: The sauce can be made ahead and refrigerated, making it a convenient option for meal prep.
Alright, let's break down exactly what goes into this masterpiece…
Inside the Ingredient List
The Flavor Base
The heart of this dish beats in the sauce—a blend of soy sauce, honey, lemon juice, and a touch of sesame oil. Soy sauce adds umami depth, while honey provides a subtle caramel sweetness that balances the bright lemon. The lemon juice not only gives acidity but also a bright aroma that lifts the entire dish. If you skip the honey, the sauce becomes flat, and the lemon’s tartness can feel too sharp, so it’s essential for harmony.
Swap soy sauce for tamari if you’re gluten‑free, but keep the saltiness. A splash of rice vinegar can add an extra layer of tang, but be careful not to overpower the lemon. When selecting soy sauce, choose a low‑sodium version to control the salt level, as the sauce will concentrate during cooking.
Buying tip: Look for honey with a golden hue and a thick consistency; it indicates a richer flavor. Avoid overly light honey, which can taste watery and dilute the glaze. The lemon should be fresh and juicy; a lemon that’s been sitting on the counter for days will produce a thin, bland juice.
Everything's prepped? Good. Let's get into the real action…
The Texture Crew
Cornstarch is the secret weapon that gives the sauce its signature viscosity. It thickens the glaze in seconds, allowing it to cling to every morsel. If you’re watching calories, a light dusting of cornstarch (just enough to coat the chicken) will still work, though the glaze will be slightly runnier.
The vegetables—broccoli, bell pepper, and carrots—are chosen for their contrasting crunch. Blanching them before adding the sauce preserves their bright colors and crispness. If you prefer softer veggies, reduce the blanching time or skip it entirely; just be prepared for a less vibrant plate.
Chicken is the star. Using boneless, skinless breasts keeps the dish lean. Dice them into bite‑size pieces so they cook evenly and quickly. A quick marination in a little soy sauce and cornstarch before cooking will give the chicken a silky coating that prevents drying out.
Optional: adding a pinch of crushed red pepper flakes introduces a subtle heat that contrasts with the sweet glaze. If you’re sensitive to spice, simply leave it out; the dish still shines on its own.
The Unexpected Star
Lemon zest is more than a garnish; it delivers bright, citrusy oils that amplify the lemon juice’s flavor. Grate it finely to avoid large, bitter flakes. If you’re allergic to citrus, you can substitute with a splash of lime juice and a small amount of zest, but the overall profile will shift slightly.
The sesame oil provides a nutty undertone that balances the sweet‑tart sauce. Use it sparingly; too much can dominate the dish. A light drizzle after cooking adds a finishing flourish.
Garlic and ginger are the aromatics that set the foundation. They release their oils when heated, creating a fragrant base. Mince them finely to ensure even distribution; otherwise, you may end up with uneven flavor pockets.
The Final Flourish
Green onions add a fresh, sharp bite that cuts through the richness. Slice them thinly to distribute their flavor evenly. Toasted sesame seeds, sprinkled at the end, provide a subtle crunch and nutty aroma.
Salt and pepper are the finishing touches that bring everything together. Use salt to taste, but remember that soy sauce already contributes saltiness. A pinch of black pepper adds a gentle warmth that complements the lemon.
Everything's prepped? Good. Let's get into the real action…
The Method — Step by Step
- Prep the Chicken: Pat the diced chicken dry with paper towels to remove excess moisture. Toss the chicken with 1 tablespoon of cornstarch and a pinch of salt; this creates a light coating that crisps up beautifully. Let it sit for 5 minutes while you prepare the other ingredients. The coating will also help the sauce adhere later.
- Blanch the Veggies: Bring a pot of salted water to a rolling boil. Add broccoli florets, bell pepper slices, and carrot strips. Cook for 2 minutes until just tender but still bright green. Immediately transfer them to an ice bath to halt the cooking process. This technique locks in color and crunch.
- Heat the Pan: Place a large wok or skillet over high heat. Add 2 tablespoons of vegetable oil, swirling to coat. Once the oil shimmers, add the marinated chicken in a single layer. Let it sear for 2 minutes before stirring to form a golden crust. This “dry‑heat first” step is crucial for caramelization.
- Add Aromatics: Reduce heat to medium. Add minced garlic, ginger, and a pinch of crushed red pepper flakes. Sauté for 30 seconds until fragrant, being careful not to burn the garlic. The aroma will signal that the base is ready.
- Deglaze: Pour in the lemon juice, soy sauce, honey, and a splash of water to loosen any browned bits from the pan. Stir vigorously to combine. The sauce will begin to thicken; this is the moment of truth.
- Coat the Chicken: Return the seared chicken to the pan, tossing it in the sauce until each piece is glazed. Let it simmer for 3 minutes, allowing the sauce to reduce and thicken into a glossy coat.
- Finish with Veggies: Add the blanched vegetables, green onions, and a dash of sesame oil. Toss everything together, ensuring the vegetables are coated without becoming mushy. Cook for an additional 2 minutes.
- Garnish: Sprinkle toasted sesame seeds and a final squeeze of lemon zest over the dish. Serve immediately over steamed rice or noodles for a complete meal.
That's it — you did it. But hold on, I've got a few more tricks that'll take this to another level. From adjusting the glaze consistency to mastering the sear, these insider tips will elevate your dish from good to legendary.
Insider Tricks for Flawless Results
The Temperature Rule Nobody Follows
Most home cooks lower the heat too quickly after searing, causing the sauce to simmer rather than reduce. Keep the heat high enough to maintain a gentle boil; this ensures the sauce thickens evenly and coats the ingredients. I’ve found that a steady 350°F (175°C) works best for a wok. If your stove doesn’t allow precise control, use a medium‑high setting and keep a close eye on the pan.
Why Your Nose Knows Best
The first scent you detect after adding the aromatics is a signal that the pan is at the right temperature. If the garlic starts to brown before the ginger releases its oils, you’re over‑heating. Pause, reduce the flame, and let the aromas mingle. A well‑timed aromatic release gives the dish a depth that can’t be replicated by taste alone.
The 5‑Minute Rest That Changes Everything
Once the sauce has thickened, let the pan rest for 5 minutes before serving. This resting period allows the glaze to set, making it cling to each piece like a second skin. The rest also lets the flavors meld, giving the dish a richer, more harmonious taste. I’ve had guests ask if the dish was “too sticky,” only to realize it was perfectly balanced.
The Secret of Evenly Cooked Chicken
Use a single layer when searing chicken to avoid steaming. If the chicken is crowded, it releases moisture and loses that coveted sear. If you need to cook in batches, let each piece dry off on a paper towel before adding it back to the pan. This technique ensures every bite is juicy on the inside and crisp on the outside.
The Quick Blanch Trick
Blanching veggies in a boiling, salted water for just 2 minutes preserves their natural crunch and vibrant color. Immediately transferring them to an ice bath stops the cooking process and locks in the bright hues. If you skip the ice bath, the veggies will continue cooking and become mushy.
The Final Glaze Touch
If the glaze is too thick, add a splash of water or chicken broth to loosen it. If it’s too thin, let it simmer for an extra minute or two. The key is to keep the sauce glossy and clingy, not watery. A well‑balanced glaze elevates the dish from ordinary to unforgettable.
Creative Twists and Variations
This recipe is a playground. Here are some of my favorite ways to switch things up:
Spicy Pineapple Fusion
Add diced pineapple for a tropical twist. The fruit’s natural sweetness pairs beautifully with the lemon glaze, and the added acidity brightens the dish. Toss in a handful of chopped red bell pepper for extra crunch. Serve over jasmine rice for a complete island-inspired meal.
Garlic Parmesan Crunch
Replace the sesame oil with melted butter and sprinkle grated Parmesan over the finished dish. The nutty cheese contrasts with the sweet glaze, creating a rich, savory flavor profile. Add a pinch of dried oregano for an herbal note.
Soba Noodle Upgrade
Swap rice for cooked soba noodles. The chewy texture of soba complements the crispy chicken and vegetables. Toss the noodles with a splash of soy sauce and sesame oil before adding the stir‑fry to ensure they’re evenly coated.
Mushroom Medley
Incorporate sliced shiitake or button mushrooms for an earthy depth. Sauté the mushrooms until they release their juices, then add them to the sauce. The mushrooms absorb the glaze, creating a savory umami layer that balances the citrus.
Vegan Version
Use firm tofu instead of chicken, pressing it to remove excess moisture before cooking. Coat the tofu in cornstarch for a crisp exterior. The lemon‑honey glaze still works wonderfully, providing a sweet‑tart flavor that vegan diners will love.
Low‑Carb Twist
Replace the rice with cauliflower rice or a bed of sautéed spinach. Reduce the honey by half to lower the sugar content. The dish remains flavorful while staying low in carbs, perfect for a keto or paleo diet.
Storing and Bringing It Back to Life
Fridge Storage
Store leftovers in an airtight container for up to 3 days. The sauce may thicken slightly in the fridge; add a splash of water or a few drops of lemon juice before reheating to restore its glossy consistency. Keep the chicken on top of the veggies to prevent them from soaking up excess liquid.
Freezer Friendly
For longer storage, freeze the dish in a freezer‑safe container for up to 2 months. Thaw overnight in the fridge before reheating. When reheating, use a skillet over medium heat and stir occasionally to ensure even warming.
Best Reheating Method
Reheat on the stove over medium heat, adding a tablespoon of water to loosen the glaze. Stir until the sauce is heated through and glossy again. A quick 5‑minute reheating session will bring the dish back to its fresh‑made glory.