I was standing in my kitchen, the stove roaring like a beast, when I realized my sandwich game was stuck in a rut. I had tried everything from grilled cheese to turkey club, but none of them sparked that electric thrill I craved. That night, a dare from a friend—“Make the most unforgettable sandwich or I’ll take you out to a fancy place”—sent a shiver down my spine. I stared at the chicken breasts on my counter, their pale skin shimmering like a secret waiting to be uncovered. The air smelled of fresh herbs and the promise of something daring. I knew the moment had arrived to rewrite sandwich lore.
Picture this: a sizzling pan, the sound of chicken hitting hot oil like a drumbeat, and the aroma of paprika and cayenne spiraling up to mingle with the faint sweetness of honey. I’ve spent countless afternoons in kitchens that feel more like laboratories than havens, but this recipe is a laboratory of love, not a maze of confusion. Each ingredient has been chosen for its role in a symphony of flavors—spicy, creamy, crunchy, and utterly irresistible. The sauce, a silky blend of mayo, hot sauce, lime, and cilantro, coats the bread like velvet, while the chicken delivers a bite that crackles with peppery heat. It’s the kind of sandwich that makes your taste buds do a happy dance and your eyes widen in disbelief. I dare you to taste this and not go back for seconds.
What makes this version stand out is not just the ingredients but the way they interact. I’ve taken the classic spicy chicken sandwich and turned it into a performance, with each component playing its part with precision. The bread isn’t just a vessel; it’s a character that rises to the occasion, with a buttery crust that shatters like thin ice. The sauce isn’t a sidekick; it’s the main act, drizzling across the chicken like a molten sunrise. The result? A sandwich that’s hands down the best version you’ll ever make at home, a dish that will have your friends begging for the recipe and your family refusing to eat anything else. I’ll be honest—I ate half the batch before anyone else got to try it. The rest? Well, that’s for you to discover.
Imagine pulling this sandwich out of the oven, the whole kitchen smelling incredible, the heat from the grill still lingering on the grill marks. Picture the moment your knife slides through the tender, juicy chicken, revealing a pink center that’s perfectly cooked. The crunch of the toasted bun, the burst of heat from the sauce, the coolness of fresh lettuce—all converge into a single bite that feels like a hug from a friend. This isn’t just a meal; it’s an experience, a memory in the making. And now, ready for the game‑changer? Let me walk you through every single step—by the end, you’ll wonder how you ever made it any other way.
What Makes This Version Stand Out
- Taste: The sauce balances heat with a subtle sweetness, creating a flavor profile that lingers on the palate. It’s not just spicy; it’s a layered experience that keeps you coming back for more.
- Texture: The chicken is crisp on the outside yet juicy inside, while the bun provides a buttery crunch that breaks apart with every bite.
- Ingredient Quality: Fresh, high‑grade chicken and real lime juice give this sandwich a depth that pre‑made sauces can’t match.
- Speed: From prep to plate, the entire process takes less than an hour, making it ideal for busy weeknights or a last‑minute dinner.
- Versatility: Swap the pepper jack for mozzarella or add avocado for a creamy twist—this base adapts to your mood.
- Crowd‑Pleaser: The combination of spicy, creamy, and crunchy elements makes it a hit at potlucks, game days, or any gathering.
Alright, let’s break down exactly what goes into this masterpiece…
Inside the Ingredient List
The Flavor Base
At the heart of this sandwich is the sauce—a creamy, fiery elixir that marries mayo, hot sauce, lime, and cilantro into a single, unforgettable dressing. The mayonnaise provides the silky foundation, while the hot sauce injects a bold kick that wakes up the palate. Lime juice adds a bright, citrusy tang that cuts through the richness, and fresh cilantro brings a herbaceous freshness that balances the heat. If you skip the lime, the sauce becomes cloyingly sweet; if you omit the cilantro, you lose the bright counterpoint that keeps everything from feeling heavy.
For those who prefer a milder version, reduce the cayenne pepper to a quarter teaspoon or swap the hot sauce for a milder chili paste. If you’re a fan of tangy flavors, add a splash of apple cider vinegar to the sauce for an extra zing. When selecting the mayo, look for one that’s smooth and unsweetened—this ensures the sauce stays clean and not overly sweet. A good tip: chill the sauce in the fridge for at least 30 minutes before assembling; this allows the flavors to meld and the texture to thicken.
Fun Fact: The origin of hot sauce dates back to the 1700s, when it was used as a preservative and flavor enhancer in the Caribbean. Today, it’s a staple in kitchens worldwide, offering a fiery punch that can turn any dish from ordinary to extraordinary.
The Protein Crew
The chicken is the star of the show—boneless, skinless breasts that are both lean and tender. Brining the chicken in a saltwater solution before cooking can dramatically improve its juiciness and flavor retention. If you can’t find fresh chicken, frozen works just fine; just thaw it completely to avoid uneven cooking. Skipping the brine may result in a drier final product, especially if you’re cooking the chicken at a high temperature.
When choosing your chicken, look for a firm texture with a slight pink hue—this indicates freshness. If you’re in a hurry, pre‑cooked rotisserie chicken can be a quick substitute, but the texture won’t match the freshly cooked version. A quick tip: pat the chicken dry with paper towels before seasoning; this helps the coating stick better and produces a crispier crust.
The Texture Crew
Flour, panko breadcrumbs, and buttermilk combine to create a coating that’s both crunchy and tender. The flour forms the first barrier, absorbing moisture and giving the coating a firm base. Panko breadcrumbs add a light, airy crunch that breaks apart with each bite, while buttermilk tenderizes the chicken and adds a subtle tang. If you’re avoiding gluten, substitute the flour with a gluten‑free blend or use almond flour for a nutty twist.
For a richer coating, add a pinch of smoked paprika to the flour mixture; it gives a deep, smoky undertone that pairs beautifully with the spicy sauce. If you’re watching calories, you can reduce the amount of panko and use a thin layer of crushed crackers instead. Remember, the coating is what holds the sauce together—skipping it will result in a soggy sandwich that loses its bite.
The Final Flourish
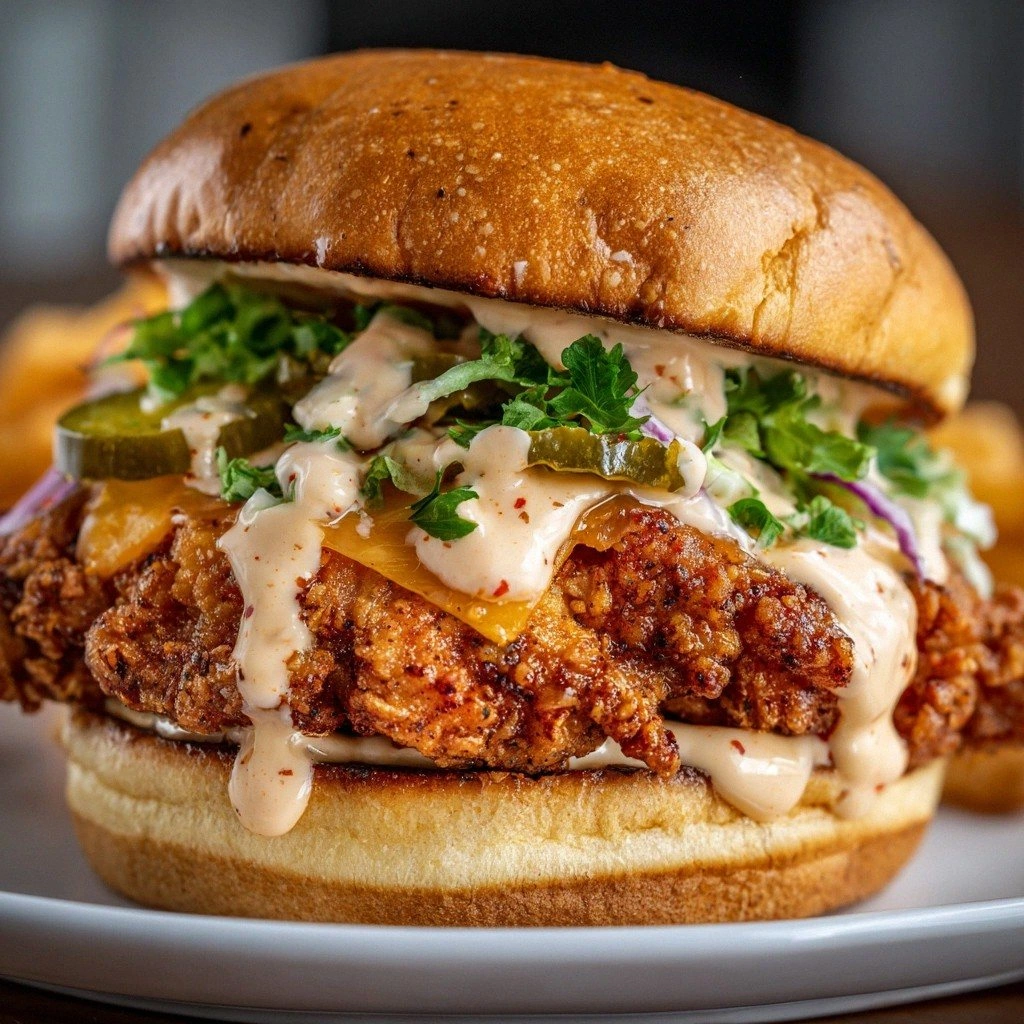
Fresh ingredients like lettuce, tomato, and cheese elevate the sandwich, adding crunch, freshness, and melty richness. Shredded lettuce provides a cool contrast to the hot chicken, while ripe tomato slices offer juicy bursts of acidity that cut through the creaminess. Pepper jack cheese adds a mild heat and a gooey texture that melts perfectly over the warm chicken. If you’re craving an extra layer of flavor, add a few slices of pickles or a spread of avocado for a creamy, tangy finish.
Choosing the right bun is crucial; a brioche bun offers a buttery sweetness that balances the heat, while a whole‑wheat roll adds a nutty undertone. If you prefer a lighter option, a ciabatta roll will give you a crisp exterior and a chewy interior. A quick hack: toast the bun lightly on a skillet before assembling; this seals the edges and prevents sogginess.
Everything’s prepped? Good. Let’s get into the real action…
The Method — Step by Step
- Prep the Chicken: Pat the chicken breasts dry with paper towels, then season both sides with salt, pepper, paprika, cayenne, garlic powder, and onion powder. This dry rub creates a flavor base that will cling to the coating. If you’re using a brine, let the chicken soak for at least 30 minutes before seasoning. This step is crucial for juicy, flavorful meat.
- Set Up the Dredging Station: In one shallow dish, whisk together the flour, a pinch of salt, and a dash of black pepper. In a second dish, whisk the buttermilk until smooth. In a third dish, combine the panko breadcrumbs with a sprinkle of smoked paprika for extra depth. This three‑step dredging station ensures each layer adheres perfectly.
- Coat the Chicken: Dip each seasoned breast first into the flour, then into the buttermilk, and finally into the panko mixture, pressing gently to secure the coating. The double‑dip method ensures a thick, crunchy crust that holds the sauce. If the coating looks uneven, let the coated chicken rest for a minute before cooking.
- Heat the Oil: Pour 2 tablespoons of olive oil into a large skillet and heat over medium‑high until shimmering. The oil should be hot enough that a drop of water sizzles on contact but not so hot that it burns. This temperature is key to achieving a crisp exterior without overcooking the interior.
- Fry the Chicken: Place the coated chicken in the skillet, being careful not to overcrowd. Cook for 4–5 minutes per side, or until golden brown and the internal temperature reaches 165°F (74°C). The sizzle you hear is the sound of flavor sealing in; don’t walk away from the stove here.
- Make the Sauce: While the chicken cooks, whisk together 1/2 cup mayonnaise, 1/4 cup hot sauce, 1 tablespoon honey, 1 tablespoon lime juice, and 1 tablespoon chopped cilantro in a bowl. The mixture should be smooth and thick enough to coat the back of a spoon. Taste and adjust seasoning—more lime for brightness, more hot sauce for heat.
- Toast the Buns: Lightly butter the inside of each brioche bun and toast them cut‑side down in a dry skillet until golden. This step locks in the bun’s structure and prevents it from becoming soggy from the sauce.
- Assemble: Spread a generous layer of sauce on the bottom bun, then place the hot chicken on top. Layer shredded lettuce, tomato slices, and a slice of pepper jack cheese. Finish with a drizzle of sauce on the top bun and close the sandwich. The layering order ensures each bite is a balanced explosion of textures.
- Serve Immediately: Slice the sandwich in half if desired and serve with a side of pickles or a fresh salad. The sandwich is at its peak when hot, so don’t let it sit too long before eating.
That’s it — you did it. But hold on, I’ve got a few more tricks that will take this to another level…
Insider Tricks for Flawless Results
The Temperature Rule Nobody Follows
Many cooks think that higher heat is always better for a crisp coating, but that’s a myth. The ideal skillet temperature for this recipe is medium‑high, around 350°F (175°C). If the oil is too hot, the coating burns before the chicken cooks through; if it’s too cool, the coating absorbs oil and becomes greasy. Use a thermometer or the “water droplet” test to gauge the right heat.
Why Your Nose Knows Best
When the chicken hits the pan, the aroma that fills the kitchen is a signal that the coating is forming properly. A sweet, nutty smell indicates the panko is browning, while a sharp, slightly acrid scent suggests the spices are cooking through. Trust your nose; it’s the best quality control you’ll have.
The 5-Minute Rest That Changes Everything
After frying, let the chicken rest on a wire rack for five minutes. This allows the juices to redistribute, ensuring every bite is juicy. If you cut into the chicken immediately, the juices will spill out, leaving a dry center.
Keep the Sauce Cool Until Assembly
Store the sauce in the refrigerator until you’re ready to assemble the sandwich. A cold sauce stays thick and doesn’t run off the bun, giving you a clean, controlled application.
Use a Cast‑Iron Skillet for Even Heat
Cast iron retains heat better than stainless steel or non‑stick pans. This means the chicken cooks evenly, with a uniform golden crust. If you don’t have cast iron, a heavy‑bottomed skillet works well too.
Make the Sauce Ahead of Time
Prepare the sauce the night before and let it chill. The flavors meld, making the sauce richer and more cohesive. When you’re ready to cook, simply stir the sauce before spreading it on the sandwich.
Creative Twists and Variations
This recipe is a playground. Here are some of my favorite ways to switch things up:
Smoky Chipotle Version
Swap the hot sauce for chipotle‑in‑adobo and add a dash of smoked paprika to the coating. The result is a smoky, slightly sweet heat that pairs wonderfully with the creamy sauce.
Asian Fusion Twist
Replace the pepper jack with a slice of mozzarella and sprinkle sesame seeds on the coating. Finish with a drizzle of sriracha and a squeeze of lime for an Asian‑inspired flavor profile.
Vegetarian Delight
Use a thick portobello mushroom cap instead of chicken. Marinate it in the same spice blend, bread it, and pan‑fry until crisp. The earthy mushroom complements the spicy sauce beautifully.
Breakfast Edition
Swap the chicken for a fried egg and add a slice of bacon. The savory, salty elements make this sandwich a hearty breakfast option that will keep you satisfied all morning.
Cheese Lover’s Dream
Layer cheddar and provolone between the chicken and the bun. The melted cheeses add a gooey richness that contrasts the crisp coating and spicy sauce.
Low‑Calorie Makeover
Use a grilled chicken breast instead of fried, and replace the mayo with Greek yogurt in the sauce. This version retains the flavor profile while cutting calories.
Storing and Bringing It Back to Life
Fridge Storage
Store the assembled sandwich in an airtight container in the refrigerator for up to 2 days. Keep the sauce separate if you’re concerned about sogginess; add it just before eating.
Freezer Friendly
Wrap the sandwich tightly in foil and place it in a freezer bag. It stays good for up to 3 months. Thaw overnight in the fridge, then reheat in a skillet to restore crispness.
Best Reheating Method
Reheat in a preheated skillet over medium heat for 3–4 minutes, flipping halfway. Add a splash of water to the pan to create steam, which keeps the bun from drying out. Finish with a quick toast on the skillet to revive the crunch.