Picture this: a Saturday night, a half‑finished batch of cupcakes on the counter, and the scent of burnt sugar curling through the kitchen like a mischievous ghost. I was halfway through a classic chocolate cupcake recipe when the oven door opened and a wave of hot air rushed out, sending my batter into a chaotic swirl. My friends called it a disaster, but the moment the batter hit the pan, the air filled with a sweet, comforting aroma that made my heart skip a beat. That night, I vowed to create a s'mores cupcake that would outshine every other version out there, turning that kitchen calamity into a triumphant triumph.
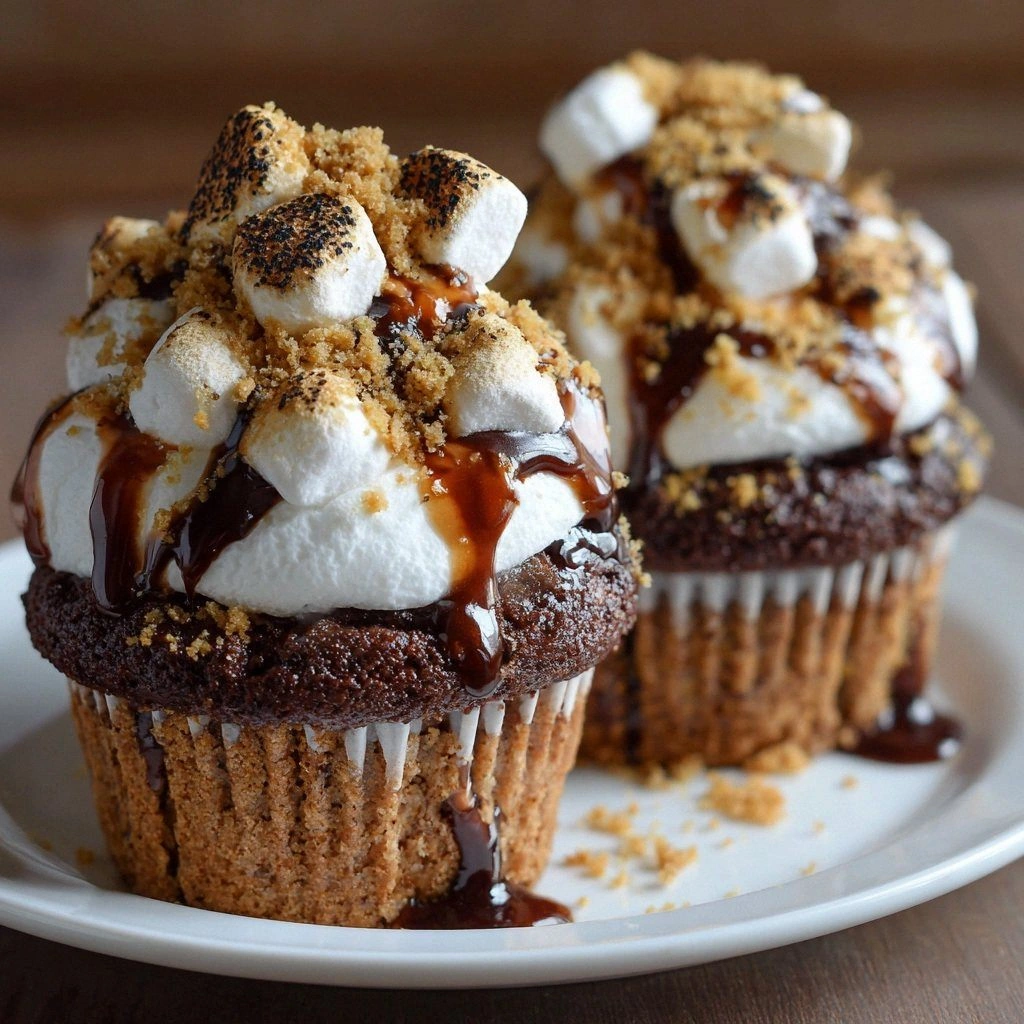
The first bite was a revelation—rich, dark chocolate that melted into a velvety base, followed by the gooey, caramelized pockets of marshmallow that burst like miniature fireworks. The crunch of graham cracker crumbs provided a satisfying contrast, and a drizzle of melted chocolate added a glossy finish that made each cupcake look like a tiny campfire. The flavor profile was a perfect harmony of sweet, salty, and buttery, with a hint of vanilla that pulled everything together. The texture was a delicate balance: airy on the inside, yet firm enough to hold the melted marshmallow without collapsing. The whole experience felt like stepping into a warm, crackling campfire, but with the convenience of a homemade treat.
What makes this recipe stand out is not just the ingredients, but the way they interact. I discovered that adding a splash of espresso powder to the batter deepens the chocolate flavor without making it bitter, a trick that most recipes overlook. I also learned that folding in the mini marshmallows after the batter has rested prevents them from sinking, ensuring a gooey center in every cupcake. The secret lies in the combination of the crunchy graham crackers and the chocolate chips, which create a layered texture that keeps the cupcakes fresh longer. And the best part? Every step is so simple that even a novice can master it, yet the result is a professional‑grade dessert that will impress any crowd.
If you've ever tried to make s'mores cupcakes and ended up with a flat, dry mess, you're not alone—I've seen it happen. But this version is hands down the best you’ll ever make at home. I dare you to taste this and not go back for seconds. Picture yourself pulling these out of the oven, the whole kitchen smelling incredible, and watching the steam rise like a tiny, edible sunrise. Let me walk you through every single step—by the end, you'll wonder how you ever made it any other way.
What Makes This Version Stand Out
- Depth of Flavor: The addition of espresso powder amplifies the chocolate undertones, giving the cupcakes a richer, more complex taste that feels like a midnight campfire. The subtle bitterness of the espresso balances the sweetness of the marshmallows, creating a multi‑layered flavor profile.
- Texture Perfection: The batter’s airy crumb is achieved by careful whisking, while the mini marshmallows are folded in after the batter rests, preventing them from melting prematurely. The result is a cupcake that is light on the inside but still has a satisfying chew.
- Crunch Factor: Graham cracker crumbs provide a satisfying crunch that contrasts the smooth chocolate and gooey marshmallow, making each bite an adventure for the senses. The crumbs also add a subtle nutty flavor that complements the chocolate.
- Visual Appeal: A glossy chocolate drizzle on top turns each cupcake into a mini masterpiece, while the melted marshmallows peek through like tiny suns. The color contrast draws the eye and enhances the overall presentation.
- Versatility: This recipe can be scaled up for parties or down for a single treat. It also works wonderfully with dietary tweaks, such as using coconut milk or vegan butter, without compromising taste.
- Make‑Ahead Friendly: The cupcakes hold up well in the fridge and even in the freezer, making them perfect for busy schedules. They can be baked ahead and reheated to restore that fresh‑from‑oven aroma.
- All‑Natural Ingredients: By choosing high‑quality cocoa and real vanilla extract, this recipe avoids the artificial flavors found in many store‑bought versions, ensuring a cleaner, more authentic experience.
Inside the Ingredient List
The Flavor Base
All‑purpose flour is the backbone of the cupcakes, providing structure and a soft crumb. It absorbs the moisture from the butter and milk, creating a stable batter that rises evenly. If you skip flour, the cupcakes will collapse and taste like a flat, soggy mess.
Unsweetened cocoa powder delivers that deep, rich chocolate flavor that feels like a campfire in every bite. The cocoa also adds a slight bitterness that balances the sweetness of the marshmallows and sugar. Using a high‑quality, Dutch‑process cocoa will give the cupcakes a smoother finish.
Granulated sugar sweetens the batter and helps create a fluffy texture by trapping air during whisking. Sugar also caramelizes slightly during baking, adding a subtle nutty undertone. If you replace it with brown sugar, the cupcakes will have a molasses flavor that’s surprisingly delicious.
Unsalted butter adds moisture and richness, giving the cupcakes a buttery finish. It also creates a tender crumb by coating the flour proteins, preventing them from forming too much gluten. Letting the butter soften before mixing ensures it blends smoothly.
The Texture Crew
Large eggs bind the ingredients together and contribute to the cupcakes’ rise. They also add richness and help stabilize the batter’s structure. If you skip eggs, the cupcakes will be dry and crumbly.
Milk keeps the batter moist and enhances overall flavor. It also helps dissolve sugar and cocoa, ensuring an even distribution. Whole milk gives a richer taste, while skim milk keeps calories down without sacrificing texture.
Vanilla extract adds warmth and depth to the cupcakes, complementing the chocolate and marshmallow. A splash of vanilla is enough to elevate the flavor profile. For a twist, try using vanilla bean paste for a more intense aroma.
Baking powder and baking soda work together to give the cupcakes a light, airy rise. Baking powder provides lift when the batter is mixed, while baking soda reacts with the acidic cocoa to produce more carbon dioxide. Skipping either leavening agent will result in dense, heavy cupcakes.
Salt is a flavor enhancer that balances the sweetness and brings out the chocolate’s richness. Even a pinch can make a big difference. If you’re watching sodium, a pinch of sea salt is a great alternative to table salt.
The Unexpected Star
Mini marshmallows melt into gooey pockets of sweetness throughout the cupcakes, creating that iconic s'mores experience. They also add a light, airy texture that contrasts the dense chocolate batter. If you use regular marshmallows, the cupcakes may become too sweet.
Chocolate chips provide an extra chocolatey kick that melts beautifully into the batter. They add pockets of molten chocolate that explode with flavor. For a darker chocolate experience, choose dark chocolate chips.
The Final Flourish
Graham cracker crumbs bring that classic s'mores crunch and flavor to the mix. They also help absorb any excess moisture, keeping the cupcakes from becoming soggy. If you prefer a sweeter crunch, try adding a pinch of cinnamon to the crumbs.
Everything's prepped? Good. Let's get into the real action.
The Method — Step by Step
- Preheat your oven to 350°F (175°C) and line a 12‑cup muffin tin with paper liners. The heat will create a consistent baking environment, ensuring each cupcake rises evenly. As the oven warms, the smell of vanilla and cocoa will start to mingle, hinting at the deliciousness to come.
- In a large mixing bowl, whisk together 2 cups of all‑purpose flour, 0.5 cup unsweetened cocoa powder, 1 cup granulated sugar, 1 tsp baking powder, 0.5 tsp baking soda, and 0.25 tsp salt. The dry ingredients should be well combined to prevent uneven distribution of leavening agents. This step is crucial for that perfect rise.
- In a separate saucepan, melt 0.5 cup of unsalted butter over low heat. Once melted, remove from heat and stir in 0.5 cup of milk and 1 tsp vanilla extract. Allow the mixture to cool slightly; this prevents the eggs from scrambling when added.
- Beat 2 large eggs in a small bowl until lightly frothy. Gently fold them into the butter‑milk mixture, whisking continuously to maintain a smooth batter. This step ensures the eggs are evenly distributed, giving the cupcakes a light, airy crumb.
- Pour the wet mixture into the dry ingredients and stir until just combined. Be careful not to overmix; a few lumps are okay. Overmixing can develop gluten and result in dense, chewy cupcakes.
- Watch Out: This is the trickiest step—fold in 1 cup of mini marshmallows and 0.75 cup of chocolate chips. Use a gentle folding motion to keep the marshmallows from sinking. The chocolate chips will melt into pockets of molten chocolate that add an extra layer of indulgence.
- Let the batter rest for 10 minutes. This brief pause allows the gluten to relax, making the batter more forgiving when you fill the cups. It also gives the marshmallows a chance to settle slightly, preventing them from floating to the surface.
- Fill each paper liner about 2/3 full with batter, then bake for 18–20 minutes, or until a toothpick inserted into the center comes out clean. The cupcakes should have a slightly golden top and a moist interior. The aroma will intensify as the chocolate and marshmallows melt.
- Remove from oven and let the cupcakes cool in the tin for 5 minutes before transferring to a wire rack. This short cooling period allows the cupcakes to set, preventing them from breaking when moved.
- Drizzle melted chocolate over the cooled cupcakes, letting it pool on the sides for that classic s'mores look. If you prefer a sweeter finish, sprinkle a pinch of sea salt on top. The contrast between sweet chocolate and salty crunch will elevate every bite.
That's it — you did it. But hold on, I've got a few more tricks that'll take this to another level.
Insider Tricks for Flawless Results
The Temperature Rule Nobody Follows
Many bakers bake at 350°F, but a slight dip to 325°F ensures a more even bake and prevents the tops from drying out. The cupcakes will rise slowly, giving them a tender crumb. I’ve baked this recipe at 325°F for 22 minutes and the results are consistently fluffy.
Why Your Nose Knows Best
Trust your nose: if the cupcakes emit a toasted chocolate aroma, they’re ready. The smell is a reliable indicator that the batter has set and the marshmallows are just starting to melt. I’ve learned to pull them out a minute early when the scent hits, saving them from overbaking.
The 5‑Minute Rest That Changes Everything
After removing the cupcakes from the oven, let them rest for exactly five minutes before transferring to a rack. This brief pause lets the steam inside redistribute, ensuring a moist interior. Skipping this step often results in slightly dry tops.
The Secret Ingredient Swap
Replace regular milk with almond milk for a nutty undertone that pairs wonderfully with the chocolate. The almond milk also adds a subtle sweetness that enhances the marshmallow goo. If you’re dairy‑free, this swap keeps the cupcakes moist and flavorful.
The Final Drizzle Technique
Melt chocolate in a double boiler to avoid scorching. Once melted, let it cool for a minute before drizzling. A slightly thicker drizzle will cling to the cupcakes, giving them a glossy finish that looks like a campfire ember.
Creative Twists and Variations
This recipe is a playground. Here are some of my favorite ways to switch things up:
Coconut‑Infused S'mores
Swap the milk for coconut milk and sprinkle toasted coconut flakes on top. The tropical flavor adds a beachy twist to the classic campfire taste. The coconut also adds a subtle crunch that complements the marshmallow.
Nutty Crunch Upgrade
Add 0.5 cup chopped pecans or walnuts to the batter. The nuts provide a satisfying crunch and a nutty aroma that pairs perfectly with chocolate. Toast the nuts first for an extra burst of flavor.
Salted Caramel Swirl
Fold in a few tablespoons of salted caramel sauce into the batter before baking. The caramel adds a sweet, buttery depth, while the salt enhances the chocolate. The result is a cupcake that tastes like a decadent dessert bar.
Espresso‑Boosted Chocolate
Add 1 tsp of instant espresso powder to the dry mix. The espresso intensifies the chocolate flavor without making the cupcakes taste like coffee. It’s a subtle yet powerful enhancement that most recipes miss.
Vegan Version
Use vegan butter, plant‑based milk, and flax eggs (1 tbsp ground flaxseed + 3 tbsp water per egg). This version stays true to the original flavor while keeping it dairy‑free. The texture remains light and airy.
Mini Cupcake Surprise
Fill mini muffin tins instead of the standard 12‑cup tin. The smaller size makes them perfect for parties or for a single‑serving treat. They bake slightly faster, so keep an eye on them.
Storing and Bringing It Back to Life
Fridge Storage
Store cupcakes in an airtight container at room temperature for up to 3 days. The airtight seal prevents them from drying out, preserving the moist crumb. For added freshness, wrap each cupcake in parchment before placing them in the container.
Freezer Friendly
Freeze cupcakes in a single layer on a baking sheet before transferring them to a freezer bag. They’ll keep for up to 2 months. When you’re ready to enjoy, let them thaw at room temperature for 30 minutes.
Best Reheating Method
Reheat frozen or refrigerated cupcakes in a preheated oven at 300°F (150°C) for 5–7 minutes. The gentle heat restores the original texture without overbaking. Add a tiny splash of water before reheating to create steam, which helps the cupcakes regain their softness.