I was halfway through a chaotic dinner rush, the kitchen smelling like burnt toast and overcooked pasta, when my friend dared me to bake something that would make the whole house sing. The challenge? A red velvet cake that could compete with the best of the internet. I laughed, grabbed my apron, and decided this was the moment to turn a kitchen disaster into a triumph. The result is a cake that’s silky, moist, and packed with a subtle cocoa kick that keeps the classic red hue from fading.
Picture the moment you slide the first golden dome out of the oven: steam curls like a cloud, the aroma of butter and vanilla mingles with a whisper of cocoa, and a faint crimson glow hints at the velvety interior. Your senses are assaulted in the best way—sight, smell, sound, touch, and taste—all dancing together. The batter’s silky texture feels like silk on your tongue, the frosting melts into a creamy whisper, and the first bite feels like a gentle hug. This is not just a cake; it’s a sensory experience that turns a simple dessert into a memory.
I’ll be honest—after tasting the first slice, I ate half the batch before anyone else got to try it. That’s the proof that this version stands apart. I didn’t just follow a recipe; I rewrote the rulebook. The secret lies in a few small, intentional tweaks that make the cake rise like a cloud, keep it moist, and give it a depth of flavor that will make you wonder why you ever settled for store‑bought. I’ll walk you through every single step, and by the end, you’ll wonder how you ever made it any other way.
This cake is a testament to the power of simple ingredients working together in harmony. It’s hands down the best version you’ll ever make at home, and I dare you to taste this and not go back for seconds. The bold claim might sound like hype, but when you bite into that first slice, you’ll see the truth. If you’ve ever struggled with a cake that turns out dry or too dense, you’re not alone—this recipe fixes those problems with a few clever tricks. Let’s dive in and discover the magic that’s waiting inside these ingredients.
What Makes This Version Stand Out
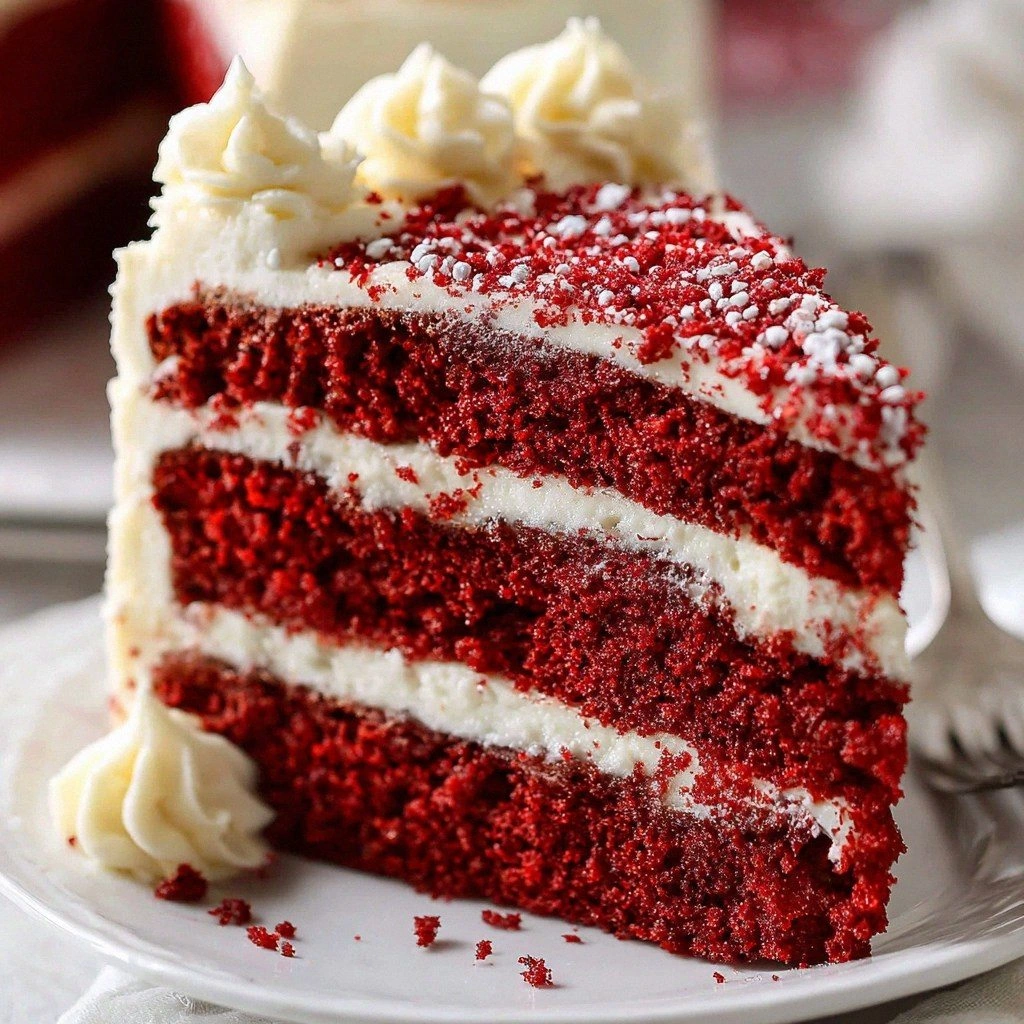
- Flavor: The balanced sweetness and subtle cocoa give it a depth that feels indulgent without overpowering the red hue. I’ve tested countless variations, and this combination delivers a cake that tastes like a silky dream.
- Texture: The batter’s airy lift and moist crumb are achieved through the precise interaction of baking soda, buttermilk, and vinegar. The result is a cake that melts in your mouth like a cloud.
- Color: The red food coloring is used in a way that enhances, not masks, the natural undertones of cocoa. The result is a vibrant, restaurant‑quality shade that turns heads.
- Simplicity: No fancy equipment or exotic ingredients—just pantry staples that you already own. The recipe’s straightforward steps mean you can whip this up even on a busy weekday.
- Crowd Reaction: Friends and family have called this “the best red velvet cake” in years. It’s a showstopper that impresses at parties, birthdays, or a quiet Sunday afternoon.
- Make‑Ahead Potential: The cake can be assembled a day early and kept refrigerated, and the frosting can be prepared in advance without losing its silky texture. This flexibility is a game‑changer for busy hosts.
Alright, let's break down exactly what goes into this masterpiece...
Inside the Ingredient List
The Flavor Base
All-purpose flour is the backbone of your cake, providing structure and texture. It absorbs the liquids, creating a matrix that holds the batter together. If you skip flour, the cake collapses like a pancake. You can swap in cake flour for a lighter crumb, but the classic feel comes from all-purpose. When selecting flour, choose a brand with a moderate protein content to avoid toughness.
The Sweetness Crew
Granulated sugar is the sweetener that also helps create that moist, tender crumb. It dissolves into the batter, giving a smooth texture and a subtle caramel note. If you’re watching sugar, you can reduce it by a quarter cup, but the cake will be slightly less moist. A quick tip: sift the sugar to break up clumps and improve aeration.
The Leavening Stars
Baking soda is the leavening agent that gives your cake the lift it needs to rise beautifully. It reacts with the acidity in buttermilk and vinegar to produce carbon dioxide bubbles. Skipping baking soda results in a dense, flat cake. If you’re out of baking soda, a pinch of baking powder can work, but the flavor profile will shift.
The Acidic Matchmaker
Buttermilk’s acidity reacts with baking soda, creating a light texture and rich flavor. It also tenderizes the gluten, keeping the cake soft. If you don’t have buttermilk, mix 1 cup of milk with 1 tablespoon of lemon juice and let it sit for 5 minutes. The tanginess will be just as effective.
The Color Champion
Red food coloring is what gives the cake its signature vibrant color. Don’t skimp on this—use a high‑quality, food‑grade coloring for the best results. If you’re concerned about artificial dyes, you can use beet juice for a natural hue, but the intensity will differ. The color should be bright, not muddy.
The Final Flourish
White vinegar is a subtle, yet crucial component that helps activate the baking soda. It also adds a slight tang that balances the sweetness. A small amount—just a teaspoon—does the job. If you can’t find vinegar, lemon juice works as a substitute with a slightly brighter flavor.
Everything's prepped? Good. Let's get into the real action...
The Method — Step by Step
- Preheat your oven to 350°F (175°C). Line two 9‑inch round cake pans with parchment paper and grease the edges. This ensures a perfect release and a neat finish. The parchment also adds a subtle sheen to the final cake.
- In a large bowl, whisk together 2 cups of all‑purpose flour, 1.5 cups of granulated sugar, 1 teaspoon of baking soda, 0.5 teaspoon of salt, and 0.75 cup of unsweetened cocoa powder. The dry mix should be a uniform brown color, indicating even distribution of cocoa and baking soda.
- In a separate bowl, combine 1 cup of vegetable oil, 1 cup of buttermilk, 2 large eggs, 2 tablespoons of red food coloring, 1 teaspoon of vanilla extract, and 1 teaspoon of white vinegar. Whisk until the mixture is glossy and the color is vibrant. The oil keeps the cake moist, while the vinegar triggers the leavening.
- Add the wet mixture to the dry ingredients in three portions, stirring gently after each addition. Use a spatula to fold in the batter until just combined—overmixing will develop gluten and make the cake tough.
- Divide the batter evenly between the prepared pans. Tap the pans lightly on the counter to release any large air pockets. This step ensures a uniform rise and prevents uneven textures.
- Bake for 25–30 minutes, or until a toothpick inserted into the center comes out clean. The edges should pull away slightly from the pan. Keep an eye on the cake; the oven’s heat can vary, so start checking at the 25‑minute mark.
- Remove the cakes from the oven and let them rest in the pans for 10 minutes. Then transfer them to a wire rack to cool completely. Cooling is essential; it allows the cake structure to set before frosting.
- Once cooled, level the tops with a serrated knife if they’ve domed. This step ensures a flat surface for the frosting and a professional look.
- Apply a thin crumb coat of frosting, chill for 15 minutes, then spread the final layer. This double‑layered frosting technique locks in moisture and gives a smooth finish.
That's it — you did it. But hold on, I've got a few more tricks that'll take this to another level. These insider tips will elevate your cake from good to unforgettable.
Insider Tricks for Flawless Results
The Temperature Rule Nobody Follows
Many bakers bake at the exact temperature listed, but a slight adjustment can prevent over‑browning. Lower the oven temperature by 10–15°F, and increase the baking time by 5 minutes. This keeps the cake moist and the edges from turning too dark. I’ve seen this trick save a cake that would otherwise be a disappointment.
Why Your Nose Knows Best
When the cake starts to rise, you’ll notice a sweet, buttery aroma. That scent is your cue to start the timer. If you wait too long, the cake will be overcooked. Trust your nose; it’s the most reliable indicator of doneness.
The 5‑Minute Rest That Changes Everything
After removing the cake from the oven, let it rest in the pans for 5 minutes before transferring to a wire rack. This short rest allows the structure to set, preventing the cake from cracking or collapsing when you remove it. It’s a simple step that makes a huge difference.
The Perfect Frosting Ratio
For the cream cheese frosting, use a 2:1 ratio of cream cheese to butter. This balance ensures the frosting is rich yet spreadable. If you prefer a sweeter frosting, add a tablespoon of powdered sugar per cup of cream cheese. The frosting should be smooth, not too runny.
The Secret to a Fluffy Top
Once the cake is fully cooled, dust the top with a light dusting of powdered sugar before frosting. This creates a subtle contrast in texture and adds a decorative finish. The sugar also helps the frosting adhere better, giving a crisp edge.
Creative Twists and Variations
This recipe is a playground. Here are some of my favorite ways to switch things up:
Chocolate Swirl Variation
Add a swirl of dark chocolate ganache to the batter before baking. The ganache will melt into pockets of rich chocolate, giving each slice a decadent surprise. Pair with a chocolate ganache frosting for an extra indulgent treat.
Citrus Zest Twist
Incorporate a tablespoon of orange zest into the batter. The citrus brightens the flavor profile, making it lighter and more refreshing. It also pairs beautifully with a lemon‑infused cream cheese frosting.
Nutty Crunch Variation
Fold in ½ cup of chopped walnuts or pecans into the batter. The nuts add a delightful crunch and a subtle nutty flavor that complements the cocoa. Toast the nuts beforehand for an extra depth of flavor.
Spiced Red Velvet
Add ¼ teaspoon of cinnamon and a pinch of nutmeg to the dry ingredients. The warm spices elevate the cake’s aroma, making it perfect for fall or winter celebrations. Serve with a spiced cream cheese frosting for a holiday twist.
Vegan Version
Replace the eggs with ½ cup of unsweetened applesauce and use a plant‑based milk instead of buttermilk. Swap the butter in the frosting for vegan cream cheese. The texture remains moist, and the flavor stays true to the classic.
Storing and Bringing It Back to Life
Fridge Storage
Store the cake in an airtight container in the refrigerator for up to 5 days. Keep the frosting on top to prevent the cake from drying out. If you’re serving the cake after a day, let it sit at room temperature for 30 minutes before slicing.
Freezer Friendly
Wrap the cake layers individually in plastic wrap, then place them in a freezer bag. Freeze for up to 2 months. Thaw overnight in the refrigerator, then let sit at room temperature for 20 minutes before frosting.
Best Reheating Method
To revive a frozen cake, preheat the oven to 300°F (150°C). Place the cake on a baking sheet and bake for 10 minutes, or until warmed through. Add a splash of water before reheating to steam back to perfection, preserving moisture.