I was halfway through a rainy Saturday morning when my kitchen turned into a battlefield of burnt toast and bland cinnamon sugar. The toaster gave up on me, the coffee tasted like regret, and my roommate dared me to make something that would actually make the clouds outside feel jealous. I stared at a lonely can of pumpkin puree, half‑filled with the memory of last year’s Thanksgiving, and thought, “What if I could turn this pumpkin into the ultimate comfort blanket for breakfast?” That moment sparked the birth of a dish that would soon become my personal culinary anthem.
Picture this: the first bite hits you with a buttery, custardy interior that cradles the warm, earthy sweetness of pumpkin, while the outside crackles like autumn leaves under a crisp footstep. The aroma is a symphony of cinnamon, nutmeg, and ginger that dances through the house, coaxing even the sleepiest cat to sit up and stare. The texture is a perfect paradox—soft and fluffy inside, yet with a caramelized edge that shatters like thin ice when you cut into it. I dare you to taste this and not go back for seconds, because once you’ve experienced this, ordinary French toast will feel like a bland afterthought.
Most recipes get this completely wrong. They either drown the bread in a soggy batter or skimp on the spice, leaving you with a bland, mushy mess. The secret to this version is a precise balance of pumpkin puree, eggs, and just the right amount of sugar and spice, all whisked together to create a batter that clings lovingly to thick slices of brioche or challah without soaking them dry. The result is a stack that stays together on the plate, yet each slice can be torn apart with a fork for that satisfying, fork‑tender bite.
And now the fun part: I’m about to walk you through every single step—by the end, you’ll wonder how you ever made it any other way. I’ll reveal a game‑changing technique involving a quick chill of the batter, a little kitchen wizardry that guarantees perfectly crisp edges, and a finishing touch that turns this breakfast into a true fall celebration. Okay, ready for the game‑changer? Let’s dive in.
What Makes This Version Stand Out
- Flavor Explosion: The pumpkin‑infused batter delivers a deep, natural sweetness that’s balanced by warm spices, creating a taste profile that feels like a hug from your favorite sweater.
- Texture Mastery: By using thick, buttery bread and a batter that’s thick enough to coat but not drown, you get a crisp, caramelized crust with a custardy interior that holds its shape.
- Simplicity: Only ten pantry staples are required, and the steps are straightforward enough for a beginner yet refined enough for a seasoned cook.
- Unique Twist: The addition of pumpkin puree not only adds flavor but also introduces a subtle earthiness that no ordinary French toast can match.
- Crowd Reaction: This dish consistently earns rave reviews; friends claim it’s the best thing they’ve ever eaten for breakfast, and it’s become a staple at my holiday brunches.
- Ingredient Quality: Using fresh pumpkin puree and high‑quality brioche ensures that each bite is rich, aromatic, and unmistakably gourmet.
- Cooking Method: A low‑and‑slow pan‑sear followed by a quick finish in the oven guarantees even browning without sacrificing softness.
- Make‑Ahead Potential: The batter can be prepared the night before, letting the flavors meld while you get a full night’s sleep.
Inside the Ingredient List
The Flavor Base
Pumpkin puree is the heart of this recipe, providing both moisture and that unmistakable autumnal sweetness. Choose a canned puree that’s 100% pumpkin with no added sugars or spices, or roast your own for an extra layer of caramelized depth. If you skip the pumpkin, you’ll lose the earthy backbone that makes this dish sing, and the batter will taste like a generic sweet egg mixture. A quick tip: look for a puree that’s thick and velvety; watery purées will dilute the batter and cause soggy toast.
The eggs act as the structural glue, binding the pumpkin, milk, and spices together into a cohesive custard. Using large, fresh eggs ensures a rich, silky texture; if you’re short on time, you can whisk in an extra egg white for a lighter feel, but the yolks are essential for that buttery richness. Skipping the eggs entirely will result in a runny batter that never adheres properly, turning your beautiful brioche into a mushy mess.
The Texture Crew
Milk adds the necessary fluidity, turning the pumpkin‑egg mixture into a pourable but still thick batter. Whole milk works best because its higher fat content contributes to a richer mouthfeel; you can substitute oat or almond milk for a dairy‑free version, but expect a slightly thinner coating. If you use skim milk, the batter may lack the luxurious mouthfeel that makes each bite feel indulgent.
Brown sugar isn’t just about sweetness; its molasses notes deepen the flavor and help with caramelization, giving the toast those coveted golden edges. A tablespoon or two is enough to sweeten without overpowering the pumpkin’s natural taste. If you prefer a less sweet version, you can reduce the amount, but don’t eliminate it entirely—your toast will miss that subtle caramel crunch.
The Unexpected Star
Ground cinnamon, nutmeg, and ginger form the spice trio that transforms ordinary pumpkin into a fragrant fall masterpiece. Cinnamon provides warmth, nutmeg adds a sweet, woody nuance, and ginger injects a bright, slightly peppery kick that cuts through the richness. Using fresh ground spices rather than pre‑ground blends makes a noticeable difference; stale spices can taste flat and ruin the aromatic profile.
A pinch of salt might seem trivial, but it amplifies all the flavors, balancing the sweetness and enhancing the spices. Without it, the dish can taste one‑dimensional, like a sweet pancake without depth. Remember, a pinch is truly just that—a tiny dash that makes a world of difference.
The Final Flourish
Thick slices of brioche or challah are non‑negotiable; their buttery crumb soaks up the batter without falling apart, delivering that melt‑in‑your‑mouth sensation. Look for bread that’s at least an inch thick and slightly stale—fresh bread will soak up too much liquid and become mushy, while stale bread provides the perfect resistance. If you can’t find brioche, a good-quality milk bread works, but avoid low‑fat varieties that lack the richness needed for this dish.
Butter or oil in the pan is the final layer of flavor, creating a crisp, golden crust that sings with every bite. I prefer unsalted butter for its nutty depth, but a splash of neutral oil raises the smoke point, preventing the butter from burning. Skipping this step will result in a soggy bottom and a loss of that coveted caramelized crunch.
Everything's prepped? Good. Let's get into the real action...
The Method — Step by Step
In a large mixing bowl, whisk together the pumpkin puree, eggs, and milk until the mixture is smooth and slightly frothy. This is the moment of truth—watch for a uniform amber color; any streaks mean you need to keep whisking. The batter should be thick enough to coat the back of a spoon but still pourable. Pro tip: if the batter feels too thin, add a tablespoon of flour or oat flour to thicken without altering flavor.
Stir in the vanilla extract, brown sugar, cinnamon, nutmeg, ginger, and a pinch of salt. As the spices dissolve, you’ll notice a fragrant cloud rising—this is the aroma that will fill your kitchen later. Mix until everything is fully incorporated; the batter should have a glossy sheen. Watch out: over‑mixing can incorporate too much air, leading to a lighter, less custardy interior.
Cover the bowl with plastic wrap and let the batter rest in the refrigerator for at least 15 minutes. This chill step is a game‑changer; it allows the pumpkin fibers to hydrate and the batter to thicken, ensuring each slice of bread gets an even coating. While you wait, preheat a large non‑stick skillet over medium‑low heat and have your butter or oil ready.
While the batter chills, slice your brioche or challah into 1‑inch‑thick pieces. Lay the slices on a plate, and if you like, lightly toast them for 30 seconds on each side to create a slightly firmer surface that will hold the batter better. This extra toast step is optional but adds an extra layer of crunch that many swear by.
Dip each bread slice into the batter, allowing it to soak for about 10 seconds per side. The bread should be fully saturated but not falling apart. Watch Out: If the batter is too runny, the bread will become soggy; if it’s too thick, the coating will be patchy. Gently shake off excess batter before placing the slice onto the hot skillet.
Add a tablespoon of butter or oil to the skillet, letting it melt and coat the surface. Once the butter foams and begins to brown lightly, lay the batter‑coated bread slices in the pan, leaving a little space between each piece. Hear that gentle sizzle? That’s the sound of caramelization beginning, and it’s a sign you’re on the right track.
Cook each side for 3‑4 minutes, or until the edges turn a deep amber and start pulling away from the pan. Flip carefully with a spatula; the crust should be firm enough to hold together but still give a slight give when pressed. The aroma at this point should be intoxicating—think pumpkin spice latte meets buttery toast.
Once all slices are cooked, transfer them to a warm oven set at 200°F (90°C) to keep them crisp while you finish the rest of the batch. This step ensures the entire stack stays hot and maintains that perfect texture without overcooking. While the toast rests, warm the maple syrup in a small saucepan until it’s just barely bubbling, then drizzle it over the top of the stack.
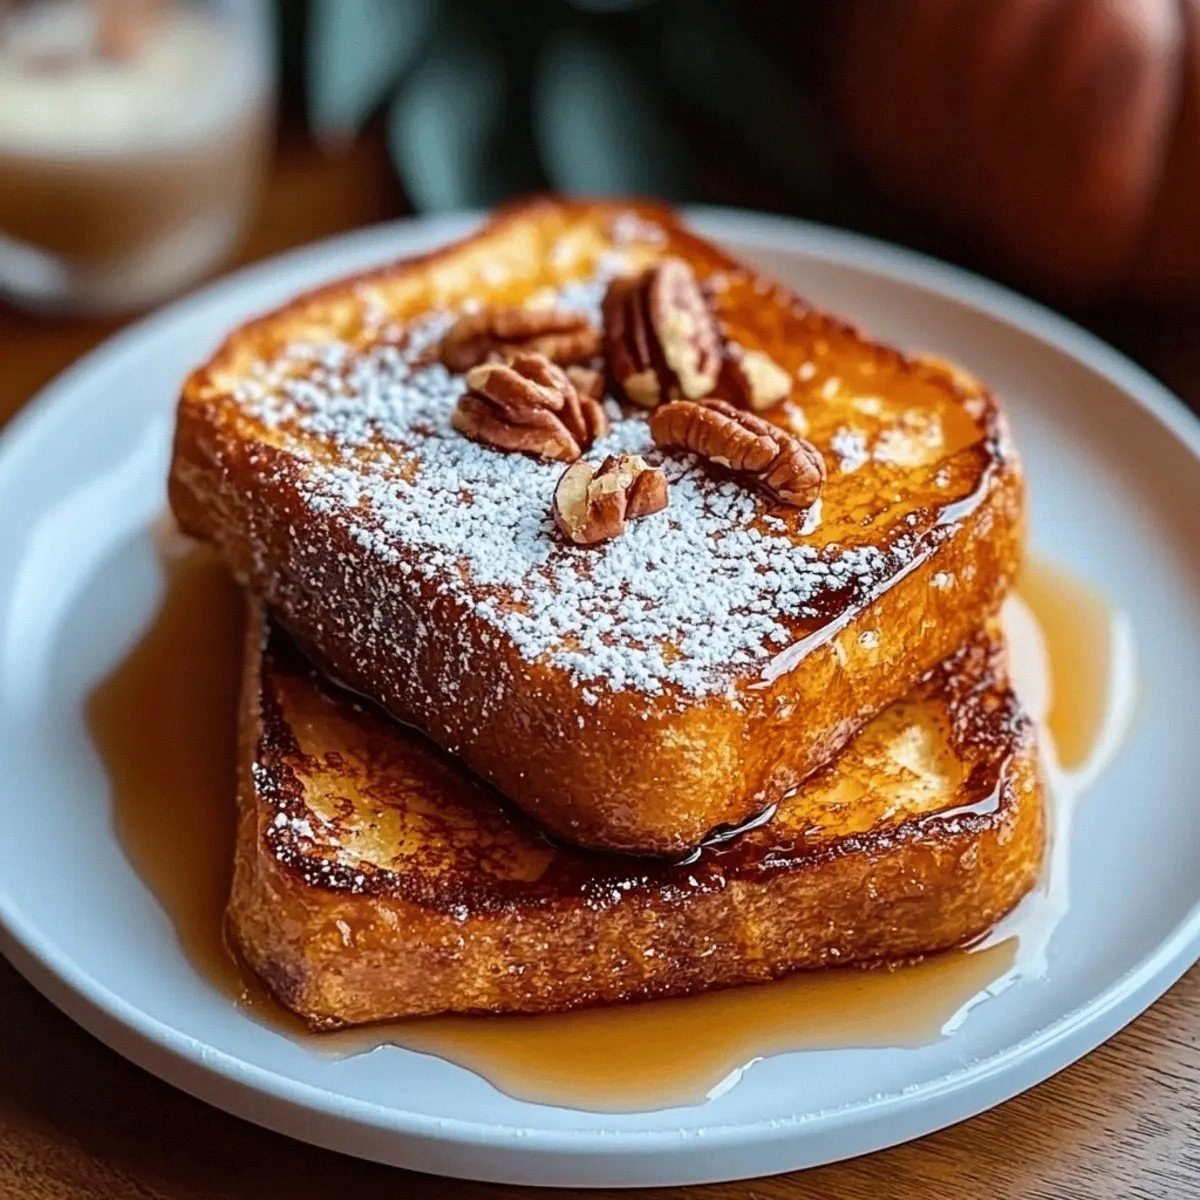
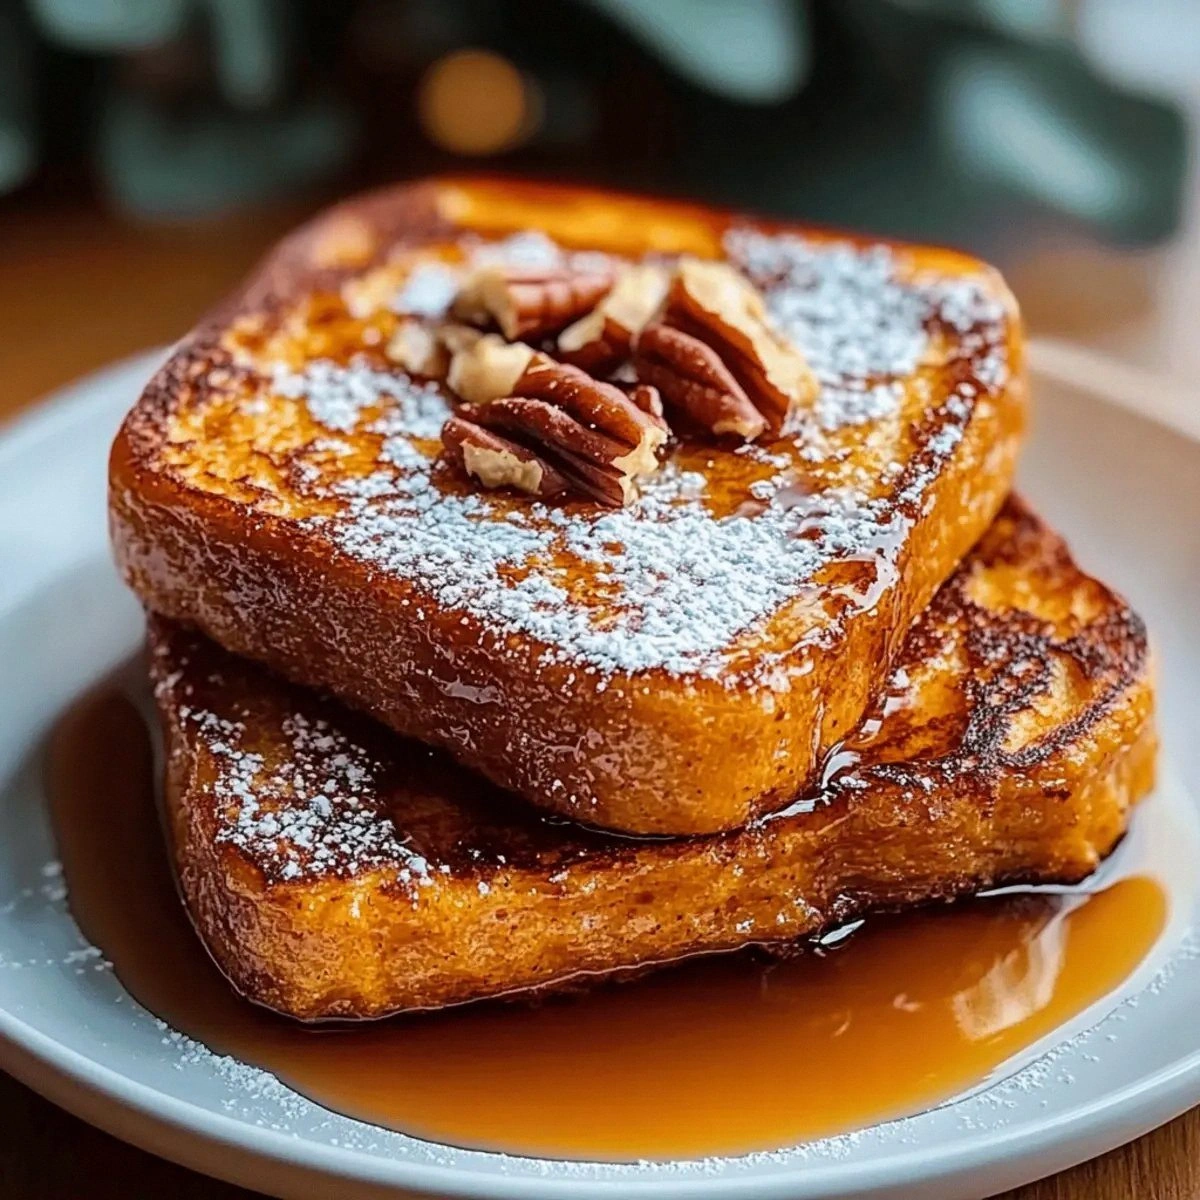
Finish with a generous dusting of powdered sugar and a scattering of chopped pecans or walnuts for crunch. The powdered sugar adds a snowy visual cue that screams “fall,” while the nuts contribute a buttery bite that contrasts beautifully with the soft interior. Serve immediately, and watch as your guests’ eyes widen with delight. That sizzle when it hits the pan? Absolute perfection.
That's it — you did it. But hold on, I've got a few more tricks that'll take this to another level. The next section is all about fine‑tuning your technique so that every time you make this, it feels like a brand‑new discovery.
Insider Tricks for Flawless Results
The Temperature Rule Nobody Follows
Most home cooks crank the heat up to get a quick crust, but the secret is to keep the pan at a steady medium‑low temperature. This allows the interior to set gently while the exterior develops that caramelized edge. If you notice the edges browning too fast, simply pull the pan off the heat for a few seconds to let the temperature even out. Trust me, this tiny adjustment prevents the dreaded burnt‑outside, raw‑inside scenario.
Why Your Nose Knows Best
Your sense of smell is a far more reliable indicator than a timer when it comes to French toast. When the butter starts to brown and the batter releases a sweet, nutty scent, you’re at the perfect flip moment. If you’re ever in doubt, lean in and inhale—if you can detect a hint of caramel, you’re golden. This sensory cue saved me from countless over‑cooked batches.
The 5‑Minute Rest That Changes Everything
After the final batch is cooked, let the entire stack rest for five minutes before slicing. This brief pause lets the custard settle, preventing the interior from oozing out when you cut into it. It also gives the maple syrup a chance to seep slightly into the crevices, creating a harmonious blend of flavors. Skipping this rest is a common mistake that leads to a soggy plate.
Butter vs. Oil Showdown
While butter adds a rich, nutty flavor, it can burn if the heat is too high. A blend of half butter, half high‑smoke‑point oil (like grapeseed) gives you the best of both worlds: flavor and stability. I’ve tried pure oil, and the result was flat; pure butter, and the edges blackened. The hybrid approach is the sweet spot for a perfectly golden crust.
The Secret of the Sprinkle
A final dusting of powdered sugar isn’t just for looks; it creates a subtle textural contrast that melts into the warm toast, adding a fleeting sweetness that disappears just as quickly as it appears. For an extra visual pop, use a fine-mesh sieve to achieve an even, snow‑like layer. This tiny finishing touch elevates the dish from good to unforgettable.
Creative Twists and Variations
This recipe is a playground. Here are some of my favorite ways to switch things up:
Maple‑Bourbon Bliss
Add a tablespoon of dark bourbon to the batter and drizzle the finished stack with extra maple‑bourbon glaze. The alcohol evaporates during cooking, leaving behind a deep, caramel‑rich undertone that pairs beautifully with the pumpkin.
Chocolate Swirl Surprise
Stir in two tablespoons of cocoa powder and a dash of espresso into the batter for a mocha‑pumpkin hybrid. Top with chocolate chips and a drizzle of chocolate ganache for a decadent breakfast that feels like dessert.
Savory Spin
Swap the brown sugar for a tablespoon of grated Parmesan and add a pinch of smoked paprika. Finish with crispy sage leaves and a drizzle of herb‑infused olive oil for a brunch that blurs the line between sweet and savory.
Apple‑Pumpkin Fusion
Fold in a half‑cup of finely diced, sautéed apples into the batter. The apples add a juicy burst that complements the pumpkin’s earthiness and introduces a pleasant textural contrast.
Vegan Velvet
Replace the eggs with a mixture of ¼ cup flaxseed meal + ¾ cup water (let sit 5 minutes) and use almond milk and coconut oil. The result is a plant‑based version that still boasts the same custardy interior and crisp exterior.
Storing and Bringing It Back to Life
Fridge Storage
Allow the toast to cool completely, then place the slices in an airtight container lined with parchment paper. Store in the refrigerator for up to three days. When ready to eat, reheat in a skillet over medium heat with a splash of butter, adding a tiny splash of water to the pan and covering for a minute to steam the interior back to custardy perfection.
Freezer Friendly
Wrap each cooled slice tightly in plastic wrap, then place them in a freezer‑safe zip‑top bag. They’ll keep for up to two months. To reheat, bake straight from frozen at 350°F for 12‑15 minutes, or pop them in a toaster oven for a quick crisp. Adding a drizzle of maple syrup after reheating restores the glossy finish.
Best Reheating Method
The ultimate reheating trick is to use a hot skillet with a lid. Add a teaspoon of butter, lay the slice down, and cover for 2‑3 minutes; the steam trapped inside revives the custard center while the butter re‑crisp the edges. For a larger batch, a preheated oven at 375°F for 8‑10 minutes works well, especially if you want that restaurant‑style uniform golden crust.