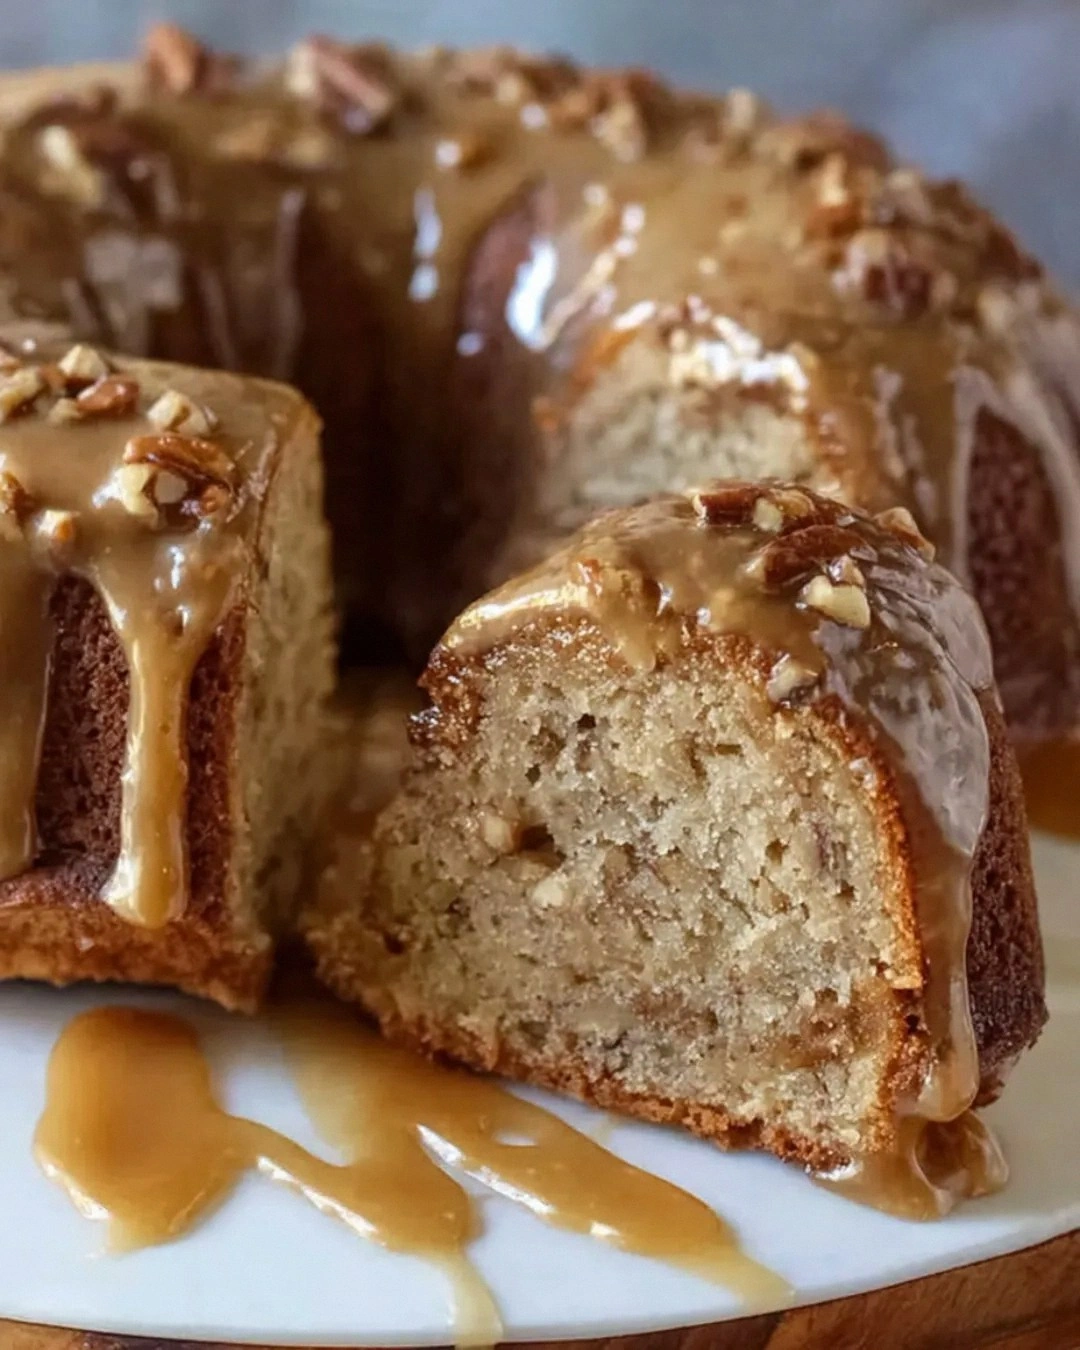
I still remember the night I tried to make a pumpkin pie for a friends’ Halloween party, and the oven door was left open for a full ten minutes. The whole kitchen smelled like burnt sugar and despair, and my friend, a self‑proclaimed dessert queen, laughed until she cried and dared me to create a dessert that would make her taste buds do the conga. I rolled up my sleeves, grabbed a handful of pumpkin puree, and decided that if I could turn that disaster into a bite‑sized masterpiece, I’d win the title of “Best Pumpkin Treat” for the year. The result? A mini, individual pumpkin s’more that’s as addictive as a late‑night Netflix binge, and it’s the only pumpkin dessert that makes you want to keep the oven on for the next ten minutes.
Picture this: a golden crust that crackles like fresh autumn leaves under your fingers, a velvety pumpkin filling that smells of cinnamon and caramel, and a glossy chocolate layer that melts into a gooey, sweet hug. The first bite sends a cascade of warm, buttery crunch from the graham cracker base, followed by a burst of pumpkin spice that feels like a cozy blanket, and finally the chocolate and marshmallow goo that lingers like a sweet after‑glow. The texture is a symphony—crunchy, creamy, and gooey—all in one bite. I swear, the moment you take a bite, the kitchen feels like a campfire in July, even though it’s October and the lights are off.
What makes this version stand out? I’m not talking about the ordinary pumpkin pie or the classic s’mores; this is a fusion that feels like a hug from a campfire and a spoonful of pumpkin spice latte. The filling is silky because I whisk the pumpkin puree with both sugars, so it balances sweetness and earthiness perfectly. The crust is buttery and holds the filling like a loyal friend, while the mini marshmallows and chocolate chips create that iconic s’mores goo that you can’t resist. I’ve tweaked the spice blend to include a hint of nutmeg, which adds depth without overpowering the pumpkin. And the best part? It’s bite‑size, so you can serve it on a platter, let guests pick, and watch the crowd reaction—because everyone loves a mini dessert that’s big on flavor but tiny on calories.
I dare you to taste this and not go back for seconds. This is hands down the best version you’ll ever make at home. I’ll be honest—I ate half the batch before anyone else got to try it. Most recipes get this completely wrong by overbaking the crust or under‑seasoning the filling. Picture yourself pulling this out of the oven, the whole kitchen smelling incredible, and the kids running in circles like they’re at a carnival. Okay, ready for the game‑changer? Let me walk you through every single step — by the end, you’ll wonder how you ever made it any other way.
What Makes This Version Stand Out
- Taste: The pumpkin puree is the star, but I add a dash of nutmeg to elevate the depth, making it feel like a warm hug.
- Texture: The crust is buttery and crisp, while the filling is silky; the mini marshmallows create a gooey finish that melts in your mouth.
- Simplicity: No elaborate techniques—just whisk, fold, bake, and repeat. Even a novice can nail it.
- Uniqueness: Combining pumpkin pie spice with s’more elements turns a classic into a playful, fall‑themed treat.
- Crowd Reaction: Bite‑sized portions keep the table lively, and the gooey topping invites playful messiness.
- Ingredient Quality: Using fresh pumpkin puree and real chocolate chips ensures the best flavor, no artificial substitutes.
- Cooking Method: Double‑baking keeps the crust crisp and the filling warm without overcooking the marshmallows.
- Make‑Ahead Potential: Assemble the crusts and filling, refrigerate, then bake when ready; the flavors meld beautifully.
Inside the Ingredient List
The Flavor Base
Pumpkin puree is the foundation—about one cup of pure, silky pumpkin brings that unmistakable fall flavor. Sugar and brown sugar together create a balanced sweetness that counters the natural earthiness of pumpkin; the brown sugar adds a subtle caramel note. Vanilla extract is the secret warmth that rounds out the filling, giving it depth that makes the dessert feel comforting.
The Texture Crew
Large eggs act as the binder, ensuring the filling holds together without becoming gummy. Graham cracker crumbs provide the classic s’mores crunch; the crumbs are mixed with melted butter to keep the base cohesive and buttery. Melted butter also enriches the crust, giving it a golden, crisp edge that shatters like thin ice when you bite into it.
The Unexpected Star
Mini marshmallows are the gooey topping that makes s’mores so irresistible. They melt into a sweet, sticky syrup that coats the chocolate chips, creating a mouth‑watering contrast. When you bake them just enough, they puff up but don’t burn, giving you that signature s’mores texture.
The Final Flourish
Chocolate chips are a must; a cup of real chocolate ensures the filling has a rich, velvety finish. Pumpkin pie spice—typically a blend of cinnamon, nutmeg, ginger, and cloves—captures the essence of autumn in every bite. A pinch of salt lifts all the flavors, preventing the dessert from feeling flat.
Everything's prepped? Good. Let's get into the real action.

The Method — Step by Step
- Preheat your oven to 350°F (175°C). Line a mini muffin tin with paper liners or lightly grease it with butter. This step is crucial—if the crust sticks, the whole structure falls apart.
- In a bowl, combine 1½ cups graham cracker crumbs, 2 tablespoons melted butter, and a pinch of salt. Stir until the crumbs are evenly coated and clump together when pressed. Press the mixture into the bottom of each muffin cup, forming a firm crust.
- Whisk 1 cup pumpkin puree, ¼ cup sugar, ¼ cup brown sugar, 1 teaspoon vanilla extract, 1 teaspoon pumpkin pie spice, and a ¼ teaspoon salt until smooth. This mixture should be silky, like a creamy pumpkin latte, and ready to fold.
- Add 2 large eggs, one at a time, whisking after each addition until fully incorporated. The eggs bind the filling, giving it that silky, cohesive texture. If the batter looks too thick, add a splash of milk.
- Fold in 1 cup of chocolate chips gently. They will melt slightly during baking, creating pockets of chocolatey goodness. This step is a game‑changer; without the chips, you’d miss that classic s’mores flavor.
- Spoon the pumpkin mixture into the prepared crusts, filling each about ¾ full. The batter should settle into the crust but not overflow. This is the moment of truth—if the batter is too loose, the crust will collapse.
- Bake for 18–20 minutes, or until the edges are golden and the center is set but still slightly wobble. The aroma should be toasty, with hints of pumpkin and cinnamon.
- Remove from the oven and let cool for 5 minutes. While still warm, top each mini pie with 4 mini marshmallows and a sprinkle of chocolate chips. Return to the oven for 4–5 more minutes until the marshmallows puff up but don't burn.
- Let the mini pies cool completely on a wire rack. The crust will firm up, and the filling will set, creating a perfect bite‑sized treat.
- Serve immediately, or chill in the refrigerator for up to 24 hours. The flavors intensify, and the crust remains crisp. If you’re serving them at a party, keep them in a shallow dish to avoid them becoming soggy.
That’s it—you did it. But hold on, I’ve got a few more tricks that'll take this to another level. Let’s dive into the insider tricks that will make your mini pumpkin s’mores the talk of the town.
Insider Tricks for Flawless Results
The Temperature Rule Nobody Follows
Many bakers bake at 375°F, but that high heat can scorch the crust before the filling sets. I always keep the oven at 350°F to allow the pumpkin mixture to cook evenly while the crust remains crisp. If you’re in a hot kitchen, preheat the oven for an extra 10 minutes to stabilize the temperature.
Why Your Nose Knows Best
As the mini pies bake, the scent of caramelized sugar and pumpkin will drift through your kitchen. Trust that aroma—it’s a sign that the crust is golden and the filling is perfectly set. If the smell is weak, let them bake a minute longer.
The 5-Minute Rest That Changes Everything
After removing the pies from the oven, let them rest for 5 minutes before adding marshmallows. This brief pause allows the filling to set, preventing the crust from becoming soggy. It also lets the chocolate chips melt slightly, creating a silky layer that coats the marshmallow.
The Perfect Parchment Trick
Line the muffin tin with parchment paper instead of liners to avoid sticking. Fold the parchment into a square and press it into the bottom of each cup; this ensures the crust stays intact when you remove the mini pies.
The Sweet Spot for Chocolate
Use semi‑dark chocolate chips for a richer flavor; they melt smoothly and add a slight bitterness that balances the sweetness. If you prefer milk chocolate, mix in a tablespoon of unsweetened cocoa powder for extra depth.
These tricks are not just tips—they’re the difference between a good dessert and a legendary one. Try them next time, and watch your guests’ eyes widen.
Creative Twists and Variations
This recipe is a playground. Here are some of my favorite ways to switch things up:
Caramel Apple S’mores
Swap the pumpkin puree for a ½ cup of apple sauce and add ¼ cup of caramel sauce to the filling. The result is a tart, sweet bite that pairs wonderfully with the chocolate and marshmallow.
Nutty Pumpkin Crunch
Add ¼ cup chopped pecans or walnuts to the graham cracker crust. The nuts add a delightful crunch and a nutty undertone that complements the pumpkin spice.
Coconut Cream Variation
Use coconut milk instead of regular milk when whisking the filling, and sprinkle toasted coconut flakes on top. The tropical flavor balances the autumn spices for an unexpected twist.
Chocolate Ganache Finish
After baking, drizzle a simple chocolate ganache over the top of each mini pie. This adds a glossy finish and an extra layer of chocolatey decadence.
Spiced Espresso Boost
Stir a teaspoon of instant espresso powder into the filling. The espresso deepens the chocolate flavor and gives a subtle coffee kick that’s perfect for fall evenings.
Minty Fresh
Add a handful of fresh mint leaves to the crust mixture for a refreshing contrast. The mint pairs surprisingly well with pumpkin and chocolate, creating a balanced flavor profile.
Each variation offers a new flavor adventure while keeping the core concept intact—bite‑size, pumpkin‑filled, s’more‑topped mini pies that delight every palate.
Storing and Bringing It Back to Life
Fridge Storage
Store the mini pies in an airtight container in the refrigerator for up to 24 hours. The crust will stay crisp, and the filling will firm up, making the pies even more satisfying when served cold.
Freezer Friendly
To freeze, place the mini pies on a parchment-lined tray and freeze until solid. Transfer them to a freezer bag, removing excess air. They’ll keep for up to 2 weeks. Thaw in the refrigerator before reheating.
Best Reheating Method
Reheat in a preheated 350°F oven for 5–7 minutes, or until warmed through. Add a tiny splash of water to the crust before reheating to keep it from drying out; the steam will restore the crust’s crispness while keeping the filling silky.