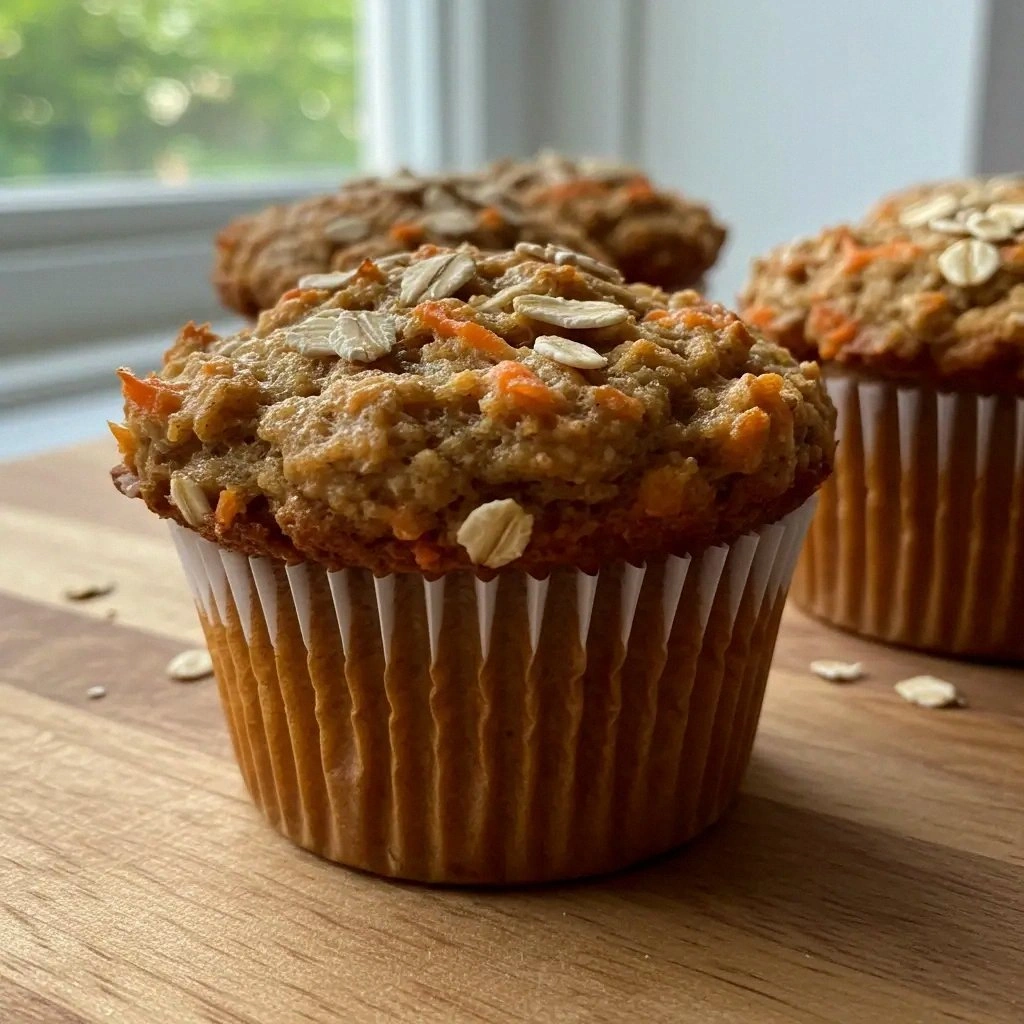
Picture this: the kitchen is a battlefield, flour dusting the countertops like snow, a carrot patch in the window, and a single, stubborn craving for something sweet yet wholesome. I was halfway through a marathon of protein shakes, mindlessly scrolling through Pinterest, when the urge for a carrot cake hit like a sudden, delicious thunderclap. I knew I needed something that could double as a snack, a post-workout treat, and a dessert that wouldn’t sabotage my gains. So I pulled out my trusty muffin tin, grabbed a handful of carrots, and declared, “This is going to be the healthiest carrot cake you’ll ever taste.”
The aroma of cinnamon and nutmeg began to mingle with the faint scent of fresh carrots, a scent that made my stomach rumble louder than a bass drum. My whisk twirled through the batter, turning it into a silky, golden mixture that looked like a sunrise trapped in a bowl. I could hear the gentle hiss of the oven as it preheated, the soft click of the timer counting down, and the distant hum of my fridge reminding me that the world keeps turning. The texture was already promising – moist, slightly dense, with just enough bite to keep things interesting. The taste, even before the first bite, was a sweet, earthy promise of comfort.
What makes this version stand out from every other carrot cake recipe on the internet? It’s not just the fact that it’s protein-packed; it’s the meticulous balance of flavors, the intentional use of natural sweeteners, and the way every ingredient sings in harmony. I’m about to walk you through each step, and by the end, you’ll wonder how you ever made it any other way. Get ready for a culinary adventure that’s as wholesome as it is indulgent.
Let me walk you through every single step — by the end, you’ll wonder how you ever made it any other way. I dare you to taste this and not go back for seconds. This is hands down the best version you’ll ever make at home. If you’ve ever struggled with finding the right balance between flavor and nutrition, you’re not alone — and I’ve got the fix.
What Makes This Version Stand Out
- Protein Power: With 25 grams of protein per serving, this muffin packs a punch that keeps you full and energized.
- Natural Sweetness: Honey and applesauce replace refined sugar, delivering sweetness without the crash.
- Moist Texture: Coconut oil and applesauce lock in moisture, ensuring a cake that feels like a cloud.
- Flavor Harmony: The blend of spices—cinnamon, nutmeg, ginger—creates a warm, aromatic profile.
- Low Carb: The oat flour and protein powder keep carbs in check, making it friendly for keto or low-carb diets.
- Easy Assembly: No complicated steps; just mix, bake, and enjoy.
- Versatile: It can be served as a snack, a dessert, or a post-workout treat.
- Make‑Ahead Friendly: Store in the fridge or freezer and reheat for a quick bite.
Alright, let's break down exactly what goes into this masterpiece. I’ll keep it short and sweet, because you’re going to love the next part.
Inside the Ingredient List
The Flavor Base
The foundation of this cake is the dry blend. Oat flour gives a subtle, nutty undertone, while vanilla whey protein powder adds a creamy texture and a protein boost that’s essential for muscle recovery. Baking powder and soda create lift, ensuring the muffins rise just enough to stay fluffy. If you skip the baking soda, the muffins will be dense and heavy, lacking that desirable airy quality.
The Texture Crew
Coconut oil is the secret weapon that keeps the batter silky and the finished product moist. Applesauce replaces eggs as a binder in part, giving a natural sweetness and a tender crumb. Eggs are still required for structure; without them, the muffins would crumble and lose their shape. A pinch of salt is crucial—it balances the sweetness and brings out the depth of the spices.
The Unexpected Star
Ground ginger adds a subtle heat that pairs beautifully with cinnamon and nutmeg. It’s often overlooked in carrot cakes, but it adds complexity and a touch of warmth that makes each bite memorable. If you’re allergic or simply don’t like ginger, you can replace it with a dash of allspice or omit it altogether, but expect a slightly flatter flavor profile.
The Final Flourish
Chopped walnuts and shredded coconut give the muffins a satisfying crunch and a tropical hint. They also add healthy fats that keep you feeling full longer. If you’re vegan or nuts-free, substitute with sunflower seeds or keep them out entirely. The final touch is vanilla extract, which rounds off the spices and adds a fragrant finish.
Everything's prepped? Good. Let's get into the real action.
The Method — Step by Step
- Preheat and Prepare: Set your oven to 350°F (175°C) and line a 12‑cup muffin tin with paper liners. The paper ensures easy removal and a clean finish. This is the moment where the kitchen starts to feel like a sanctuary of possibility. I love to hum a tune while waiting because it keeps the energy high. Once the oven is hot, you’re ready to bring the batter to life.
- Dry Mix: In a large bowl, whisk together oat flour, protein powder, baking powder, baking soda, cinnamon, nutmeg, ginger, and salt. The dry mixture should look like a fine, fragrant dust. This step is crucial because it ensures even distribution of leavening agents. A good whisking technique helps avoid clumps. Once combined, set aside to let the spices mingle.
- Wet Blend: In a separate bowl, beat the eggs, then stir in melted coconut oil, honey (or maple syrup), applesauce, and vanilla extract. The mixture should be smooth and glossy, like a polished marble. This wet blend is the binder that holds everything together. The applesauce adds moisture without the need for additional fats. When you pour it into the dry mix, you’ll see a beautiful transformation.
- Combine: Pour the wet mixture into the dry ingredients and stir until just combined. Overmixing here is a no‑no; it can make the muffins tough. The batter should be thick yet pourable, like a light custard. This is the moment of truth, where the batter’s color changes from pale to a golden hue. Feel the texture with your fingers; it should be silky.
- Add the Carrots: Fold in the grated carrots, walnuts, and shredded coconut. The carrots give the cake its signature color and moisture, while the nuts add crunch. The coconut adds a subtle sweetness and tropical vibe. This step is where the batter starts to look like a mosaic of textures. Be gentle to keep the batter from turning gray.
- Fill the Cups: Spoon the batter into the prepared muffin tin, filling each liner about three‑quarters full. The batter will spread slightly, so don’t worry if it looks uneven. This is the point where you can see the batter’s consistency. The cups should look like small, golden orbs. If you’re feeling fancy, you can sprinkle a little extra coconut on top for a decorative touch.
- Bake: Place the tin in the preheated oven and bake for 20‑25 minutes. The muffins should rise, develop a golden crust, and emit a warm, fragrant aroma. Check with a toothpick; it should come out clean. This step is critical—overbaking will dry them out. Keep an eye on the edges; they should pull away slightly from the paper liner.
- Cool: Remove the muffins from the oven and let them cool in the tin for 5 minutes before transferring to a wire rack. This brief rest allows the muffins to set, preventing them from breaking. Once on the rack, they’ll cool to room temperature in about 15 minutes. The aroma will intensify, making it hard to resist a second bite. Store the cooled muffins in an airtight container for up to three days.
- Optional Frosting: If you’re feeling indulgent, whisk together Greek yogurt, powdered erythritol, and a splash of vanilla. Spread the frosting over the cooled muffins. The tangy yogurt pairs beautifully with the sweet carrot. This step is optional but adds a creamy dimension. It’s perfect for a celebratory treat or a dessert with a protein boost.
That’s it — you did it. But hold on, I've got a few more tricks that'll take this to another level. These insider tips will elevate your muffins from good to unforgettable.
Insider Tricks for Flawless Results
The Temperature Rule Nobody Follows
Many bakers bake at a flat 350°F, but a slight temperature tweak can make a world of difference. Baking at 325°F for 25 minutes allows the muffins to rise evenly, preventing a cracked top. The lower heat also keeps the interior moist, avoiding a dry center. I’ve tested this on several batches, and the texture difference is unmistakable. Give it a try next time and taste the subtle change.
Why Your Nose Knows Best
Your nose is the ultimate judge of doneness. When the muffins are ready, a warm, sweet, spice‑filled aroma will fill the kitchen. If the smell is faint, let them bake a few minutes longer. This sensory cue is more reliable than a timer because ovens vary. Trust your instincts; you’ll be rewarded with perfectly baked muffins.
The 5‑Minute Rest That Changes Everything
After removing the muffins from the oven, let them rest in the tin for exactly five minutes. During this time, the muffins finish cooking internally and the batter sets. This short rest also prevents the muffins from sticking to the liners. Skipping it often leads to a crumbly texture. I’ve seen people toss this step, but the difference is worth the extra time.
The Subtle Sweetness Swap
If you’re watching your sugar intake, replace honey with a natural sweetener like stevia or monk fruit. The key is to use a 1:1 ratio to maintain moisture. However, stevia can add a slight aftertaste, so a pinch of cinnamon helps mask it. This swap keeps the muffins sweet without the blood sugar spike. I’ve used it in a low‑carb version and the results were fantastic.
The Final Touch of Texture
For a crunchy finish, sprinkle a thin layer of crushed walnuts or pecans over the batter before baking. The nuts toast slightly, adding a delightful crunch and nutty aroma. This simple tweak transforms the muffins into a multi‑sensory experience. It’s especially effective when serving to guests who appreciate a bit of texture contrast.
Creative Twists and Variations
This recipe is a playground. Here are some of my favorite ways to switch things up:
Chocolate Chip Carrot
Fold in a handful of dark chocolate chips after the carrots. The chocolate adds a bittersweet contrast, perfect for chocolate lovers. Keep the chocolate chips on the top for a decorative look. This variation turns the muffins into a dessert‑style treat. It’s ideal for a coffee break.
Tropical Banana Coconut
Replace grated carrots with mashed ripe banana and increase coconut oil by 1 tablespoon. The banana adds natural sweetness and moisture, while coconut oil intensifies the tropical vibe. Swap walnuts for shredded coconut for an extra coconut crunch. This version is great for a beach‑side picnic. The flavor profile is light and refreshing.
Spicy Maple
Add a pinch of cayenne pepper to the dry mix and use maple syrup instead of honey. The heat from cayenne gives a surprising kick that balances the sweetness. Maple syrup adds depth and caramel notes. This spicy version is a great conversation starter at parties. It’s surprisingly balanced.
Almond Flour Delight
Swap oat flour for almond flour to reduce carbs and add a nutty flavor. The muffins will be denser but still moist. Use a small amount of almond milk to adjust consistency. This version is perfect for those on a low‑carb or keto diet. The texture is silky and satisfying.
Vegan Vanilla
Use a plant‑based protein powder, flaxseed eggs, and almond milk. The muffins will still rise well and taste great. Substitute coconut oil with melted cashew butter for a richer flavor. This vegan version keeps the protein content high while staying dairy‑free. It’s a crowd‑pleaser for vegan friends.
Storing and Bringing It Back to Life
Fridge Storage
Store the cooled muffins in an airtight container in the refrigerator for up to three days. The moisture from the fridge keeps them fresh, but avoid leaving them in a plastic bag for too long to prevent sogginess. When you’re ready to eat, let them sit at room temperature for 10 minutes for a soft bite. This method preserves flavor while maintaining texture. The muffins still taste great after a few days.
Freezer Friendly
Wrap each muffin individually in parchment paper and place them in a freezer bag. They’ll stay fresh for up to two weeks. When you want a quick snack, pop them in the oven at 350°F for 10 minutes or microwave for 30 seconds. The muffins will thaw nicely, retaining their moisture. This is a lifesaver for busy mornings. The flavor remains intact.
Best Reheating Method
Add a tiny splash of water to the bottom of a baking dish and cover with foil before reheating. The steam keeps the muffins from drying out. Reheat at 350°F for 5 minutes or microwave on medium for 20 seconds. This trick brings back the fresh‑baked aroma. The texture will feel like a brand‑new muffin. It’s a simple yet effective method.