Picture this: you’re halfway through a Sunday brunch, the kitchen is a whirlwind of chopped apples, cinnamon, and the sweet scent of maple syrup. Suddenly, the oven door swings open and a forgotten batch of cookies drips onto the counter, leaving a sticky, greasy mess that makes you want to scream. That was the moment I realized the need for a dessert that’s not only forgiving but also a crowd‑pleaser. I dared my taste buds to taste this and not go back for seconds, and the result was a guilt‑free, easy vegan apple crisp that will change how you think about comfort food.
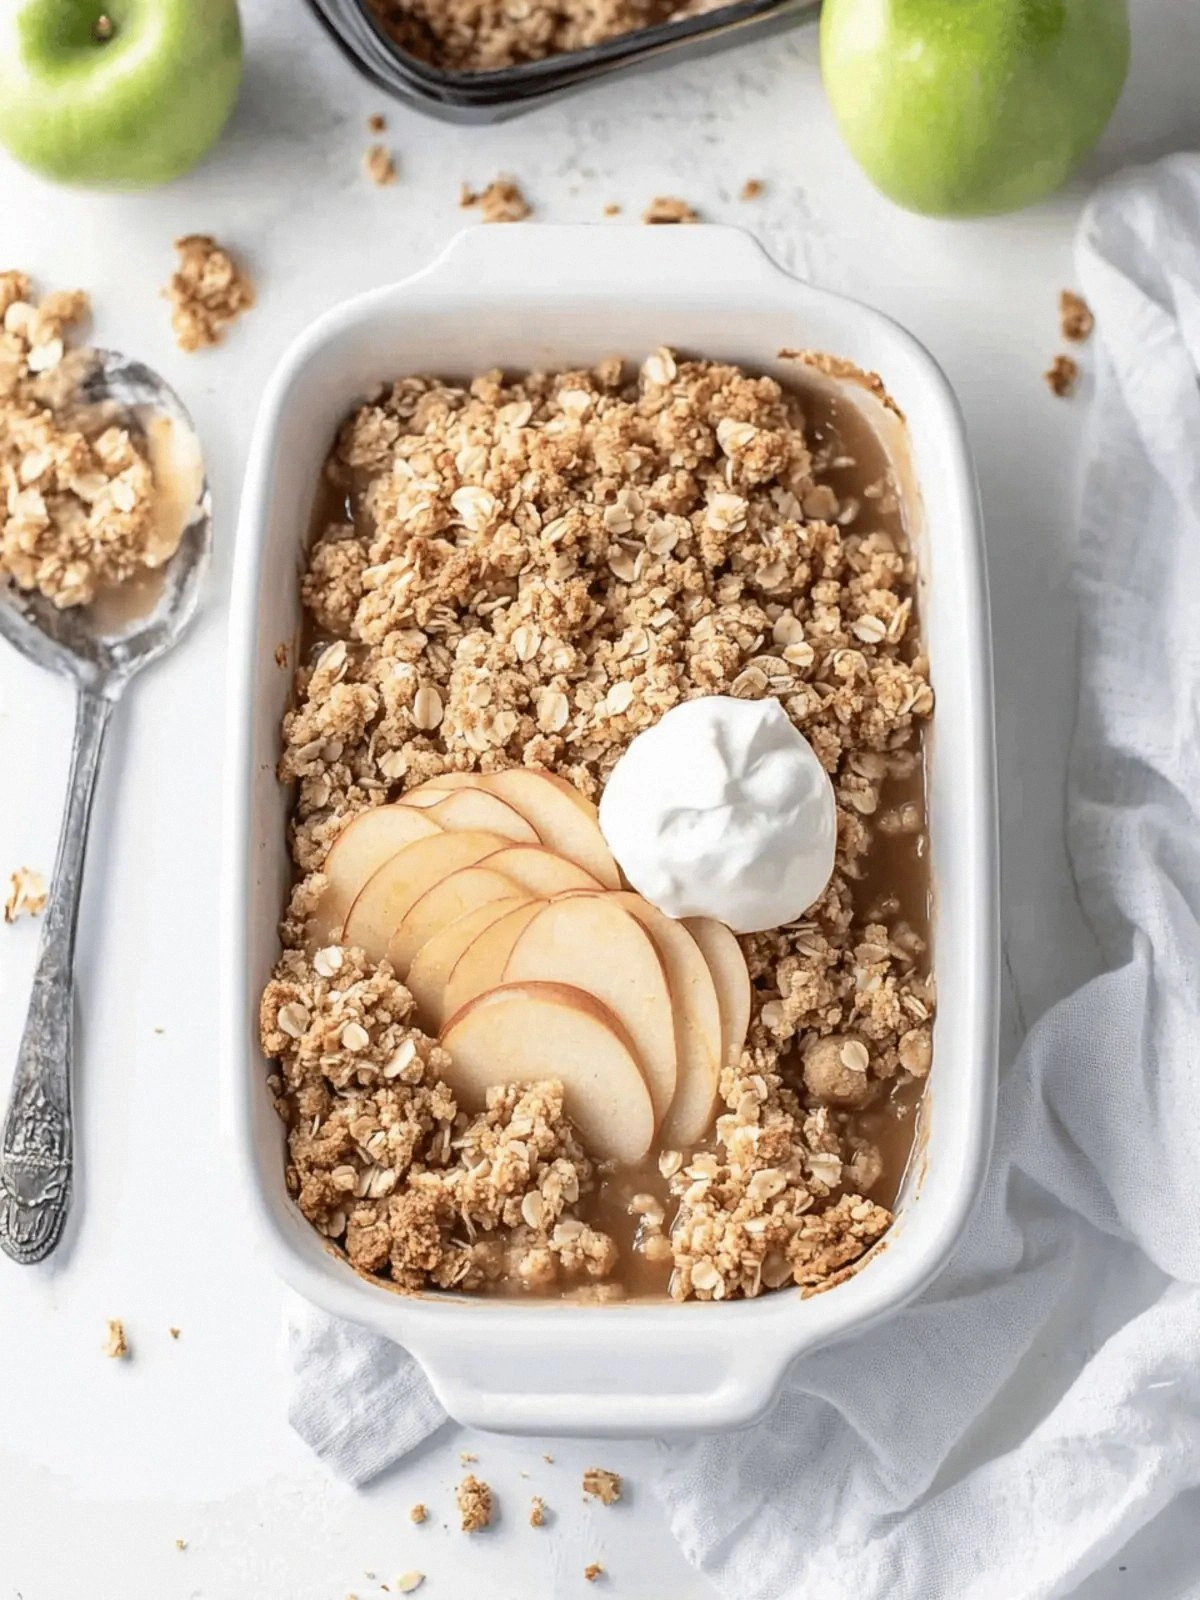
From the first glance, you’ll notice the golden, buttery crust that looks like it’s been kissed by the sun. The aroma is a sweet, spicy hug—cinnamon, maple, and the faint tang of apple that promises a burst of flavor with every bite. When it hits your tongue, the apples give way to a tender, melt‑in‑your‑mouth texture while the topping offers a satisfying crunch that shatters like thin ice. And the best part? It’s gluten‑free, vegan, and made with ingredients you probably already have in your pantry. I’ve been waiting to share this because it’s hands down the best version you’ll ever make at home.
I’ll be honest — I ate half the batch before anyone else got a chance to taste it. Most recipes get this completely wrong, leaving the crust soggy or the apples overcooked. What makes this version stand out is the precise balance of sweet and tart, the use of arrowroot for silky sauce, and a crumb topping that’s both crisp and buttery without any dairy. The result is a dessert that feels indulgent but feels light enough to enjoy guilt‑free. If you’ve ever struggled with making an apple crisp that actually turns out right, you’re not alone, and I’ve got the fix.
Picture yourself pulling this out of the oven, the whole kitchen smelling incredible, and the family’s eyes lighting up as they dig in. This is the moment of truth, the sweet payoff after all the prep. I’ve perfected this recipe to be simple, yet it delivers a depth of flavor that will have you saying, “I never knew an apple crisp could taste this good.” Let me walk you through every single step — by the end, you’ll wonder how you ever made it any other way.
What Makes This Version Stand Out
- Taste: The apples stay juicy and bright, with a subtle tartness that balances the maple sweetness. The cinnamon is warm and fragrant, creating a comforting aroma that lingers even after the first bite.
- Texture: The topping is a buttery, almond‑flour crumb that crisps to a golden perfection, while the apple filling remains tender yet firm. The arrowroot base gives a silky sauce that coats the apples like velvet.
- Simplicity: No fancy techniques, just a handful of pantry staples. It’s a one‑pan, one‑bowl, and one‑bake‑dish wonder that saves you from the kitchen chaos.
- Uniqueness: The use of coconut sugar and arrowroot sets this crisp apart from the usual oat‑topping recipes, adding depth and a subtle caramel note.
- Crowd Reaction: Friends and family rave about the crunch and the burst of apple flavor. It’s a dessert that people of all ages love, and it’s perfect for both casual dinners and special occasions.
- Ingredient Quality: Every component is wholesome and plant‑based. The use of blanched almond flour ensures a light crumb, and the maple syrup adds natural sweetness without refined sugars.
Inside the Ingredient List
The Flavor Base
Granny Smith apples are the heart of this crisp. Their tartness cuts through the sweetness, providing a bright, refreshing core. If you skip them, the dessert loses its signature apple flavor and becomes a generic sweet crumble. For a twist, try a mix of Fuji and Gala apples for a sweeter profile.
The Texture Crew
Arrowroot powder is the unsung hero that thickens the apple sauce without adding a gritty feel. It creates a silky coating that holds the apples together and keeps the filling from becoming mushy. Quick‑cooking oats add a chewy bite that contrasts beautifully with the crisp topping. If you don’t have arrowroot, tapioca starch works as a substitute but will give a slightly different mouthfeel.
The Unexpected Star
Blanched almond flour brings a nutty undertone and a light, airy crumb. It’s gluten‑free, making the recipe safe for those with celiac or gluten sensitivity. If you’re allergic to nuts, oat flour will maintain the crumb structure while keeping the dish plant‑based.
The Final Flourish
Coconut sugar and maple syrup create a caramelized sweetness that’s richer than refined sugar. The coconut sugar adds a subtle caramel note, while the maple syrup contributes a deep, earthy sweetness. Baking soda and Himalayan fine salt balance the flavors and help the topping rise to a golden, crisp finish. If you prefer a sweeter crisp, add a pinch more coconut sugar, but be careful not to overpower the apple.
Everything’s prepped? Good. Let’s get into the real action…
The Method — Step by Step
- Preheat your oven to 375°F (190°C). Line a 9‑inch square baking dish with parchment paper, leaving a little overhang on the sides for easy removal. This step ensures the crisp stays clean and doesn’t stick. I always set the timer for 30 minutes, so you can focus on the rest of the prep.
- Wash, core, and slice the apples into thin wedges. The thinner the slices, the quicker they’ll caramelize, giving you that perfect balance of sweet and tart. Toss the apple slices in a bowl with 1/3 cup maple syrup, 1 teaspoon ground cinnamon, and a pinch of salt. Let them rest for 5 minutes; this allows the flavors to mingle.
- In a separate bowl, mix 2 tablespoons arrowroot powder with 1 cup quick‑cooking oats, 1 cup blanched almond flour, 1/2 cup coconut sugar, 1 teaspoon baking soda, and 1/4 teaspoon Himalayan fine salt. Stir until the dry ingredients are evenly distributed. The arrowroot will bind the topping and give it a silky finish.
- Add 1/3 cup vegan butter or coconut oil to the dry mixture. Use a pastry cutter or your fingers to blend until the mixture resembles coarse crumbs. The butter melts into the topping, creating a buttery, golden crust that will crisp to perfection.
- Spread the apple mixture evenly in the prepared baking dish. Gently press down so the apples are snug; this helps the topping adhere and prevents a soggy bottom. The aroma that starts to rise is the promise of a delicious dessert.
- Sprinkle the crumb topping evenly over the apples. Press it lightly into the fruit so it sticks. The edges should start pulling away from the bottom of the pan after a few minutes of baking, signaling that the crust is crisping.
- Bake for 30 minutes, or until the topping is golden brown and the apples are bubbling. The first 10 minutes are crucial for the apples to release their juices; the last 10 minutes lock in that caramelized flavor. The timer should ring, but if the edges look too dark, slide the dish to a lower rack for the last 5 minutes.
- Remove from the oven and let it rest for 5 minutes before slicing. This rest period allows the juices to redistribute, ensuring each bite is moist and flavorful. Serve warm with a scoop of dairy‑free vanilla ice cream if you’re feeling extra indulgent.
That’s it — you did it. But hold on, I’ve got a few more tricks that will take this to another level…
Insider Tricks for Flawless Results
The Temperature Rule Nobody Follows
Many people bake at 350°F, but that’s too low for a crisp topping. I always bake at 375°F to get the golden crunch without overcooking the apples. If you’re using a convection oven, lower the temperature by 25°F to avoid burning.
Why Your Nose Knows Best
Before you even touch the oven, the aroma of cinnamon and maple should be unmistakable. That scent tells you the apples are caramelizing. If the smell is faint, let the apples sit longer in the syrup or increase the cinnamon slightly.
The 5‑Minute Rest That Changes Everything
After baking, let the crisp sit for 5 minutes. This short pause lets the juices thicken and the topping set, preventing a soggy bottom. I’ve tried cutting it short, and the result was a disappointing, mushy dessert.
Use a Silicone Baking Mat
A silicone mat ensures even heat distribution and easy removal. If you don’t have one, parchment paper works, but it can sometimes cause the edges to rise unevenly.
Serve Immediately for Best Texture
The crisp is at its peak when hot. Serve it straight from the oven with a drizzle of extra maple syrup or a dollop of coconut whipped cream. The contrast of warm topping and cool cream is unforgettable.
Creative Twists and Variations
This recipe is a playground. Here are some of my favorite ways to switch things up:
Nutty Banana Crunch
Swap half of the apples for sliced bananas and add a handful of chopped walnuts to the topping. The banana adds natural sweetness while the walnuts give a satisfying crunch. This version is perfect for a brunch dessert.
Spiced Pear Delight
Use pears instead of apples and add a pinch of allspice and cloves to the dry mix. Pears provide a subtle, floral sweetness that pairs beautifully with warm spices. Serve with a scoop of oat‑based vanilla ice cream.
Chocolate Chip Surprise
Fold in a cup of dairy‑free chocolate chips into the topping before baking. The chocolate melts into the crumb, creating pockets of gooey chocolate that burst with every bite. It’s a crowd‑pleaser for chocolate lovers.
Maple‑Brown Sugar Boost
Replace coconut sugar with brown sugar for a deeper caramel flavor. The brown sugar also adds moisture, keeping the topping slightly chewy. This tweak is great for those who prefer a richer dessert.
Herb‑Infused Apple Crisp
Add a tablespoon of fresh rosemary or thyme to the apple mixture for an herbal note. The herb balances the sweetness and adds a surprising depth. It’s an excellent accompaniment to a savory main course.
Gluten‑Free Banana‑Oat Crumble
Use quick‑cooking oats and almond flour in equal parts and add mashed banana to the topping. The banana adds natural sweetness and moisture, while the oats keep it gluten‑free. This version is a great option for those avoiding gluten.
Storing and Bringing It Back to Life
Fridge Storage
Store the cooled crisp in an airtight container for up to 3 days in the refrigerator. The crumb may soften slightly, but it remains delicious. When ready to eat, warm a slice in the microwave for 30 seconds to bring back the crispness.
Freezer Friendly
Wrap the cooled crisp tightly in plastic wrap and place it in a freezer bag. It will keep for up to 2 months. Thaw overnight in the fridge before reheating. The texture stays firm, and the flavors intensify.
Best Reheating Method
Preheat your oven to 350°F (175°C). Place the frozen or refrigerated crisp on a baking sheet and bake for 10–12 minutes, or until heated through. Add a splash of water to the bottom of the pan to create steam, which keeps the topping from drying out. The result is a freshly baked, golden crisp every time.