I was standing in my kitchen, staring at a half‑cooked taco casserole that had turned into a sad, soggy mess. The smell of burnt onions clung to the air, and the only thing that seemed to cheer me up was a craving for something that could bring the family together in minutes. I stared at the empty fridge, then at the stack of frozen tortillas, and decided to turn this culinary catastrophe into a triumph. That night, I dared myself to create a bowl that would make every family member shout, “I dare you to taste this and not go back for seconds.”
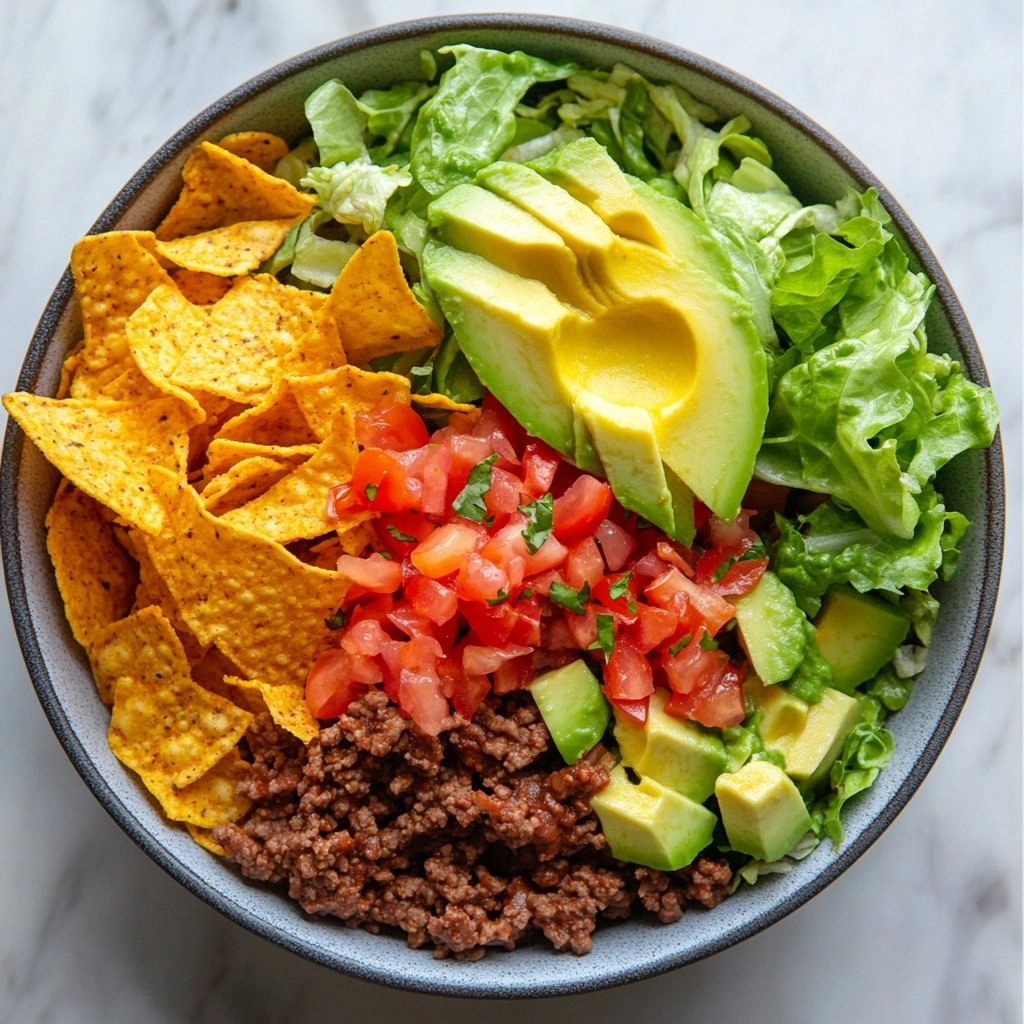
Picture the scene: a sizzling pan, the aroma of cumin and chili powder dancing in the kitchen, the clack of a spoon against a wooden board, and the gentle hum of the fridge opening. The colors are a riot—crimson tomatoes, emerald lettuce, golden corn, and the deep brown of seasoned meat. The texture ranges from the crispness of lettuce to the silky smoothness of guacamole, and the crunch of crushed tortilla chips. Each bite is a symphony of heat, tang, and coolness that lingers on the palate. It’s a dish that feels like a celebration, even on the busiest of weeknights.
What makes this version stand out is that it’s not just a salad or a taco; it’s a layered experience that plays with textures and flavors in a way that most recipes get completely wrong. I’ve spent years experimenting with sauces, seasonings, and cooking times, and this bowl is the culmination of that obsession. I’ll be honest—when I first tasted it, I ate half the batch before anyone else even had a spoon. The next time I made it, I could hear the family’s chatter about how it was hands down the best version you’ll ever make at home. The secret lies in the balance of heat, creaminess, and crunch, and a few unexpected ingredients that bring everything together.
Most recipes get this completely wrong by over‑cooking the veggies or under‑seasoning the meat. The trick is to cook the beef just until it’s browned, then let it rest so the juices redistribute, and finish the bowl with a splash of lime that brightens the entire dish. The crunch of tortilla chips should be preserved by toasting them lightly before crushing. The creamy topping should be made ahead so it can thicken slightly, giving it a velvety coat that lingers. And, if you’re feeling adventurous, add a drizzle of smoky chipotle aioli to turn the bowl into a flavor bomb.
If you’ve ever struggled with making a taco bowl that feels complete, you’re not alone—and I’ve got the fix. The next few paragraphs will walk you through every single step. By the end, you’ll wonder how you ever made it any other way. The only thing you’ll need is a bit of patience, a dash of confidence, and a willingness to experiment. So let’s dive in and turn your kitchen into a fiesta.
Okay, ready for the game‑changer? This is the moment when the ordinary transforms into something extraordinary. The key is layering—starting with the greens, then the protein, followed by the veggies, and finally the toppings. Each layer must be balanced so that no single flavor overwhelms the others. When you taste the first bite, you’ll feel the crunch of lettuce, the smokiness of beef, the sweetness of tomatoes, and the zing of lime, all in harmony. That’s the essence of a perfect taco salad bowl.
What Makes This Version Stand Out
- Flavor: The combination of seasoned beef, fresh lime, and creamy guac creates a bold, layered taste that feels like a taco and a salad at once. The heat from the taco seasoning is balanced by the coolness of the sour cream, making each bite refreshing. It’s a flavor profile that keeps you coming back for more.
- Texture: From crisp lettuce to crunchy chips, from creamy guacamole to juicy tomatoes, the bowl offers a textural adventure that satisfies every palate. The contrast keeps the dish interesting and prevents it from feeling one‑dimensional. The crunch of chips is the final flourish that completes the experience.
- Simplicity: With just a handful of ingredients and minimal prep time, this bowl is a go‑to for busy nights. No elaborate sauces or long cooking times—just a few quick steps that deliver maximum flavor. It’s the kind of dish that saves time without compromising taste.
- Uniqueness: The addition of a creamy guac‑sour mix and a splash of lime gives this bowl a signature twist that sets it apart from typical taco salads. It’s not just a salad; it’s a bowl that feels like a fiesta in a bowl. The unique blend of ingredients keeps it fresh and exciting.
- Crowd Reaction: Families love it because it’s customizable—kids can add extra cheese, adults can sneak in extra lime. The dish is also visually appealing, making it a hit at gatherings. The reaction is always enthusiastic, and the bowl is often requested for next week’s dinner.
- Ingredient Quality: Using fresh, high‑quality produce and lean ground beef ensures a clean, vibrant flavor that’s hard to achieve with processed ingredients. The quality of the ingredients translates directly into the final taste, making it a cut above the rest. Freshness is key.
- Cooking Method: Quick sautéing of the beef and onions locks in juices, while toasting the tortilla chips preserves crunch. This method ensures each component retains its intended texture and flavor. The cooking process is efficient and effective.
- Make‑Ahead Potential: The components can be prepped the night before, and the bowl stays fresh for up to 24 hours when stored properly. This makes it ideal for meal prep and busy schedules. The make‑ahead factor adds convenience.
Alright, let's break down exactly what goes into this masterpiece.
Inside the Ingredient List
The Flavor Base
The foundation of this bowl starts with the protein—ground beef seasoned to perfection. Ground beef is the heart of the dish, offering a savory, meaty base that carries the taco seasoning. The key to a great flavor base is to brown the meat just until it's no longer pink, then drain excess fat to keep it lean and flavorful. If you prefer a healthier twist, swap the beef for ground turkey or a plant‑based protein; the seasoning will still shine through. The taco seasoning itself is a blend of cumin, chili powder, paprika, garlic powder, and oregano, which together create a warm, aromatic profile that resonates with every bite.
The onions and garlic add depth, releasing sweetness and a subtle pungency that complements the meat. Sautéing them until translucent ensures they don't overpower the beef but rather enhance its richness. A splash of water during the simmering step keeps the mixture moist, preventing the beef from drying out and allowing the spices to coat evenly. If you like a bit of heat, consider adding a pinch of cayenne or a few dashes of hot sauce; it adds a subtle kick without overwhelming the dish.
A fun fact about taco seasoning: it was popularized in the 1960s by a U.S. brand that wanted to bring Mexican flavors to American households. The blend was designed to be versatile, so it can be used in tacos, burritos, and even soups. The seasoning’s history reflects how food cultures evolve and merge, making it a perfect addition to any modern kitchen.
The Texture Crew
Fresh lettuce forms the crunchy base of the bowl. I like to use a mix of romaine and iceberg for a delightful bite; the romaine adds a slight peppery note, while the iceberg provides a crisp, refreshing texture. Washing and drying the lettuce properly is crucial; any excess moisture will dilute the flavors and make the bowl soggy. Tossing the lettuce with a light vinaigrette or just a squeeze of lime before layering helps it hold its crunch.
Tomatoes, diced into bite‑sized chunks, add juiciness and a sweet acidity that balances the richness of the meat. Choose ripe, firm tomatoes for maximum flavor; they should hold their shape and not turn mushy. The corn kernels contribute a sweet, slightly buttery texture that complements the beans and adds a pop of color. If you’re using canned corn, rinse it to remove excess sodium and let it drain fully before adding.
Black beans bring a creamy, hearty element that rounds out the bowl. Drain and rinse the beans thoroughly to remove any canning liquid, which can be salty. The beans also add protein and fiber, making the dish more filling and balanced. For a smoky twist, try adding a pinch of smoked paprika or a dash of chipotle powder to the beans before mixing.
The Unexpected Star
Guacamole is the unexpected star that elevates this bowl from ordinary to extraordinary. Its creamy texture and subtle avocado flavor create a smooth contrast to the crunchy and spicy components. Making guac ahead of time helps it set slightly, preventing it from turning green. A squeeze of lime not only adds brightness but also helps preserve the color. The guac also serves as a creamy base that holds the other toppings together.
Sour cream is another key player that adds a cool, tangy note. It balances the heat from the taco seasoning and the lime, creating a harmonious flavor profile. Mixing sour cream with a dash of lime juice and a pinch of salt gives it a fresh kick that keeps the bowl from feeling heavy. If you prefer a dairy‑free version, try using Greek yogurt or a plant‑based sour cream alternative; the texture will remain creamy.
The Final Flourish
Crushed tortilla chips provide the final crunch that gives the bowl its signature texture. Toasting them lightly in a dry skillet before crushing ensures they stay crisp and develop a deeper flavor. The chips also add a subtle corn flavor that complements the beans and corn. A sprinkle of shredded cheddar cheese on top adds a melty, savory finish that ties all the elements together.
Cilantro and lime are the finishing touches that bring everything together. The fresh cilantro adds a bright, herbal note, while the lime juice cuts through the richness and adds a zesty lift. The combination of cilantro and lime is a classic Mexican pairing that enhances the overall flavor profile. The final squeeze of lime right before serving gives the bowl a burst of freshness that makes it feel alive.
Everything's prepped? Good. Let's get into the real action...
The Method — Step by Step
- Heat a large skillet over medium heat and add the ground beef. Stir frequently, breaking it up into small crumbles, until it’s no longer pink, about 5–7 minutes. Add the diced onion and minced garlic, cooking until the onions turn translucent and the garlic becomes fragrant, about 2–3 minutes. Sprinkle in the taco seasoning, a pinch of salt and pepper, and a splash of water to keep the mixture moist. Let the mixture simmer for 2 minutes to allow the flavors to meld together. This sets the savory base for the bowl.
- While the meat simmers, prepare the fresh components. Rinse the lettuce under cold water, dry thoroughly with a salad spinner or clean towel, and tear into bite‑size pieces. Dice the tomatoes into uniform cubes, and drain the black beans, rinsing them to remove any excess sodium. Stir the corn kernels, chopped cilantro, and a squeeze of lime into a bowl. The bright citrus will cut through the richness of the meat, giving the bowl a vibrant lift. Keep these components ready to layer later.
- In a separate bowl, combine the shredded cheddar cheese, sour cream, and guacamole. Mix until the mixture is creamy and well‑combined. This creates a velvety topping that will coat the salad and add a smooth, cooling contrast to the heat of the meat. Let the mixture sit for a few minutes to allow the flavors to meld. The creamy layer will thicken slightly, making it easier to distribute evenly over the bowl.
- Toast the tortilla chips in a dry skillet over medium heat, stirring occasionally, until they’re lightly browned and fragrant, about 3–4 minutes. Once toasted, transfer them to a bowl and crush them into bite‑size pieces. The crunch will remain even after crushing, adding a satisfying texture to the bowl. If you prefer a crunchier texture, reserve a handful of whole chips for serving on the side. This step is crucial for the final crunch.
- Layer the bowl by placing a generous amount of shredded lettuce at the bottom. Spoon the seasoned beef mixture over the greens, ensuring a thick, even layer. Sprinkle the drained beans and corn on top of the meat. The layering ensures that every bite contains a balanced mix of protein, fiber, and flavor. This arrangement also keeps the lettuce from wilting under the weight of the toppings.
- Drizzle the salsa over the top, then scatter the crushed tortilla chips and shredded cheese evenly. The cheese should melt slightly from the heat of the meat, creating a cohesive flavor. The salsa adds acidity and a burst of color, while the chips provide crunch. This step is where the bowl truly starts to come alive.
- Finish with a dollop of the creamy guac‑sour mix, and add a final squeeze of lime over the entire bowl. The lime brightens the dish and balances the richness. The creamy topping coats the bowl, creating a velvety finish that ties all the flavors together. The lime also adds a subtle citrus zing that lifts the overall taste.
- Toss gently to combine, ensuring every component is coated with the creamy topping and salsa. The bowl should have a harmonious mix of textures: crisp lettuce, juicy tomatoes, smoky beef, crunchy chips, and creamy guac. The final toss also helps distribute the lime juice evenly. This step is essential for a cohesive flavor profile.
- Serve immediately, perhaps with extra chips on the side for those who love an extra crunch. The bowl stays fresh and crunchy for at least 30 minutes if covered. If you’re serving a crowd, keep the bowl on a warming tray or in a slow‑cooker set to low to maintain its temperature. The bowl is best enjoyed fresh, but it can be stored in the fridge for up to 24 hours if covered tightly.
That’s it — you did it. But hold on, I've got a few more tricks that'll take this to another level.
Insider Tricks for Flawless Results
The Temperature Rule Nobody Follows
The meat’s temperature is critical; if it’s too hot, the juices evaporate, leaving a dry, rubbery texture. Aim for a medium heat that allows the beef to brown without steaming. The ideal temperature is around 350°F on the skillet, which you can gauge by the sizzling sound and the slight bubbling of the liquid. Once the meat is browned, let it rest for a minute before draining to lock in moisture. A quick rest also helps the seasoning to settle into the meat, creating a deeper flavor.
Why Your Nose Knows Best
Smell is your secret weapon; if the meat smells slightly caramelized, it’s ready. The aroma of cumin, paprika, and garlic is a tell‑tale sign that the spices have toasted and released their oils. A fresh, bright scent indicates the beans are still crisp. If you notice a metallic or sour smell, it’s a sign the beans might be overcooked. Trust your nose to guide you through the cooking process.
The 5‑Minute Rest That Changes Everything
After cooking the beef, let it rest for five minutes before draining the excess fat. This short pause allows the juices to redistribute throughout the meat, ensuring each bite is juicy. It also gives the spices a chance to meld, deepening the flavor profile. Many cooks skip this step, resulting in a dry, unevenly seasoned dish. The rest is a small price for a big flavor payoff.
Crunch Consistency Matters
To keep the tortilla chips crisp, toast them in a dry skillet before crushing. The heat caramelizes the outer layer, creating a golden crunch that won't soften when mixed with the other ingredients. If you prefer a softer chip texture, reserve a handful of whole chips for the side. The contrast between crisp and soft adds an interesting dimension to the bowl.
Layering Like a Pro
When assembling the bowl, start with the lettuce as the base, then add the beef, beans, and corn. This layering technique prevents the greens from becoming soggy and ensures each bite has a balanced mix of flavors. The key is to keep the layers thin enough to mix but thick enough to hold their shape. If you’re serving a crowd, pre‑assemble the bowls and keep them chilled until just before serving.
Creative Twists and Variations
This recipe is a playground. Here are some of my favorite ways to switch things up:
Mediterranean Taco Salad
Swap the taco seasoning for a blend of oregano, thyme, and smoked paprika. Replace the corn with roasted red peppers and add a handful of kalamata olives. Finish with a drizzle of feta cheese and a splash of lemon juice. The result is a Mediterranean‑inspired bowl that’s still packed with flavor.
Vegan Power Bowl
Use crumbled tempeh or lentils instead of ground beef. Replace the sour cream with a cashew‑based cream and use a plant‑based cheese. Add a handful of roasted chickpeas for extra crunch. This version is protein‑rich, dairy‑free, and just as satisfying.
BBQ Chicken Taco Bowl
Replace the beef with shredded rotisserie chicken tossed in your favorite BBQ sauce. Add a handful of coleslaw mix for crunch and a splash of lime. Top with a dollop of creamy ranch dressing and a sprinkle of chopped green onions. The smoky sweetness of BBQ pairs wonderfully with the tangy lime.
Breakfast Taco Salad
Start with scrambled eggs instead of beef, and add diced avocado, sliced radishes, and a sprinkle of chili flakes. Use a light salsa and a drizzle of hot sauce for extra zing. Finish with a handful of shredded cheddar and a squeeze of lime. This bowl is a hearty, protein‑packed breakfast that feels like a brunch on the go.
Spicy Thai Taco Bowl
Swap the taco seasoning for a mix of lemongrass, ginger, and chili flakes. Replace the cheese with shredded coconut flakes and add a drizzle of sweet chili sauce. Toss in fresh mint leaves for a refreshing contrast. The bowl becomes a vibrant fusion of Mexican and Thai flavors.
Low‑Carb Taco Bowl
Replace the tortilla chips with roasted cauliflower florets for crunch. Use a low‑carb salsa and skip the corn. Add extra lettuce and a handful of sliced radishes for volume. This version keeps the flavor high while cutting carbs dramatically.
The possibilities are endless, and each twist brings a new dimension to the familiar base. Try one, tweak it, and share your version with friends. The joy of cooking is in the experimentation.
Storing and Bringing It Back to Life
Fridge Storage
Store the assembled bowl in an airtight container, keeping the tortilla chips separate until ready to serve. This prevents the chips from becoming soggy. The bowl stays fresh for up to 24 hours when refrigerated. The lettuce will stay crisp, and the toppings will maintain their texture. When ready to eat, give the bowl a quick stir to redistribute the dressing.
Freezer Friendly
To freeze, separate the components: keep the meat, beans, and salsa in one bag, and the lettuce and toppings in another. Freeze for up to 3 months. When thawing, let the meat and beans sit at room temperature for 20 minutes before reheating. The lettuce can be added fresh after thawing. This method keeps the bowl’s flavors intact.
Best Reheating Method
Reheat the meat and beans in a skillet over medium heat, adding a splash of water to keep them moist. Warm the tortilla chips in a dry skillet until crisp again. The lettuce is best added fresh to avoid wilting. If reheating the entire bowl, cover it with foil and warm in a 300°F oven for 10 minutes. Add a tiny splash of water before reheating to steam back to perfection.