I was halfway through a midnight baking marathon, my pantry stocked with the usual suspects—flour, sugar, butter, and the occasional egg—when a sudden craving for something that screamed “summer in a jar” hit me like a lightning bolt. I opened the pantry, and there it was: a small jar of ube halaya, a deep violet gem that looked like a tropical sunset captured in syrup. “What if I could turn that into a cookie?” I whispered to the empty kitchen, and the idea stuck like a sweet sticky note. I’ve tried dozens of ube treats, from cakes to ice cream, but nothing quite matched the silky, custard‑like bite of this particular jam. This cookie is the ultimate fusion of that silky center with a caramelized, crinkle‑rim edge that melts in your mouth, and I’m about to show you why this version is the best you’ll ever make at home.
Picture the scene: the kitchen lights a warm amber glow, the aroma of butter and sugar mingling with the sweet, earthy scent of ube. I can hear the gentle pop of butter melting, the rhythmic whisking of eggs, and the faint hiss of sugar caramelizing as it hits the pan. Every sense is engaged—your eyes follow the swirl of violet batter, your nose is drawn to the caramelized edges, your fingertips feel the soft dough, and when you bite, the cookie explodes in a burst of sweet, creamy ube with a subtle hint of vanilla and sea salt. It’s like a tropical sunrise wrapped in a buttery shell, and trust me, I dare you to taste this and not go back for seconds.
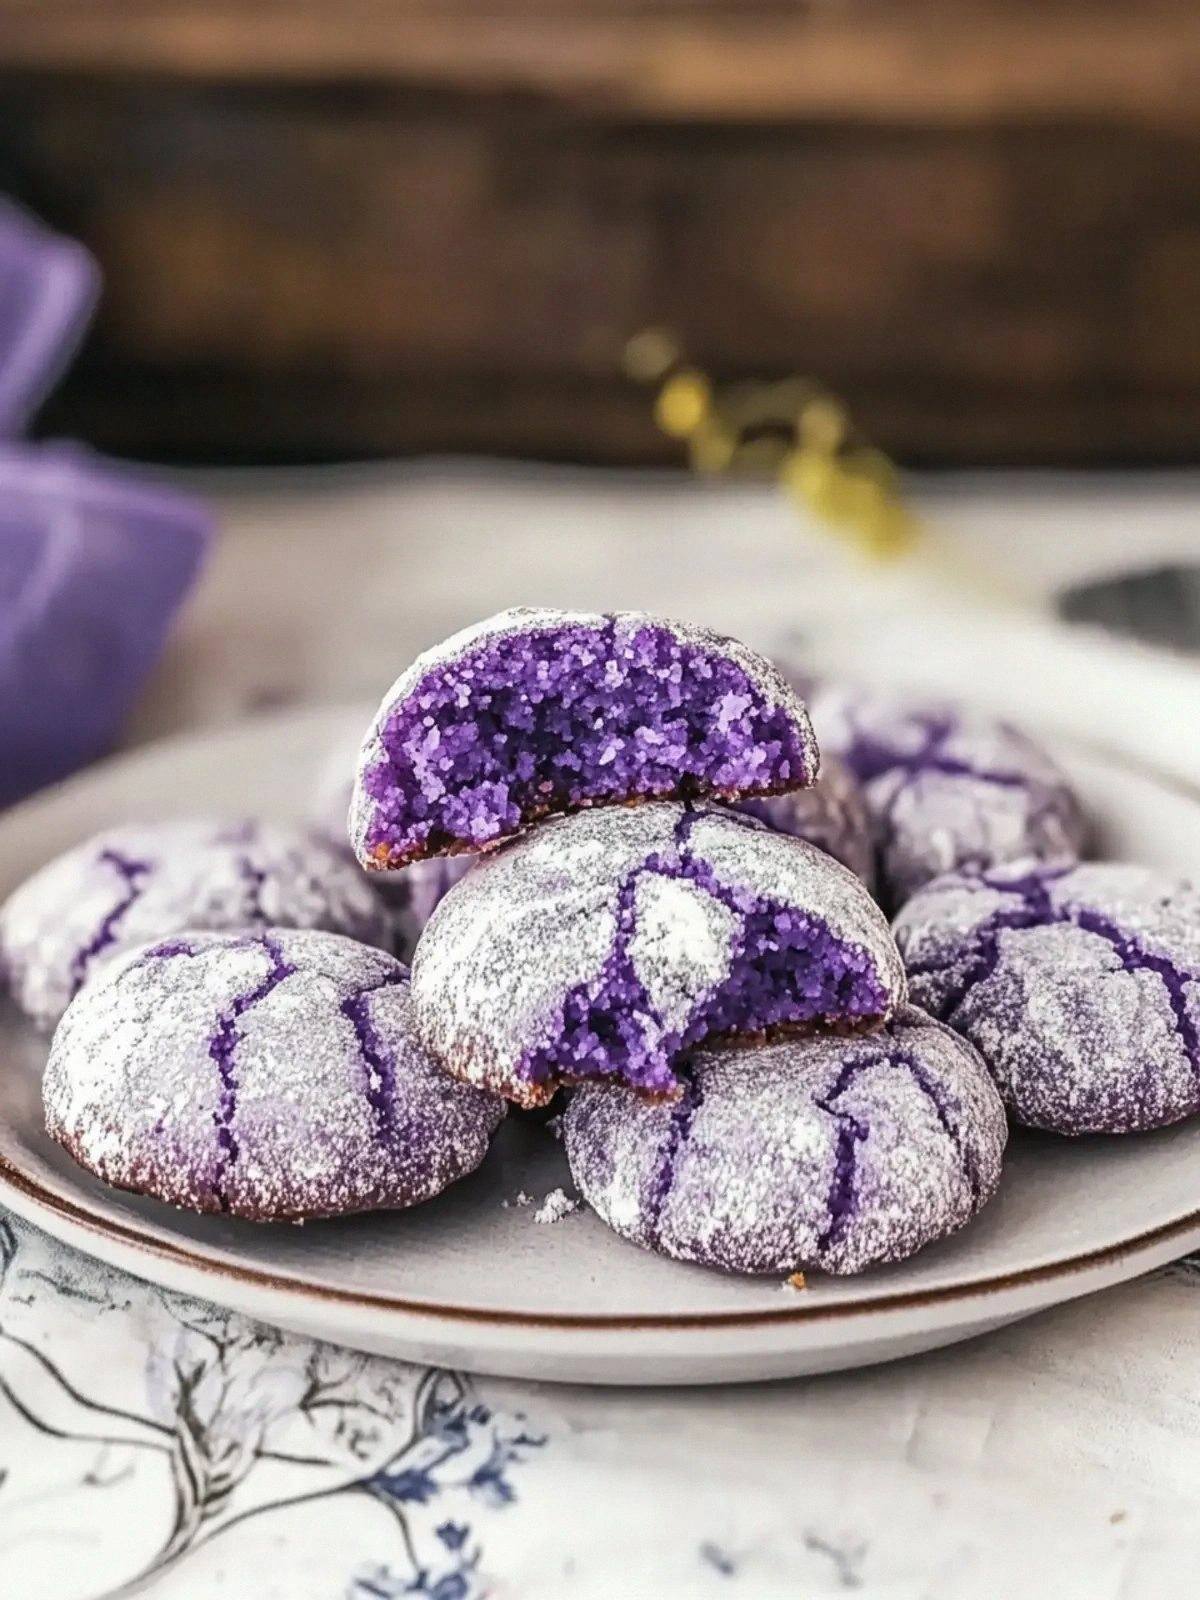
What sets this cookie apart is the meticulous balance of flavors and textures. The ube halaya isn’t just a flavoring; it’s the heart of the cookie, providing a natural sweetness that cuts through the richness of butter and the slight bitterness of sea salt. The crinkle effect—those crackled edges that shatter like thin ice—adds a delightful crunch that contrasts the soft interior. I’ve spent hours tweaking ratios, and the result is a cookie that’s soft and chewy inside, with a caramelized, slightly crisp exterior, all without the need for any fancy equipment or extra steps. This is hands down the best version you'll ever make at home, and I’m excited to walk you through every single step so you can replicate this kitchen magic.
And here’s the twist that most recipes miss: a splash of ube extract to intensify the color and flavor without overwhelming the natural sweetness. It’s a subtle trick that makes the cookie look like a jewel and taste like a dream. Picture yourself pulling this out of the oven, the whole kitchen smelling incredible, the cookies cooling on a rack with a faint violet haze curling in the air. That moment is pure joy, and you’ll want to share it with everyone. Let me walk you through every single step—by the end, you’ll wonder how you ever made it any other way.
What Makes This Version Stand Out
- Flavor Depth: The combination of ube halaya and a hint of ube extract creates a layered sweetness that feels both nostalgic and novel. It’s like a sweet memory of childhood desserts with a modern twist.
- Texture Contrast: The buttery, soft crumb inside meets a crisp, caramelized edge that crackles when you bite. This duality keeps every bite exciting.
- Visual Appeal: The vibrant violet hue of the dough makes it Instagram‑worthy, while the crinkled edges add an artisanal feel that turns any plate into a centerpiece.
- Gluten‑Free Friendly: By using a gluten‑free all‑purpose flour blend, the recipe remains accessible to those with dietary restrictions without sacrificing flavor or structure.
- Make‑Ahead Potential: The dough holds up well for up to 48 hours in the fridge, and the cookies keep fresh for a week when stored in an airtight container.
- Minimal Equipment: No fancy gadgets required—just a mixing bowl, a rolling pin, and a baking sheet. The only “special” tool is the crinkle cookie cutter, which can be replaced by a simple round cookie cutter.
- Kid‑Friendly: The ingredients are all safe for children, and the process can be turned into a fun family activity, especially when the kids watch the dough crackle in the oven.
- Versatility: The recipe can be adapted to regular all‑purpose flour for a richer crumb or swapped with coconut oil for a dairy‑free version.
Alright, let's break down exactly what goes into this masterpiece...
Inside the Ingredient List
The Flavor Base
The foundation of any cookie is its flavor base, and in this case, it’s a marriage of softened butter or coconut oil and granulated sugar. Butter provides that classic rich, creamy taste that melts in your mouth, while coconut oil adds a subtle tropical note and a slightly firmer texture. The sugar not only sweetens but also helps the dough spread evenly, creating that signature crinkle effect. If you’re watching calories, swap the butter for a lighter oil or reduce the sugar slightly, but be prepared for a slightly different crumb.
The Texture Crew
Next up is the egg, which acts as the glue that holds everything together. It adds moisture, structure, and a silky finish. Then there’s the ure halaya or ube jam, which brings the iconic purple color and a naturally sweet, custard‑like consistency. The jam’s high moisture content is why the cookie is so soft and chewy. If you can’t find ube jam, you can make a quick puree of boiled ube, but the texture will be a bit different.
The Unexpected Star
The ube extract is the secret weapon that amplifies flavor and color without adding bulk. A teaspoon is enough to brighten the dough and give that deep, almost metallic violet that makes the cookies pop on the plate. Don’t be afraid to experiment—if you prefer a more subtle hue, reduce the extract to half a teaspoon.
The Final Flourish
The flour—whether gluten‑free or regular—provides the structure that allows the cookie to hold its shape during baking. The baking powder gives a slight lift, preventing the cookies from being too flat. A pinch of sea salt balances the sweetness and brings out the ube’s natural flavor. Finally, the granulated sugar for rolling creates that signature crinkle pattern when the dough is rolled in sugar before baking, and the powdered sugar dusted on top gives a delicate finish and a sweet crunch.
Everything's prepped? Good. Let's get into the real action...
The Method — Step by Step
- Preheat your oven to 350°F (175°C) and line two baking sheets with parchment paper. The parchment prevents sticking and ensures even baking. As the oven warms, you’ll hear the gentle crackle of butter starting to melt—a sound that signals the beginning of cookie magic. Let the sheets sit in the oven to warm slightly; this helps the cookies bake evenly.
- In a large mixing bowl, cream the softened butter (or coconut oil) and 1 cup of granulated sugar with an electric mixer on medium speed until pale and fluffy. The creaminess of the butter should be reminiscent of a cloud, and the mixture should be light enough to hold air. This step is crucial; it incorporates air into the dough, giving the cookies a tender crumb.
- Add the large egg and beat until fully incorporated. The egg should blend seamlessly into the butter mixture, creating a smooth, glossy batter. If you see any curdling, simply whisk a splash of milk or water to bring it together.
- Fold in 1 cup of ube halaya or ube jam, followed by 1 teaspoon of ube extract. The dough will take on a deep violet hue that’s almost hypnotic. Stir until the jam is fully incorporated, ensuring the color is evenly distributed. The jam’s moisture will make the dough slightly sticky—this is expected and will give the cookies their signature chewiness.
- Sift together 2 cups of gluten‑free all‑purpose flour (or regular flour), 1 teaspoon of baking powder, and 1/2 teaspoon of sea salt. This dry blend provides structure and lift. Gently fold the dry ingredients into the wet mixture, stirring until just combined. Overmixing can create tough cookies; stop as soon as the flour is incorporated.
- Divide the dough into 1‑inch balls and roll each in 1/2 cup of granulated sugar. The sugar coating is what creates the crinkled edge as it caramelizes in the oven. Make sure each ball is evenly coated; uneven sugar will result in uneven crinkles.
- Place the sugar‑coated dough balls on the prepared baking sheets, spacing them about 2 inches apart to allow for expansion. Gently press each ball with the back of a fork to create the classic crinkle pattern. The crinkled surface should resemble a tiny, delicate lace.
- Bake for 12–15 minutes, or until the edges are golden brown and the center still looks slightly pale. The cookies should smell toasty, with a faint caramel aroma that signals the sugar is caramelizing. Keep a close eye on the baking time; overbaking will dry out the chewy center.
- Remove from the oven and let the cookies cool on the sheet for 5 minutes before transferring them to a wire rack. This short cooling period allows the cookies to set without cracking. If you’re impatient, you can press a flat object on top for a minute to flatten the crinkles slightly, but that’s optional.
- Once cooled, dust the cookies with 1/2 cup of powdered sugar for a final touch of sweetness and a subtle crunch. The powdered sugar should dissolve slightly into the surface, giving the cookie a delicate glaze. Serve immediately, or store in an airtight container for up to a week.
That's it — you did it. But hold on, I've got a few more tricks that'll take this to another level. These insider tips will help you perfect the texture, flavor, and presentation, ensuring every batch is a masterpiece.
Insider Tricks for Flawless Results
The Temperature Rule Nobody Follows
Many bakers swear by a high‑temperature bake to get a crisp edge, but for ube crinkle cookies, a steady 350°F (175°C) is key. The lower temperature allows the sugar to caramelize slowly, creating a golden, crackled crust without burning the interior. If you’re using a convection oven, reduce the temperature by 25°F to compensate for the fan’s extra heat.
Why Your Nose Knows Best
The aroma of baking is a powerful indicator of progress. When the cookies start to smell like toasted sugar and butter, it’s a sign that the sugar is caramelizing just right. If the scent is too sweet and syrupy, the cookies are still too raw. Trust your nose; it’s the best judge of doneness.
The 5‑Minute Rest That Changes Everything
After baking, let the cookies rest on the sheet for exactly five minutes before moving them to a wire rack. This brief pause allows the interior to set while the edges finish crisping. Skipping this step often results in cookies that crumble or feel too soft.
Use a Rolling Pin with a Mark
Mark the center of your rolling pin with a small dot. This ensures the dough is rolled evenly to the same thickness, preventing some cookies from being thinner and overcooked while others remain undercooked. Even thickness translates to uniform texture across the batch.
Keep the Sugar Fresh
If you’re planning to bake a large batch, store the granulated sugar for rolling in an airtight container. Moisture can cause the sugar to clump, which leads to uneven coating and a less crisp edge. A dry, sealed container keeps the sugar flaky and ready for action.
Creative Twists and Variations
This recipe is a playground. Here are some of my favorite ways to switch things up:
Chocolate‑Covered Ube Crinkles
Dip the cooled cookies in melted dark chocolate, then let them set on parchment. The chocolate adds a bittersweet depth that complements the sweet ube center. Sprinkle a pinch of sea salt on top for an extra flavor burst.
Almond Crinkle Cookies
Replace half the all‑purpose flour with almond flour for a nutty undertone and a slightly denser crumb. The almond flavor pairs beautifully with ube, creating a sophisticated twist that’s perfect for brunch.
Vegan Ube Crinkles
Swap the butter for coconut oil and the egg for a flaxseed “egg” (1 tablespoon ground flaxseed mixed with 3 tablespoons water, set for 5 minutes). The result is a completely plant‑based cookie that still delivers on flavor and texture.
Ube & Coconut Crinkles
Add 1/4 cup shredded coconut to the dough for a tropical crunch. The coconut adds a subtle chewiness and enhances the ube’s natural tropical profile.
Mini Crinkle Bites
Reduce the dough balls to 3/4‑inch pieces and bake for 10 minutes. The smaller size is perfect for parties, and the crinkled edges become even more pronounced.
Ube Crinkles with a Citrus Twist
Add a teaspoon of lemon zest to the dough for a bright, refreshing contrast to the sweet ube. The citrus lifts the flavor and adds a subtle zing that keeps the cookies from feeling too heavy.
Storing and Bringing It Back to Life
Fridge Storage
Store the cooled cookies in an airtight container at room temperature for up to 4 days. If you notice them drying out, place a slice of bread in the container; the bread will release moisture and keep the cookies soft.
Freezer Friendly
For longer storage, wrap the cookies individually in plastic wrap and place them in a freezer bag. They’ll keep for up to 3 months. When ready to enjoy, let them thaw at room temperature for 30 minutes before serving.
Best Reheating Method
To revive the cookies, preheat the oven to 300°F (150°C) and bake them for 5–7 minutes. Add a tiny splash of water to the baking sheet before placing the cookies; the steam will help restore the soft, chewy interior while keeping the edges crisp.