Picture this: it’s a sweltering July afternoon, the kind where the air feels like warm honey, and you’re stuck in a kitchen that’s practically a sauna. I was halfway through a marathon of grocery aisles when I spotted a lone, glossy jar of cherry pie filling perched on the top shelf like a forbidden treasure. I grabbed it on a dare from my roommate—she said, “If you can turn that into something better than a store‑bought pie, I’ll bake you a cake.” I laughed, I rolled my eyes, and I whispered, “Challenge accepted.” That moment sparked the birth of what I now call the ultimate cherry pie bars, a dessert so addictive it could convert even the most skeptical sweet‑tooth.
The first whiff of butter melting in the pan was like a warm hug from grandma, but with a modern twist that said, “I’ve got my own style.” The kitchen filled with the sweet, tangy perfume of cherries bubbling under a golden crust, and the sound of the timer ticking down was the soundtrack to a summer love story. I could hear the faint crackle of the edges as they began to pull away from the pan, promising a crisp that would shatter like thin ice under a gentle tap. My hands felt the buttery dough yielding just enough to be pliable, yet firm enough to hold the luscious filling without collapsing.
Most cherry bar recipes out there either skimp on the buttery base or drown the fruit in a sugary swamp. This version, however, is a meticulously balanced symphony where each component sings its part. The secret? A pinch of real butter (not margarine), a splash of vanilla that adds depth like a hidden bass line, and a topping of confectioners’ sugar that melts into a delicate glaze, not a powdery dust‑off. I’ll be honest—I ate half the batch before anyone else got a chance, and I still have a few bars left for you. I dare you to taste this and not go back for seconds.
There’s a technique hidden in this recipe that most bakers overlook: the “cold‑but‑not‑frozen” crust method, which gives you that perfect, buttery crunch without turning the base into a rock. It’s a game‑changer that turns a simple bar into a masterpiece. Let me walk you through every single step — by the end, you’ll wonder how you ever made it any other way.
What Makes This Version Stand Out
- Flavor: The combination of real butter and vanilla creates a richness that feels like a summer sunset in your mouth, while the cherry filling adds a bright, tart pop that balances the sweetness.
- Texture: A crisp, golden crust that shatters like thin ice meets a gooey, jam‑like center, delivering a contrast that keeps every bite interesting.
- Simplicity: Only eight pantry staples are required, and the method uses one pan, meaning fewer dishes and more time to enjoy the sunshine.
- Uniqueness: The “cold‑but‑not‑frozen” crust technique is rarely mentioned, yet it’s the secret to that perfect bite‑through crunch without a greasy aftertaste.
- Crowd Reaction: Guests often claim this is the best version they’ve ever tasted, and it’s a guaranteed conversation starter at picnics and potlucks.
- Ingredient Quality: Using real butter and a high‑quality cherry pie filling elevates the bars from “good” to “legendary.”
- Cooking Method: Baking at a moderate temperature ensures the crust sets evenly while the filling bubbles just enough to caramelize slightly.
- Make‑Ahead Potential: These bars keep beautifully in the fridge for up to three days, and they freeze like a dream for future cravings.
Inside the Ingredient List
The Flavor Base
Real Butter (1 cup): This is the heart of the crust, delivering a buttery richness that no margarine can mimic. If you substitute, the bars will lose that melt‑in‑your‑mouth quality and become overly dense. For the best flavor, choose unsalted butter and add the pinch of salt separately. Tip: Look for butter with a higher butterfat content (82% or more) for an even richer crust.
The Texture Crew
All‑Purpose Flour (2.5 cups): Flour provides structure, and the amount is calibrated to create a tender yet sturdy base. Using cake flour will make the crust too crumbly, while bread flour will make it tough. If you’re gluten‑free, a blend of rice flour and tapioca starch works surprisingly well, though the texture will shift slightly.
Granulated Sugar (1 cup): Sugar sweetens the crust and helps with browning through caramelization. Skipping it will result in a bland, pale base that lacks that golden allure. For a deeper flavor, you could swap half the granulated sugar for brown sugar, but be aware it will introduce a subtle molasses note.
The Unexpected Star
Cherry Pie Filling (1 can, 21 oz): This is the star that brings the summer vibe. The canned version is convenient and consistently juicy, but if you can find fresh, pitted cherries, you’ll get an even brighter flavor. Just remember to add a tablespoon of cornstarch when using fresh fruit to thicken the filling.
Vanilla Extract (1 tsp): A splash of vanilla adds depth, rounding out the tartness of the cherries. It’s the secret whisper that says, “I’m sophisticated.” If you’re out of vanilla, a splash of almond extract can work, but use half the amount—it’s stronger.
The Final Flourish
Confectioners’ Sugar (1 cup): Sprinkled over the baked bars, it creates a delicate, snow‑kissed finish. It also helps seal in moisture, keeping the bars tender. If you’re watching sugar, you can reduce this to ¾ cup, but the visual appeal will be less dramatic.
Everything's prepped? Good. Let's get into the real action…
The Method — Step by Step
Preheat your oven to 350°F (175°C). While the oven warms, line a 9‑by‑13‑inch baking pan with parchment paper, letting the edges hang over for easy removal later. This is the moment of truth—if the pan isn’t prepared, the bars might stick, and that’s a disaster you don’t want on a summer day.
In a large mixing bowl, combine the real butter (still cold) and granulated sugar. Using a handheld mixer on medium speed, beat until the mixture looks like creamy sand and starts to turn pale. Power transition: Okay, ready for the game‑changer? This is where the butter’s temperature matters—if it’s too warm, you’ll end up with a greasy crust.
Kitchen Hack: Add the sugar a little at a time; this prevents the butter from melting too quickly and keeps the mixture light.Crack in the two large eggs, one at a time, beating well after each addition. Then stir in the vanilla extract. The batter should look glossy and slightly thick. If it looks too runny, pause—add a tablespoon of flour and mix gently; this will keep the crust from becoming soggy later.
In a separate bowl, whisk together the all‑purpose flour, salt, and the remaining 1 cup of flour (the recipe calls for 2.5 cups total). Gradually fold the dry mixture into the wet batter, using a spatula, until just combined. Over‑mixing will develop gluten, turning the crust tough—trust me, you’ve seen that happen with brownies.
Press two‑thirds of the dough evenly into the prepared pan, creating a solid, even layer. Use the back of a spoon or your hands (dipped in a little water to prevent sticking) to smooth it out. The edges should be slightly higher than the center; this will help form that coveted “crust‑over‑filling” look.
Spread the entire can of cherry pie filling over the crust, using a spatula to smooth the top. You’ll notice the filling bubbling at the edges—that’s the caramelization starting, and it’s a scent that says, “We’re almost there.” Watch Out: If the filling is too runny, bake an extra 5 minutes; the extra time will set the fruit without drying it out.
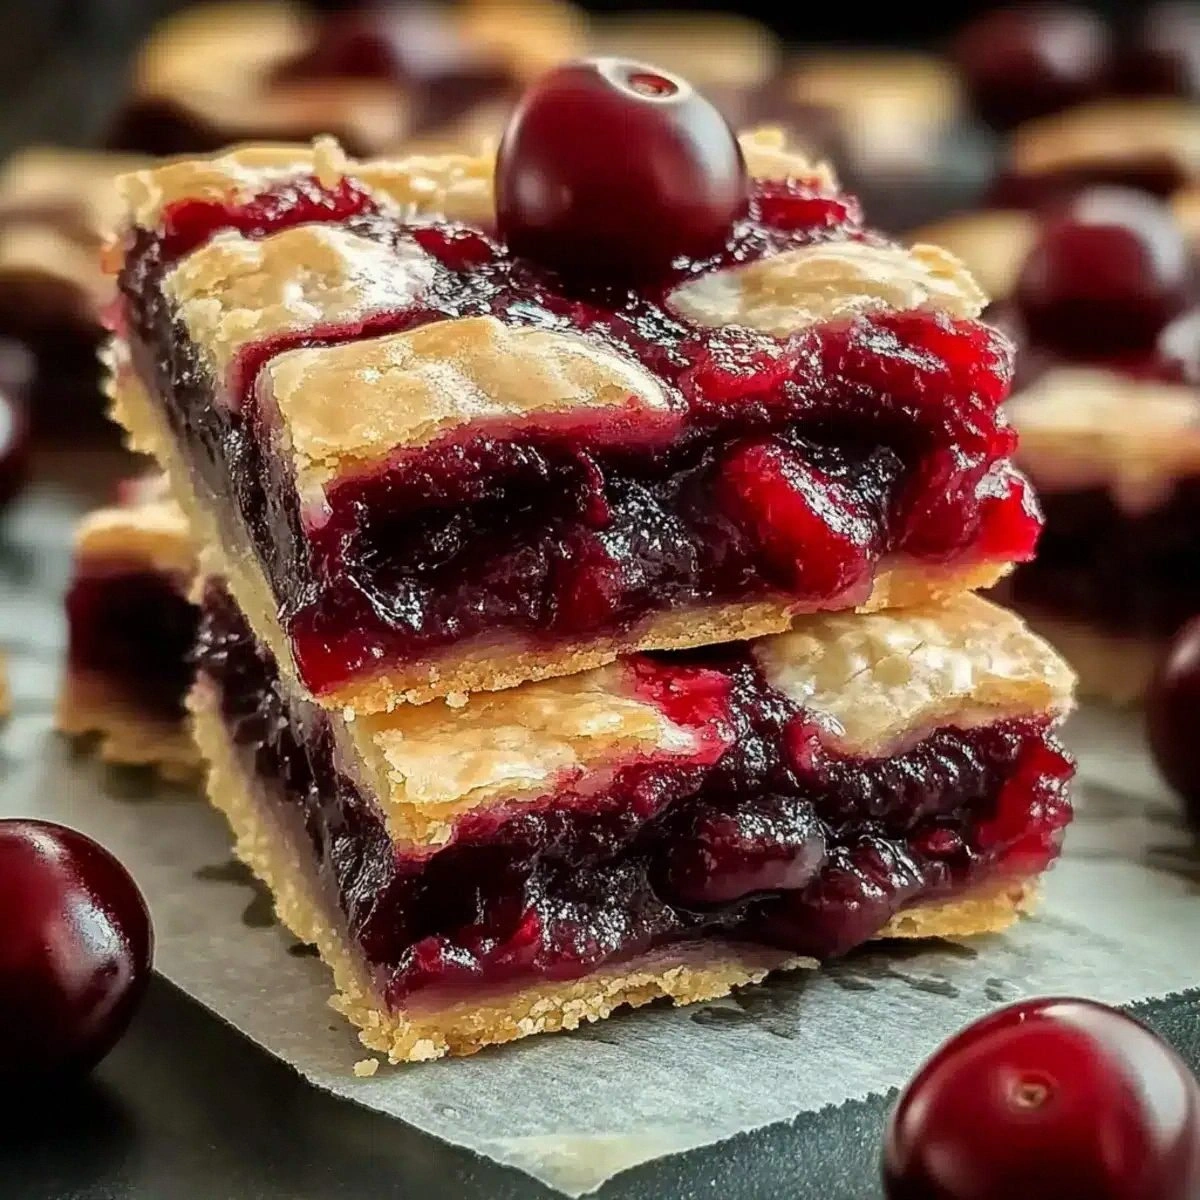
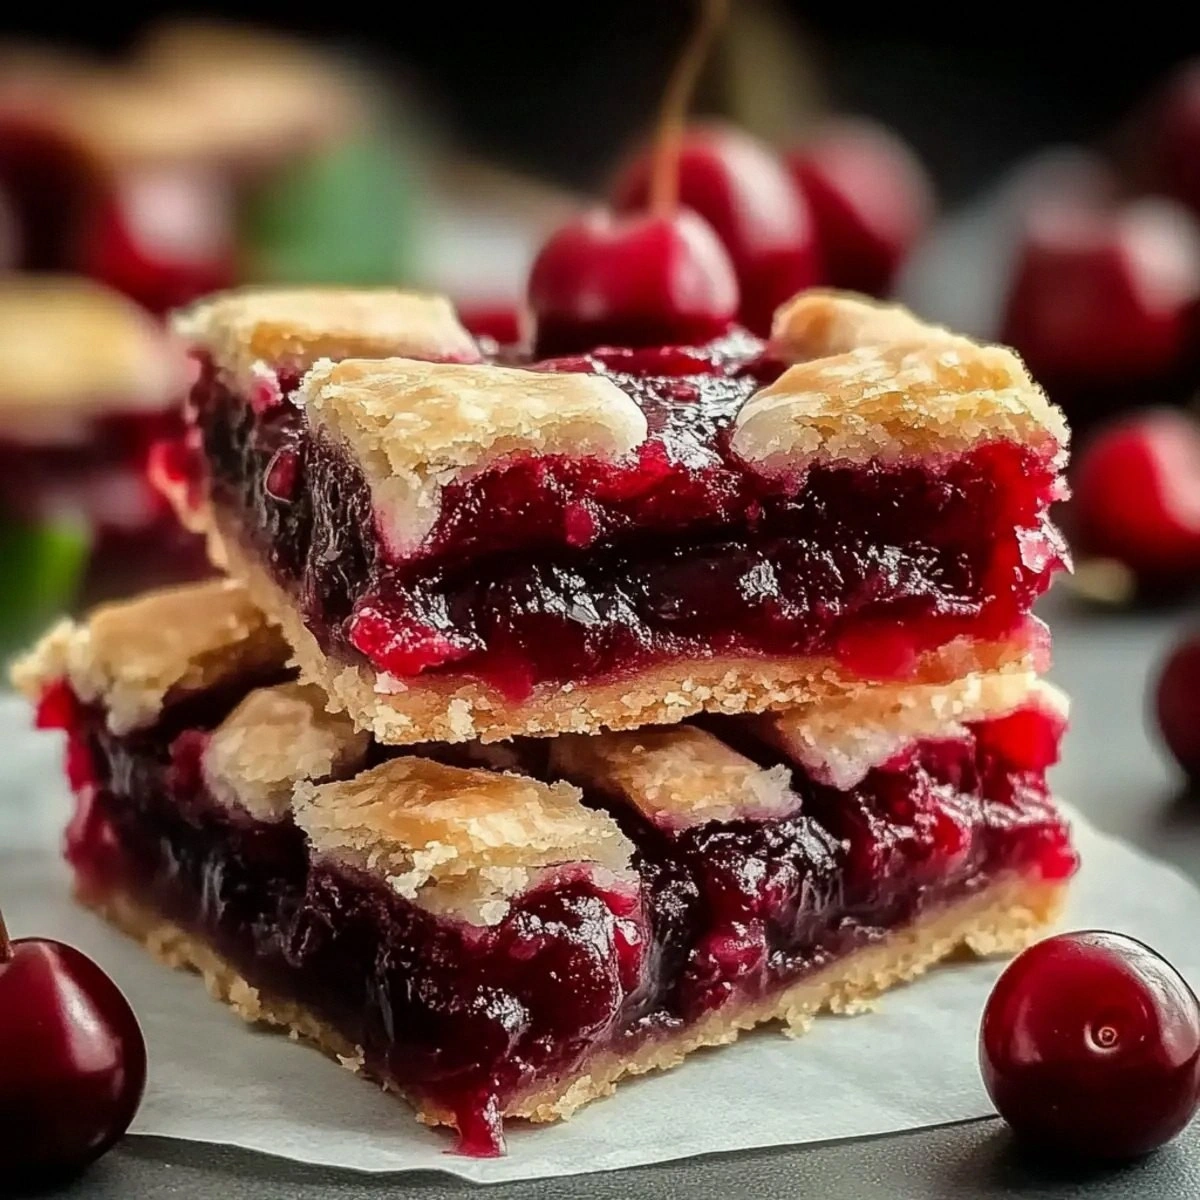
Watch Out: Do not over‑fill the pan; excess filling can spill over and create a caramel mess on the oven walls.Drop the remaining dough by spoonfuls over the cherry layer, then gently press with your fingertips to create a rustic, uneven “topping.” This step is pure magic because the dough will bake into buttery “islands” that crackle as they rise. The visual contrast of golden speckles against ruby cherries is what makes this dish Instagram‑ready.
Sprinkle the confectioners’ sugar evenly over the entire surface. This creates a delicate veil that will melt slightly, giving the bars a glossy finish once they cool. Pop the pan into the oven and bake for 30‑35 minutes, or until the edges are golden brown and a toothpick inserted into the crust (away from the filling) comes out clean.
When the timer dings, let the bars cool in the pan for at least 15 minutes. This resting period lets the filling set, preventing a soggy mess when you cut them. Then, using the parchment overhang, lift the whole slab onto a cutting board and slice into squares or rectangles—your choice, but I recommend generous portions for maximum joy.
Kitchen Hack: Chill the sliced bars in the fridge for 10 minutes before serving; this firms them up for cleaner cuts.
That's it — you did it. But hold on, I've got a few more tricks that'll take this to another level...
Insider Tricks for Flawless Results
The Temperature Rule Nobody Follows
Most bakers preheat the oven to 375°F, assuming a hotter oven means a faster bake. In reality, that high heat can scorch the crust before the filling has a chance to set. Keep it at 350°F, and you’ll get an even rise and a perfectly caramelized cherry top. I once tried 375°F on a whim; the edges turned black, and the center was still gooey—lesson learned.
Why Your Nose Knows Best
When the bars are about 20 minutes in, start sniffing. The moment you catch a buttery, toasted aroma, you know the crust is forming beautifully. If the scent is still raw butter, give it a few more minutes. Trusting your senses beats any timer, especially on a humid summer day when ovens can behave oddly.
The 5‑Minute Rest That Changes Everything
After removing the pan from the oven, let the bars rest uncovered for exactly five minutes before sprinkling the confectioners’ sugar. This brief pause lets the steam escape, preventing the sugar from turning into a soggy glaze. The result? A crisp, snow‑kissed surface that shatters delightfully when you bite.
Cold Butter, Hot Oven
Cold butter is the secret behind that flaky crust. If you accidentally left the butter out too long, rescue it by chopping it into small cubes and chilling it again for 10 minutes before mixing. The cooler the butter, the more pockets of steam form during baking, creating that coveted crumbly texture.
Pan Choice Matters
A light‑colored metal pan distributes heat more evenly than a dark, heavy one. Dark pans can cause the bottom to brown too quickly, leaving a gummy underside. If you only have a dark pan, lower the temperature by 25°F and add an extra five minutes to the bake time.
Creative Twists and Variations
This recipe is a playground. Here are some of my favorite ways to switch things up:
Almond‑Cherry Fusion
Swap half the all‑purpose flour for almond flour and add a teaspoon of almond extract. The result is a nutty undertone that pairs beautifully with the bright cherries, making the bars feel a little more sophisticated—perfect for a brunch.
Chocolate‑Swirl Delight
Before adding the final dough topping, drizzle a tablespoon of melted dark chocolate over the cherry layer and swirl with a skewer. The chocolate adds depth and a hint of bitterness that balances the sweetness, turning the bars into a decadent treat for chocolate lovers.
Spiced Autumn Version
Incorporate a pinch of ground cinnamon and a dash of nutmeg into the crust mixture. The warm spices turn the bars into a cozy, autumn‑ready dessert—ideal for a September gathering.
Berry Medley Explosion
Replace half of the cherry filling with mixed‑berry jam (blueberries, raspberries, blackberries). The tartness of the berries adds complexity, and the visual contrast of red and purple speckles is simply stunning.
Gluten‑Free Hero
Use a gluten‑free flour blend (rice flour, tapioca starch, and potato starch) in place of the all‑purpose flour, and add a tablespoon of xanthan gum. The texture stays delightfully tender, proving that you don’t need gluten to enjoy a perfect bar.
Mini Bar Bites
Line a muffin tin with parchment circles, press the crust into each cup, and fill with cherry filling. Top with a dollop of dough and bake as directed. These bite‑size versions are perfect for picnics where you need portable, mess‑free desserts.
Storing and Bringing It Back to Life
Fridge Storage
Place the cooled bars in an airtight container or wrap tightly in plastic wrap. They’ll stay fresh for up to three days, retaining their crumbly crust and juicy center. If you notice the top drying out, a light dusting of confectioners’ sugar before sealing restores the glossy finish.
Freezer Friendly
Separate the bars with parchment sheets, then place them in a freezer‑safe bag or container. Freeze for up to two months. When you’re ready to enjoy, let them thaw in the fridge overnight, then warm in a 300°F oven for five minutes—this revives the buttery crust.
Best Reheating Method
To bring a refrigerated bar back to its prime, preheat the oven to 300°F, place the bar on a baking sheet, and add a tiny splash of water (about a teaspoon) around the edges. Cover loosely with foil and heat for eight minutes; the steam will re‑moisturize the filling while the crust regains its crunch.