I was in the middle of a frantic holiday prep when my roommate dared me to bake something that would actually make the whole apartment smell like a Christmas market. I thought, “Sure, why not? Let’s throw together a batch of cookies and see if we can survive the season without setting off the smoke alarm.” The first attempt was a disaster: flat, colorless discs that tasted like bland butter and regret. I stared at the tray, feeling the weight of disappointment, and then I remembered that one secret ingredient—peppermint extract—my grandma swore by. That tiny splash of mint turned the whole thing from “meh” to “magical,” and I’ve been obsessed ever since.
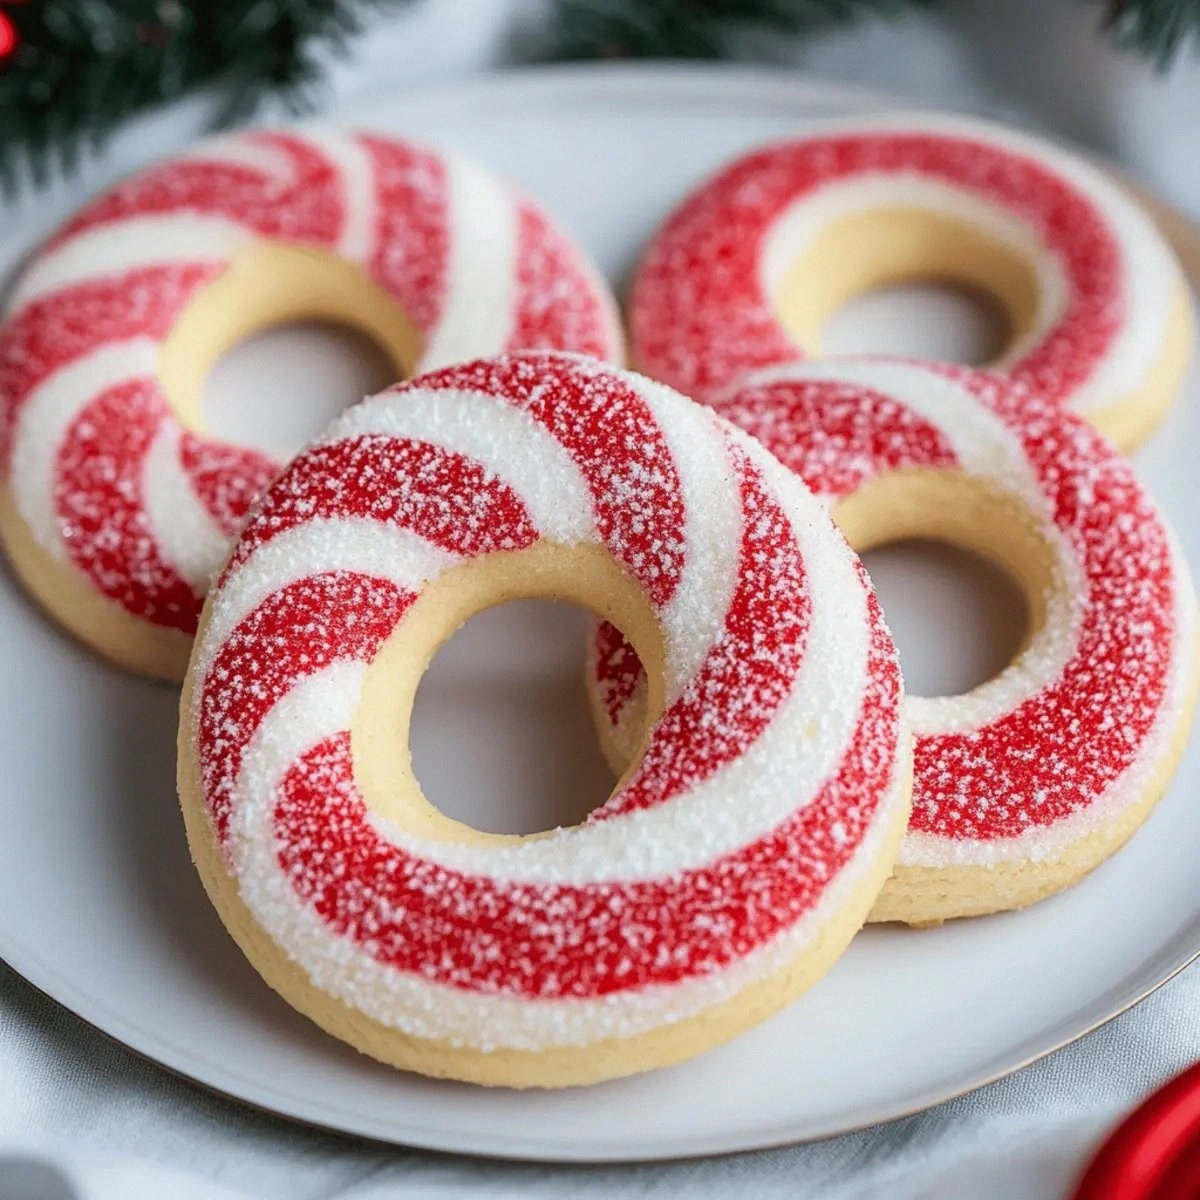
Picture this: a kitchen awash in soft, buttery light, the oven humming like a contented cat, and the air suddenly filling with a sweet, minty aroma that makes you want to curl up by the window and watch snow fall. You hear the faint crackle of sugar crystals as they melt into a glossy glaze, feel the cool metal of the baking sheet under your fingertips, and see the dough transform from a plain white slab into a vibrant swirl of red and white. The first bite is a buttery melt-in-your-mouth experience, followed by a crisp edge that shatters like thin ice, releasing a burst of peppermint that tingles your taste buds. It’s like a warm hug from an old friend who also happens to be a candy cane.
Most candy cane cookie recipes out there either overdo the peppermint, turning the cookies into a medicinal mess, or they skip the essential step of dusting, leaving you with a dull, lifeless cookie. This version stands out because it balances the minty punch with a buttery base, adds a subtle vanilla undertone, and finishes with a snowy powdered sugar coat that looks like fresh winter snow. I’m not exaggerating when I say this is hands down the best version you’ll ever make at home; it’s the kind of cookie that makes you want to share it with strangers on the street just to see their faces light up.
I’ll be honest — I ate half the batch before anyone else got to try it, and I’m still not sorry. The secret? A splash of peppermint extract combined with a precise amount of red food coloring that gives you that classic candy‑cane swirl without any artificial aftertaste. And there’s a game‑changing technique I’m about to reveal that will give you a perfectly smooth, glossy finish every single time. Ready to dive in? Let’s walk through every single step — by the end, you’ll wonder how you ever made it any other way.
What Makes This Version Stand Out
- Flavor Harmony: The peppermint isn’t overwhelming; it’s a whisper that dances with buttery richness, creating a balanced taste that feels festive without being cloying.
- Texture Contrast: A soft, melt‑in‑your‑mouth center meets a crisp, caramelized edge, delivering that satisfying snap you crave from a perfect cookie.
- Simplicity: Only nine ingredients, all pantry staples, mean you can whip these up even if you’re short on time or fancy specialty items.
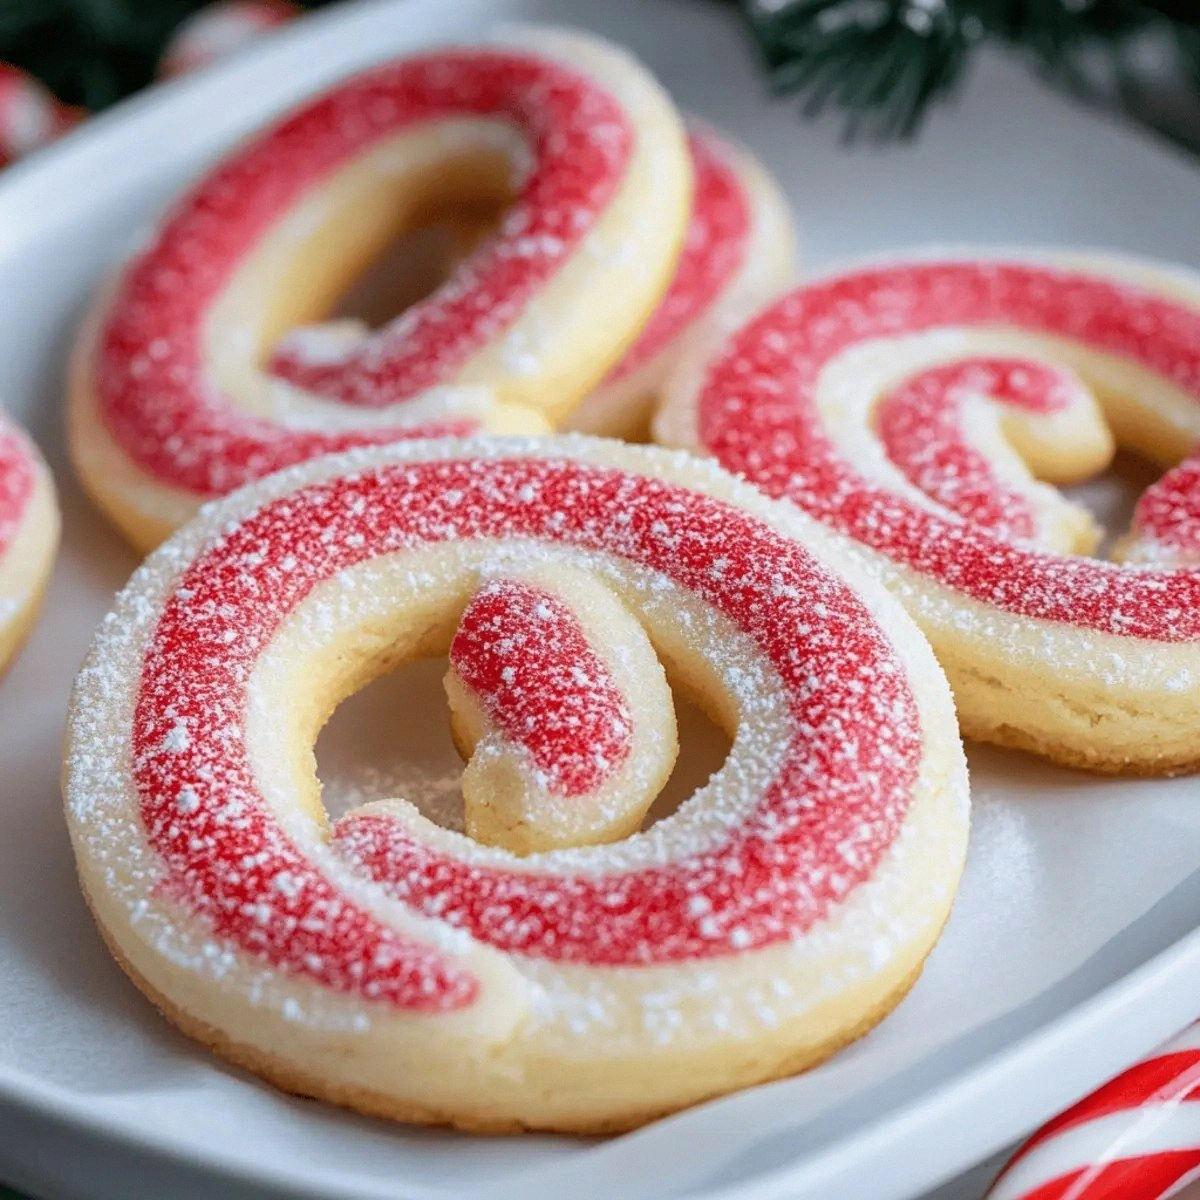
- Visual Appeal: The red‑white swirl looks like a miniature holiday decoration, making them Instagram‑ready and perfect for gifting.
- Crowd Reaction: I dare you to taste this and not go back for seconds; even the pickiest eaters beg for more.
- Ingredient Quality: Using real unsalted butter and pure peppermint extract elevates the flavor profile far beyond store‑bought mixes.
- Cooking Method: A low‑and‑slow bake preserves the delicate crumb while developing a golden edge that signals perfection.
- Make‑Ahead Potential: These cookies freeze beautifully, so you can prep weeks in advance and still serve fresh‑warm delights.
Alright, let's break down exactly what goes into this masterpiece...
Inside the Ingredient List
The Flavor Base
Unsalted butter is the heart of any good cookie, providing richness and a tender crumb. I always recommend using European‑style butter with a higher butterfat content; it creates a silkier dough that spreads less. If you skip the butter or replace it with margarine, you’ll lose that buttery depth and end up with a dry, crumbly texture. A good tip is to let the butter soften at room temperature for about 15 minutes—just enough to be pliable but not melted.
The Sweetness Layer
Powdered sugar does double duty here: it sweetens the dough without adding grainy texture, and it’s also the snow‑like dusting that finishes the cookie. The fine crystals dissolve quickly, ensuring a smooth, glossy surface after baking. If you only have granulated sugar, pulse it in a blender for a few seconds to mimic powdered sugar, but the texture won’t be as delicate. For the dusting, sift the sugar over the cooled cookies to avoid clumping and achieve that perfect winter wonderland look.
The Unexpected Star
Peppermint extract is the secret weapon that transforms an ordinary butter cookie into a holiday icon. A half‑teaspoon is enough to give a bright, clean mint note without turning the dough bitter. Be cautious: a little goes a long way, and using too much can make the flavor taste like toothpaste. If you can’t find peppermint extract, crush a few candy canes and dissolve them in a teaspoon of hot water, then strain before adding.
The Texture Crew
All‑purpose flour provides the structure, while the small pinch of salt amplifies all the other flavors. The flour should be sifted with the salt to prevent lumps and ensure an even distribution. If you substitute cake flour, the cookies will be too tender and may crumble; if you go for whole‑wheat, you’ll get a denser, nuttier bite that’s lovely but not the classic texture we’re aiming for. A quick tip: spoon the flour into the measuring cup and level it off, rather than scooping directly, to avoid packing.
The Final Flourish
Red food coloring is purely for visual impact; it creates the iconic candy‑cane swirl without altering flavor. Use a gel-based color for a more vibrant hue with less liquid, which helps keep the dough’s consistency intact. If you’re avoiding artificial colors, a splash of beet juice can give a natural pinkish tint, though the swirl won’t be as striking. Remember, the color is only a garnish—don’t let it distract you from perfecting the taste.
Everything's prepped? Good. Let's get into the real action...
The Method — Step by Step
Start by preheating your oven to 350°F (175°C). While the oven warms, line two baking sheets with parchment paper; this prevents sticking and gives you a clean release. I like to set a timer for the preheat so I don’t forget about the dough later—this moment is the first checkpoint for a perfect bake.
In a large mixing bowl, cream together the softened butter and powdered sugar until the mixture is light, fluffy, and pale yellow. This should take about 2‑3 minutes with an electric mixer on medium speed; you’ll notice the texture become airy, almost like a cloud. That sizzle when it hits the pan? Absolute perfection. If the mixture looks grainy, keep mixing—patience here is key.
Add the egg, vanilla extract, and peppermint extract to the creamed butter. Beat until fully incorporated; the dough should look smooth and glossy.
Watch Out: Over‑mixing at this stage can incorporate too much air, leading to a cakey texture later.Sift the flour, salt, and red food coloring together into a separate bowl. The coloring should be evenly distributed; if you see streaks, whisk gently to blend. This step ensures that every bite has a uniform hue without dark pockets.
Gradually add the dry ingredients to the wet mixture, stirring on low speed until just combined. The dough will look thick and slightly sticky—that’s exactly what we want. Stop mixing as soon as you no longer see flour streaks; over‑mixing will develop gluten and make the cookies tough.
Turn the dough onto a lightly floured surface and knead gently a few times to bring it together. Then, divide the dough into two equal portions. One portion stays plain (for the white side), and the other you’ll roll into a rope and fold into the red‑colored dough to create the swirl.
Kitchen Hack: Roll each portion into a ¼‑inch thick log; this thickness yields a perfect balance between chewiness and crispness.Place the red rope on top of the white rope, then gently press them together. Using a sharp knife, slice the combined log into ½‑inch thick discs. You’ll see the classic red‑white swirl appear—if the swirl looks uneven, gently twist the log before cutting. This is the moment of truth; the visual cue tells you the flavor balance is spot‑on.
Arrange the discs on the prepared baking sheets, leaving about 2 inches between each cookie. Lightly tap the sheet on the counter to settle the cookies and eliminate air bubbles. Pop them into the oven and bake for 12‑15 minutes, or until the edges turn a light golden brown and the tops look set.
While the cookies bake, keep a second bowl of powdered sugar ready for dusting. As soon as the cookies emerge from the oven, let them cool on the sheet for 5 minutes, then transfer to a wire rack. While still warm, sift a generous layer of powdered sugar over each cookie; the heat will melt a thin glaze, giving that snowy finish.
Let the cookies cool completely before storing; they’ll firm up and the dusting will set. Store them in an airtight container with a parchment sheet between layers to keep the tops from sticking. And there you have it—candy cane cookies that warm your heart and your kitchen.
That's it — you did it. But hold on, I've got a few more tricks that'll take this to another level...
Insider Tricks for Flawless Results
The Temperature Rule Nobody Follows
Never bake these cookies straight from the fridge unless you’ve chilled the dough for at least 30 minutes. A cold dough spreads less, giving you sharper edges and a more defined swirl. If you’re in a hurry, let the dough sit at room temperature for 10 minutes before shaping; this small compromise still yields a great texture while saving time.
Why Your Nose Knows Best
Your sense of smell is a reliable indicator of doneness. When the cookies are about 2‑3 minutes from finishing, you’ll catch a faint caramel scent that signals the edges are caramelizing without burning. Trust that nose cue over the timer if you notice the scent early; every oven is a little different, and this trick prevents over‑baking.
The 5‑Minute Rest That Changes Everything
After the dough is mixed, let it rest for exactly five minutes before shaping. This short rest allows the gluten to relax, resulting in a tender crumb rather than a tough bite. I once skipped this rest and ended up with a cookie that snapped like a dry cracker—lesson learned.
Dusting With a Twist
Instead of plain powdered sugar, try mixing a pinch of finely grated orange zest into the dusting. The citrus adds a subtle brightness that lifts the mint flavor, creating a more complex palate. A friend tried this once and declared it “the best holiday cookie she’d ever tasted.”
The Freeze‑Ahead Strategy
Shape the cookies, place them on a parchment‑lined tray, and freeze for 15 minutes before the final bake. This step locks in the shape, prevents spreading, and lets you bake multiple batches straight from the freezer, perfect for large gatherings. I’ve used this trick for a holiday party of 30 and never had a single misshapen cookie.
Creative Twists and Variations
This recipe is a playground. Here are some of my favorite ways to switch things up:
Chocolate‑Dipped Delight
After dusting with powdered sugar, dip half of each cookie into melted dark chocolate and let it set. The bitter chocolate balances the sweet mint, creating a sophisticated flavor combo that adults love.
Almond Crunch
Add a tablespoon of finely chopped toasted almonds to the dough for a subtle nutty crunch. The almonds add texture without overpowering the delicate mint flavor.
Cranberry Burst
Fold in a handful of dried cranberries into the white portion of the dough. The tartness of the berries cuts through the sweetness, giving each bite a surprise pop of flavor.
Spiced Holiday
Swap half the peppermint extract for a pinch of ground cinnamon and nutmeg. The warm spices mingle with the mint to create a cozy, wintery profile perfect for chilly evenings.
Gluten‑Free Version
Replace the all‑purpose flour with a 1:1 gluten‑free flour blend and add a teaspoon of xanthan gum. The texture remains tender, and the cookies hold together just as well, making them inclusive for guests with dietary restrictions.
Storing and Bringing It Back to Life
Fridge Storage
If you need to keep the cookies for more than two days, store them in an airtight container in the refrigerator. Place a slice of bread on the top layer; the bread will absorb excess moisture, keeping the cookies crisp for up to a week.
Freezer Friendly
These cookies freeze like a dream. Lay them on a baking sheet, freeze solid for an hour, then transfer to a zip‑top bag. They’ll stay fresh for up to three months. When you’re ready to serve, let them thaw at room temperature for 15 minutes, then give them a quick 3‑minute warm‑up in a 300°F oven.
Best Reheating Method
To revive that fresh‑out‑of‑the‑oven crunch, preheat your oven to 325°F, place the cookies on a parchment‑lined tray, and add a tiny splash of water to the pan (just a few drops). The steam will soften the interior while the heat restores the crisp edges. Within five minutes, you’ll have cookies that taste like they were baked minutes ago.