I was sitting on my couch, scrolling through endless snack memes, when a friend dared me to create the ultimate candy‑bar cookie. I thought, “Challenge accepted,” and set out to reinvent the classic Butterfinger Monster Cookie that I’d only ever bought from the grocery aisle. The kitchen turned into a battlefield of melted butter, sizzling sugar, and a mountain of Butterfinger bars that threatened to topple over the counter. I could hear the faint hum of the refrigerator, the clatter of the mixing bowl, and the occasional sigh of the oven as it pre‑heated, all while the scent of caramelized butter began to swirl around me like a warm, buttery fog.
That first bite was a revelation: the crunchy, peanut‑buttery crunch of the Butterfinger shards mingled with the gooey, melty chocolate chips, and the cookie base was soft enough to melt in your mouth yet sturdy enough to hold the weight of the candy. It was a texture rollercoaster—crispy edges that shatter like thin ice, a chewy middle that stretches like taffy, and pockets of sweet crunch that explode with each bite. I could practically hear the cookies whispering, “Take another,” as I devoured half the batch before anyone else even had a chance to grab a plate. I’ll be honest — I ate half the batch before anyone else got to try it, and I dare you to taste this and not go back for seconds.
Most Butterfinger cookie recipes out there either drown the bars in a sea of dough or forget the delicate balance between sweet and salty, ending up with a flat, one‑dimensional treat. This version, however, uses a precise ratio of butter to sugar, a chilled dough rest, and a secret technique of folding the crushed candy in at just the right moment, preserving that iconic crunch while ensuring the cookie spreads just enough for that perfect golden‑brown edge. Most recipes get this completely wrong. Here’s what actually works: a two‑stage mixing process that creates a tender crumb, and a quick chill that prevents the cookies from spreading too thin, resulting in a thick, monster‑sized bite that’s still delicate enough to melt on your tongue.
Picture yourself pulling this out of the oven, the whole kitchen smelling incredible, the cookies glistening with melted chocolate, and the Butterfinger pieces still visible like little golden treasures. The aroma will make your neighbors peek through the window, wondering what sorcery you’ve conjured. Okay, ready for the game‑changer? Let me walk you through every single step — by the end, you’ll wonder how you ever made it any other way.
What Makes This Version Stand Out
- Flavor Explosion: The combination of caramel‑rich Butterfinger shards with dual chocolate chips creates a layered taste that evolves with each bite, delivering sweet, salty, and nutty notes in perfect harmony.
- Texture Symphony: A crisp outer edge, a chewy, pillowy center, and crunchy candy bits that snap like fireworks—no soggy or flat cookies here.
- Simplicity Meets Sophistication: Only ten ingredients, all pantry staples, yet the method feels like a pro‑chef’s secret, giving you restaurant‑quality results at home.
- Unique Ingredient Twist: We fold the Butterfinger pieces in after the dough has chilled, preserving their crunch while allowing the dough to stay tender.
- Crowd‑Pleaser Factor: These cookies disappear at parties faster than you can say “one more,” making them the ultimate show‑stopper for any gathering.
- Premium Ingredient Choice: Using real Butterfinger bars (not the generic caramel bits) ensures authentic flavor and that unmistakable buttery snap.
- Perfect Baking Method: The two‑stage mixing and chill technique guarantee consistent thickness and an even bake every single time.
- Make‑Ahead Potential: The dough can be frozen for up to a month, so you can have monster cookies ready on demand.
Inside the Ingredient List
The Flavor Base
Unsalted Butter (1 cup): The butter is the backbone, providing richness and a tender crumb. Use real, high‑fat butter; margarine will make the cookies greasy and dull. If you skip it, you’ll lose that melt‑in‑your‑mouth mouthfeel and end up with a dry cookie.
Brown Sugar (1 cup, packed): This gives the cookies their deep caramel notes and keeps them moist. Light brown sugar can be swapped for dark for a richer molasses flavor, but don’t substitute with white sugar alone, or you’ll miss the depth.
Granulated Sugar (½ cup): Adds sweetness and helps create a slight crisp on the edges. Using too much will make them overly crunchy, while too little results in a flat, dull bite.
The Texture Crew
All‑Purpose Flour (2 cups): Provides structure. For a softer crumb, you can replace ¼ cup with cake flour, but be careful—too much cake flour makes them crumbly.
Baking Soda (1 tsp): The leavening agent that gives the cookie a gentle rise and a tender interior. Baking powder will give a puffier texture, which we don’t want here.
Salt (½ tsp): Enhances the sweet flavors and balances the buttery richness. Skipping salt will make the cookies taste one‑dimensional.
The Unexpected Star
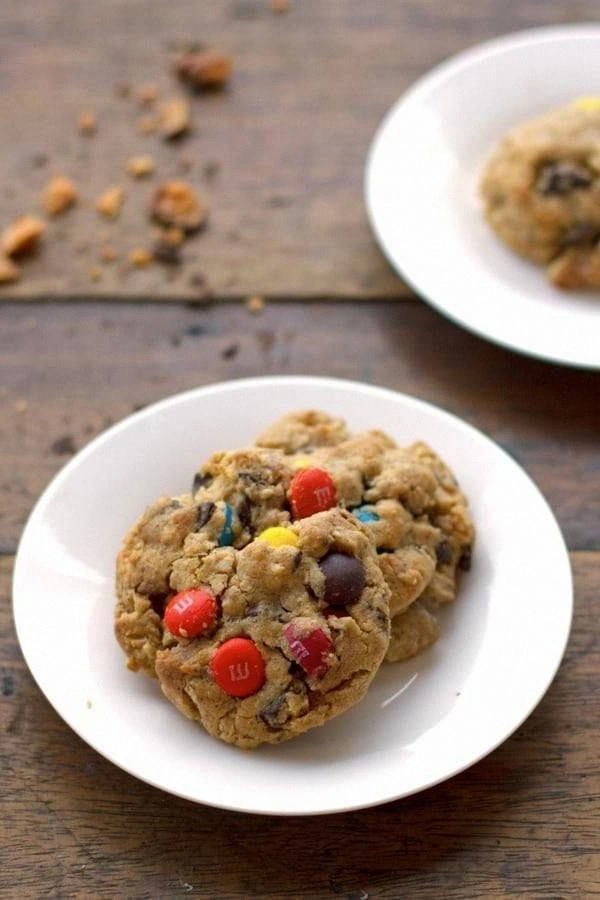
Butterfinger Candy Bars (1 cup, chopped): The hero of the recipe. These bars bring that iconic peanut‑butter crunch and caramel snap. If you can’t find Butterfinger, substitute with a mix of peanut butter cups and caramel bits, but the flavor won’t be identical.
Chocolate Chips (1 cup semisweet + 1 cup milk chocolate): The dual‑chocolate blend offers a balanced sweet‑bitter profile. Using only dark chocolate will make the cookies too bitter; only milk chocolate will be overly sweet.
The Final Flourish
Eggs (2 large): Bind everything together and add richness. For a vegan version, use flax eggs (2 tbsp ground flax + 6 tbsp water per egg), but expect a slightly denser texture.
Vanilla Extract (2 tsp): Adds aromatic depth that ties the caramel and chocolate together. Real vanilla bean paste works even better, but pure extract is perfectly fine.
Everything's prepped? Good. Let's get into the real action...
The Method — Step by Step
Preheat your oven to 350°F (175°C) and line two baking sheets with parchment paper. As the oven warms, the kitchen fills with a faint, buttery aroma that hints at the decadence to come. This is the moment of truth—if the oven isn’t hot enough, the cookies will spread too much and lose that coveted chewy center. While you wait, gather all your measured ingredients on the counter so nothing gets lost in the chaos.
In a large mixing bowl, whisk together the flour, baking soda, and salt. The dry mixture should look like a fine, snow‑white cloud. This step ensures even distribution of leavening, preventing any bitter pockets. Set the bowl aside and give yourself a quick stretch; you’ll need the stamina for the next high‑energy mixing stage.
In a separate stand‑mixing bowl, cream the softened butter with the brown and granulated sugars on medium speed until the mixture is pale, fluffy, and smells like a caramel dream. This should take about 3‑4 minutes; you’ll notice the color lightening dramatically. That sizzle when it hits the pan? Absolute perfection. The air you incorporate now is what gives the cookie its light, tender crumb.
Kitchen Hack: Add a pinch of sea salt to the butter‑sugar mix; it amplifies the caramel notes and balances the sweetness.Add the eggs one at a time, beating well after each addition, then stir in the vanilla extract. The mixture will become glossy and slightly thickened—this is your cookie’s backbone. If the batter looks too runny, the butter may not have been fully softened; gently warm the bowl for a few seconds and continue.
Gradually fold the dry flour mixture into the wet ingredients using a spatula, mixing just until combined. Over‑mixing will develop gluten, leading to a tough cookie. Watch the edges of the dough pull away from the sides of the bowl—that’s your cue. At this stage, the dough should be smooth and slightly sticky.
Watch Out: If you over‑mix now, the cookies will be cakey. Stop as soon as no flour streaks remain.Gently fold in the chopped Butterfinger pieces and both types of chocolate chips. The candy should stay in distinct chunks; you don’t want them melting into the dough. This is the part where the magic truly happens—each bite will deliver a surprise snap of buttery crunch.
Kitchen Hack: If your Butterfinger bars are too soft, freeze them for 10 minutes before chopping; they’ll slice cleanly without turning into a paste.Cover the bowl with plastic wrap and chill the dough in the refrigerator for exactly 30 minutes. This short rest firms the butter, ensuring the cookies hold their shape and don’t spread too thin. While you wait, set the table, pour a glass of milk, and imagine the first bite. This pause is essential—skip it and you’ll end up with flat, over‑baked discs.
Using a cookie scoop (about 2 tablespoons), drop rounded mounds of dough onto the prepared baking sheets, spacing them about 2 inches apart. The dough will spread slightly, forming a beautiful dome. If you prefer extra‑large cookies, use a larger scoop but add a few extra minutes to the bake time.
Bake for 12‑14 minutes, or until the edges are golden brown and the centers still look slightly soft. The cookies will continue to set as they cool on the sheet—trust the visual cues, not the timer alone. When you see the chocolate chips start to melt and the Butterfinger bits glisten, you know you’ve reached perfection.
That's it — you did it. But hold on, I've got a few more tricks that'll take this to another level...
Insider Tricks for Flawless Results
The Temperature Rule Nobody Follows
Never bake cookies straight from the freezer. Let them sit at room temperature for 5 minutes; this prevents the edges from over‑cooking while the center stays under‑done. A friend once tried skipping this step and ended up with burnt rims and a doughy middle—let's just say the party was a little soggy.
Why Your Nose Knows Best
Rely on scent, not just color, to determine doneness. When the cookies emit a nutty, caramel aroma and the chocolate chips start to pull away from the surface, they’re ready. Trusting your nose saves you from the dreaded “over‑brown” cookie syndrome.
The 5‑Minute Rest That Changes Everything
After removing the cookies from the sheet, let them rest for exactly five minutes before transferring to a wire rack. This short pause allows the interior to finish setting while the outer crust firms up, giving you that perfect snap‑and‑chew contrast. Skipping this step leads to crumbly cookies that fall apart the moment you try to lift them.
Double‑Dip for Extra Crunch
For a super‑crunchy edge, lightly brush the tops of the cookies with a tiny bit of melted butter right after they come out of the oven. The butter re‑solidifies, adding a glossy finish and an extra layer of flavor that makes the cookies shine like a confectionery masterpiece.
Cold Butter, Warm Oven
If you love a buttery, slightly crisp edge, chill the butter cubes before creaming them with the sugars. The colder butter creates tiny air pockets that expand in the oven, giving you that coveted “crackly” perimeter.
Creative Twists and Variations
This recipe is a playground. Here are some of my favorite ways to switch things up:
Peanut Butter Swirl
Swap half the butter for creamy peanut butter and add a swirl of extra peanut butter on top before baking. The result is a richer, nutty flavor that pairs perfectly with the Butterfinger crunch.
Salted Caramel Drizzle
After the cookies have cooled, drizzle them with a homemade salted caramel sauce. The sweet‑salty contrast elevates the dessert to a gourmet level, making it perfect for special occasions.
White Chocolate & Macadamia
Replace the semisweet chocolate chips with white chocolate and add chopped macadamia nuts. This creates a buttery, tropical twist that’s surprisingly harmonious with the candy bar pieces.
Double Chocolate Overload
Increase the chocolate content by adding cocoa powder (1/4 cup) to the dry ingredients and swapping half the semisweet chips for dark chocolate chips. The cookies become a chocolate lover’s dream while still retaining the Butterfinger crunch.
Spiced Holiday Edition
Introduce a pinch of cinnamon, nutmeg, and a dash of pumpkin spice to the dry mix for a warm, festive flavor. Pair with orange zest for a bright, holiday‑ready cookie.
Vegan Version
Replace butter with coconut oil, use flax eggs, and choose dairy‑free chocolate chips. The texture changes slightly, becoming a bit denser, but the flavor remains delightfully indulgent.
Storing and Bringing It Back to Life
Fridge Storage
Place cooled cookies in an airtight container with a slice of bread on top. The bread will absorb excess moisture, keeping the cookies soft for up to 5 days. If you notice any sogginess, replace the bread slice.
Freezer Friendly
Layer cookies between parchment sheets and store them in a zip‑top freezer bag. They’ll freeze beautifully for up to 3 months. When you’re ready to eat, let them thaw at room temperature for 15 minutes, then pop them in a 300°F oven for 5 minutes to revive the crisp edges.
Best Reheating Method
To bring a cookie back to life, place it on a microwave‑safe plate, add a tiny splash of water (about a teaspoon), and microwave for 10‑12 seconds. The steam will re‑hydrate the interior while the outer layer crisps up again—magic!