Picture this: a Sunday afternoon, the kitchen humming with the buzz of a blender and the clatter of a cutting board. I had just finished a rotisserie chicken, the kind that practically falls off the bone, and decided to throw a quick dinner together. I reached for tortillas, shredded cheese, and a handful of spices, but as I tossed the filling into a bowl, the chicken slipped and splattered across the counter like a rogue artist's splash. The mess was a disaster, but the aroma that followed—warm, cumin‑laden, and slightly smoky—was enough to convince me that something delicious was about to happen.
The air was thick with the scent of freshly cooked chicken, the sharp tang of salsa, and the faint sweetness of melted cheese. I could hear the sizzle as I pressed the tortilla onto a baking sheet, the sound echoing like a promise of crunch. The sight of the golden edges, the smell of butter and spices mingling, and the gentle hum of the oven all came together to create a sensory cocktail that made my mouth water even before the first bite. I could taste the anticipation on my tongue—salty, peppery, with a hint of green chile—and feel the texture of the tortilla under my fingertips, soft yet sturdy enough to hold the filling.
What sets this version apart is the balance of flavors and textures that feels both familiar and daring. The chicken is shredded to a fine consistency, allowing it to mingle with the cheese and salsa, creating pockets of gooeyness that burst with every bite. The spices—cumin, chili powder, garlic, and onion powder—are measured to give depth without overpowering the chicken's natural sweetness. The tortillas are brushed with olive oil, giving them a glossy, caramelized finish that crisps up perfectly in the oven. And the finishing touches—sour cream, guacamole, cilantro, and lime—add layers of creaminess, freshness, and acidity that lift the dish from simple to unforgettable.
I’m going to walk you through every single step of this recipe. By the end, you’ll be wondering how you ever cooked chimichangas any other way. I dare you to taste this and not go back for seconds.
What Makes This Version Stand Out
- Flavor: The combination of cumin and chili powder provides an earthy, smoky base that elevates the chicken without masking its natural flavor. The salsa adds a bright, slightly sweet kick that balances the richness of the cheese.
- Texture: The tortillas are brushed with oil before baking, creating a crisp, almost fried exterior while keeping the interior soft and pliable. The cheese melts into gooey pockets that contrast with the crunchy edges.
- Simplicity: No elaborate sauces or pre‑made fillings required. All you need is a rotisserie chicken, cheese, and a handful of pantry staples.
- Uniqueness: The use of diced tomatoes with green chilies in the salsa gives the filling a subtle heat and a hint of umami that most recipes miss.
- Crowd Reaction: Friends who taste these chimichangas often ask for the recipe the next time they host. The dish feels like a party in every bite.
- Ingredient Quality: Fresh, high‑quality cheese and real salsa make all the difference. Avoid pre‑shredded cheese and canned salsa if you want the best flavor.
- Cooking Method: Baking instead of frying reduces fat while still delivering that coveted crispy crust.
- Make‑Ahead Potential: The filling can be prepared a day ahead and refrigerated, making it a perfect go‑to for busy weeknights.
Inside the Ingredient List
The Flavor Base
The foundation of this dish starts with the chicken. A rotisserie chicken, shredded to a fine texture, offers a naturally juicy and savory base that carries the spices. When combined with cumin and chili powder, the chicken absorbs earthy and smoky undertones that are essential to a good chimichanga. Skipping the chicken would leave the dish feeling flat; the protein is what anchors the flavor profile.
The Texture Crew
Cheese is the star of the texture crew. A blend of cheddar, Monterey Jack, or a Mexican blend melts into a silky, gooey layer that clings to the tortilla. The tortillas themselves, brushed with olive oil, develop a golden, crisp edge that shatters like thin ice when bitten. If you omit the oil, the tortillas will stay soft and may become soggy from the filling. For a dairy‑free twist, substitute with a vegan cheese that melts well.
The Unexpected Star
Salsa or diced tomatoes with green chilies bring moisture, acidity, and a subtle heat that cuts through the richness of the cheese. The green chilies add a bright, peppery note that elevates the dish from ordinary to memorable. If you prefer a milder version, choose a low‑heat salsa or replace the green chilies with roasted poblano. The salsa also keeps the filling from drying out during baking.
The Final Flourish
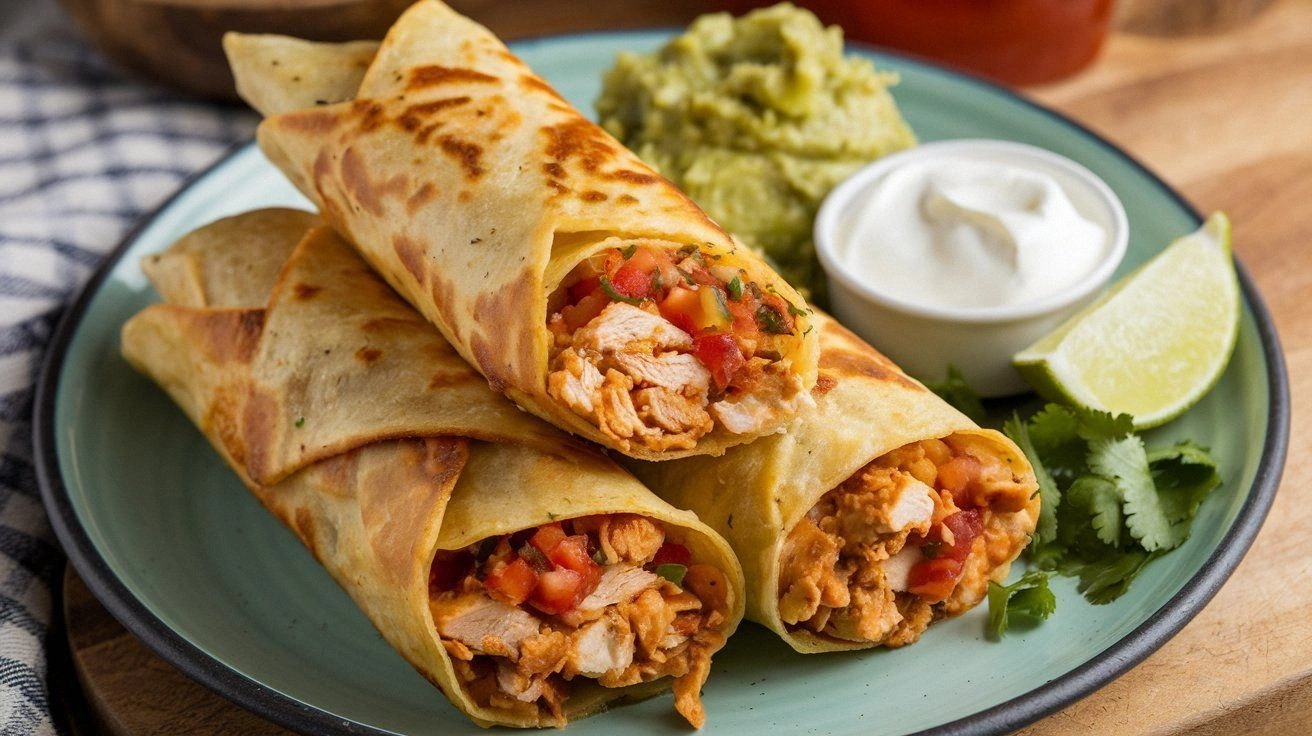
The finishing garnishes—sour cream, guacamole, cilantro, and lime wedges—add layers of creaminess, freshness, and acidity that balance the dish. Sour cream cools the heat from the spices, while guacamole contributes a buttery richness that pairs well with the cheese. Cilantro provides a herbaceous lift, and lime wedges add a bright citrus punch that brightens every bite. Skipping these garnishes would make the dish feel less complete.
Everything's prepped? Good. Let's get into the real action...
The Method — Step by Step
- Preheat your oven to 425°F (220°C). Line a baking sheet with parchment paper to prevent sticking. This high temperature will crisp the tortillas quickly while keeping the filling moist. The oven should be hot enough that the edges of the tortillas begin to brown within the first 5 minutes.
- In a large bowl, combine the shredded chicken, shredded cheese, salsa, cumin, chili powder, garlic powder, onion powder, salt, and pepper. Stir until every bite is coated in the spice mixture. The mixture should look slightly moist but not runny; it should hold together when scooped.
- Lay a tortilla flat on the parchment and spread 2-3 tablespoons of the filling evenly across the center, leaving a 1-inch border. The filling should be thick enough to stay inside but not so heavy that it tears the tortilla. If the tortilla starts to bubble, add a little more filling to balance the moisture.
- Fold the sides of the tortilla over the filling, then roll tightly from one end to the other, like a burrito. The roll should be snug but not so tight that the filling leaks out. This step locks in the flavors and ensures each bite is a balanced bite of meat, cheese, and spices.
- Brush the top of each chimichanga with olive oil or melted butter. This not only adds flavor but also helps the tortillas brown evenly. The oil should be applied in a thin, even coat to avoid excess greasiness.
- Place the rolled chimichangas on the prepared baking sheet, seam side down. Bake for 15 minutes, then flip them over and bake for an additional 10 minutes. The total baking time is 25 minutes, but keep an eye on them; if the edges become too dark, reduce the heat slightly.
- Remove the chimichangas from the oven and let them rest for 5 minutes. This brief rest allows the cheese to set slightly, preventing it from oozing out when you cut into them. The rest also lets the steam redistribute, giving you a cleaner slice.
- Serve hot, topped with a dollop of sour cream, a spoonful of guacamole, a sprinkle of chopped cilantro, and a wedge of lime for squeezing. The combination of creamy, fresh, and acidic toppings transforms the dish into a complete experience.
That's it — you did it. But hold on, I've got a few more tricks that'll take this to another level...
Insider Tricks for Flawless Results
The Temperature Rule Nobody Follows
Many people bake at a lower temperature, but 425°F is the sweet spot for crisping the tortilla without overcooking the filling. The high heat caramelizes the sugars in the salsa, giving the chimichangas a subtle sweet finish. If your oven runs hot, lower the temperature by 25°F and extend the baking time by a few minutes.
Why Your Nose Knows Best
Smell the filling as it cooks. A fragrant, toasty aroma indicates the spices are fully activated. If the smell is bland, give it another minute; the spices need time to release their oils.
The 5-Minute Rest That Changes Everything
Letting the chimichangas rest after baking might seem trivial, but it allows the cheese to set and the tortillas to firm up. A rushed slice often results in melted cheese spilling over the sides. Resting also lets the flavors meld, creating a harmonious bite.
Use Fresh Cheese, Not Pre‑Shredded
Pre‑shredded cheese often contains anti‑caking agents that prevent melting. Freshly shredded cheese melts more smoothly and provides a better texture. If you must use pre‑shredded, sprinkle a little cornstarch over it to improve melt.
Keep the Filling Moist, Not Wet
If the salsa is too watery, the tortillas will become soggy. Pat the salsa dry with a paper towel before mixing, or use a thicker salsa. A dry filling keeps the edges crisp.
Creative Twists and Variations
This recipe is a playground. Here are some of my favorite ways to switch things up:
Southwest Steak Chimichangas
Swap the chicken for thinly sliced grilled steak, and add a dash of smoked paprika. The smoky flavor pairs well with the cumin and gives the dish a hearty, meaty edge that steak lovers adore.
Vegan Bean and Veggie Chimichangas
Replace the chicken with a mixture of black beans, corn, and diced bell peppers. Use a plant‑based cheese and a vegan tortilla to keep it fully plant‑based. The result is a colorful, protein‑rich dish that satisfies even the most discerning vegans.
Buffalo Chicken Chimichangas
Add a splash of hot sauce to the filling and top the finished chimichangas with a drizzle of blue cheese dressing. The spicy kick and creamy tang create a bold, restaurant‑style experience.
Breakfast Chimichangas
Use scrambled eggs and diced ham instead of chicken, and sprinkle shredded cheddar on top. Serve with a side of pico de gallo for a breakfast that feels like a late‑night snack.
Low‑Carb Chicken Chimichangas
Swap the flour tortillas for low‑carb tortillas made from almond flour or cauliflower. Keep the rest of the recipe the same for a keto‑friendly version that doesn’t compromise on flavor.
Storing and Bringing It Back to Life
Fridge Storage
Store leftover chimichangas in an airtight container in the refrigerator for up to 3 days. Reheat in a 350°F oven for 10 minutes, or until heated through. The tortillas may soften slightly, but the filling remains juicy.
Freezer Friendly
Wrap each chimichanga tightly in plastic wrap and then in foil before freezing. They stay good for up to 2 months. Thaw overnight in the refrigerator and bake at 375°F for 15 minutes.
Best Reheating Method
To preserve crispness, reheat in a skillet over medium heat for 2 minutes per side. Add a splash of water to the pan and cover briefly to steam the interior, then remove the lid to crisp the tortilla again.