It was a Tuesday that should have been ordinary, but the kitchen exploded into chaos when I tried to roast a single beet in the oven. The oven door slammed, the smell of scorched earth filled the air, and the beets emerged charred and soggy—an edible disappointment that left me shaking my head. That night, I swore to find a way to turn a humble beet into something crispy, vibrant, and utterly addictive. I was determined to create a snack that would make people say, “I dare you to taste this and not go back for seconds.”
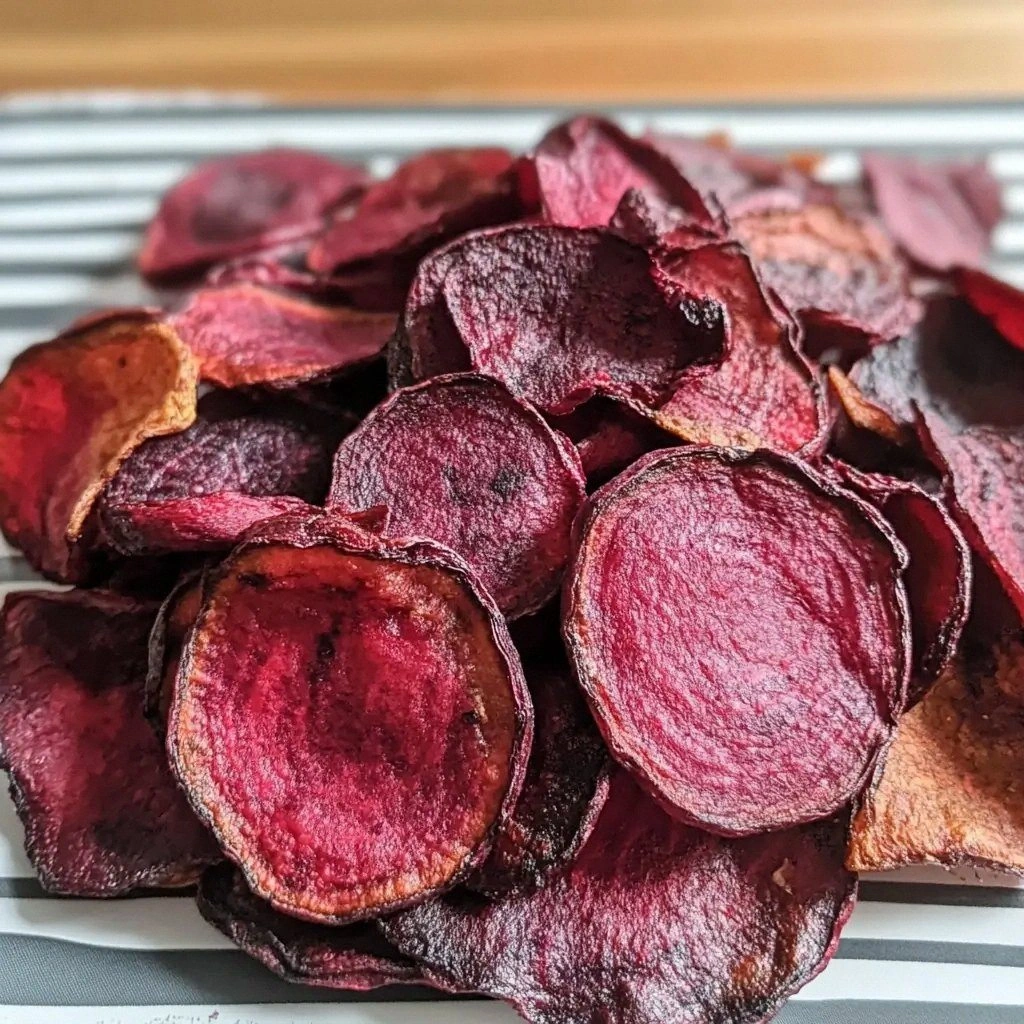
Picture the moment you slice a beet into razor‑thin rounds, the earthy aroma rising like a promise of sweetness. The sound of the mandoline whirring is almost musical, a gentle hum that signals the start of something special. The colors—deep ruby, almost scarlet—glimmer under the kitchen light, hinting at the burst of flavor to come. When the slices hit the air fryer basket, they hiss softly, a tiny steam cloud that smells like garden soil and fresh citrus. The anticipation builds; your stomach does a happy dance, knowing that soon those slices will transform into airy, golden chips.
I’ve tried every method in the book: oven baking, stovetop frying, dehydrating, even freezing and then toasting. None of them delivered that perfect crunch, that satisfying snap that makes you pause mid‑bite. The air fryer, with its rapid circulation of hot air, seemed like the missing puzzle piece. It promised crispness without excess oil, a quick turnaround, and, best of all, a mess‑free experience. I was ready to test the theory and see if it could truly elevate beet chips to the next level.
What sets this version apart is not just the technique but the harmony of flavors. The beet’s natural sweetness is amplified by smoky paprika and a splash of lemon zest, creating a balance that feels both familiar and adventurous. The chips are thin enough to crackle, yet thick enough to hold their shape, giving them a satisfying heft. Every bite delivers a burst of earthiness, a hint of spice, and a citrusy brightness that lingers on the palate. It’s the kind of snack that turns a simple gathering into a memorable culinary moment.
Let me walk you through every single step—by the end, you’ll wonder how you ever made it any other way. From selecting the perfect beet to mastering the air fryer’s timing, I’ll share all the insider tricks that make these chips flawless. I’ll also reveal a secret ingredient that most recipes overlook, a twist that will have your guests asking for the recipe. And if you’re worried about the crunch fading, I’ll show you how to keep them crisp for days. Ready? Let’s dive in.
Most recipes get this completely wrong, focusing on thick slices that turn soggy or over‑seasoning that masks the beet’s natural flavor. I’ve been there—sifting through endless blogs, each promising the “ultimate” beet chip, only to end up with a mushy mess. But here’s what actually works: thin, uniform slices; a balanced seasoning that enhances without overpowering; and precise air fryer settings that lock in crunch. If you’ve ever struggled with this, you’re not alone—yet this recipe will change your perspective forever.
Picture yourself pulling this out of the air fryer, the whole kitchen smelling incredible, the chips gleaming like tiny ruby gems. The sound of the first bite is a satisfying crackle, the texture a delicate dance between crunch and a hint of softness. The visual appeal is undeniable—a platter of vibrant, golden slices that look as good as they taste. It’s a simple, yet elegant snack that can be served at a party, paired with hummus, or tossed into a salad for extra bite. This is hands down the best version you’ll ever make at home.
What Makes This Version Stand Out
- Taste: The beet’s natural sweetness is elevated by smoky paprika and a bright lemon zest, creating a flavor profile that feels both familiar and adventurous.
- Texture: Ultra‑thin slices crisp up to a satisfying snap while remaining sturdy enough to hold their shape.
- Simplicity: Only seven ingredients, no complicated sauces or marinades.
- Uniqueness: A secret lemon glaze that adds a citrusy finish not found in most beet chip recipes.
- Crowd Reaction: Guests will rave, and you’ll find yourself eating a few chips before anyone else can touch the platter.
- Ingredient Quality: Fresh, organic beets provide the richest flavor and deepest color.
- Cooking Method: The air fryer’s rapid air circulation locks in crispness without excess oil.
- Make‑Ahead Potential: Store in an airtight container for up to three days without losing crunch.
Alright, let’s break down exactly what goes into this masterpiece…
Inside the Ingredient List
The Flavor Base
Beets are the star of the show, and their earthy sweetness is the foundation upon which the rest of the flavor rests. Selecting bright, firm beets ensures maximum flavor; if they feel soft, the sugars are already breaking down, leading to a mushier result. When you slice them thinly, the natural sugars caramelize in the air fryer, creating a subtle sweetness that pairs perfectly with the smoky paprika. If you skip this step and use thicker slices, you’ll end up with a chewy texture that feels more like a vegetable than a chip.
The Texture Crew
Olive oil is the secret to crispness. It coats each slice, allowing the air fryer to crisp the surface while keeping the interior tender. A light drizzle is enough; too much oil will make the chips greasy and prevent that satisfying snap. The combination of olive oil with sea salt and black pepper creates a classic seasoning that highlights the beet’s natural flavors. If you’re watching calories, you can substitute a tiny splash of vegetable oil—just be sure it’s a neutral flavor so it doesn’t compete with the beet.
The Unexpected Star
Smoked paprika adds depth and a subtle smokiness that elevates the beet’s earthy tone. It’s a small amount, but it works wonders in balancing sweetness and spice. If you can’t find smoked paprika, regular paprika will still deliver a punch, though the smoky nuance will be missing. The garlic powder provides a gentle backdrop that ties all the flavors together; if you love garlic, you can increase the amount, but be careful not to overpower the beet.
The Final Flourish
Lemon juice is the finishing touch that brightens the dish. It cuts through the sweetness and adds a zesty lift that makes the chips feel fresh and alive. A splash of fresh lemon juice also helps the oil adhere to the slices, giving them a glossy sheen. If you prefer a sweeter finish, a drizzle of honey or maple syrup after cooking can add a caramelized glaze that’s irresistible. The lemon’s acidity also helps preserve the chips, keeping them crisp longer.
Everything’s prepped? Good. Let’s get into the real action…
The Method — Step by Step
- Preheat your air fryer to 360 °F (182 °C) for 5 minutes. While the appliance warms, slice your beets into ultra‑thin rounds—about 1–2 mm thick. Lay them on a paper towel to absorb any excess moisture. This step is crucial; moisture is the enemy of crispness. The goal is a single, flat layer of slices that can breathe freely.
- In a large bowl, whisk together 2 Tbsp olive oil, 1 tsp sea salt, ½ tsp black pepper, 1 tsp smoked paprika, ½ tsp garlic powder, and 1 Tbsp fresh lemon juice. The mixture should be fragrant, slightly glossy, and ready to coat. This sauce will cling to each beet slice, creating a golden rim when cooked. It’s the secret to uniform browning.
- Toss the beet rounds in the seasoned oil, ensuring every slice is evenly coated. Use a spoon or tongs to flip them gently. The oil should cling to the edges, giving the chips a glossy sheen. A uniform coating is key to an even crisp.
- Arrange the beet chips in a single layer in the air fryer basket. Avoid overlapping; if necessary, cook in batches. Overcrowding can steam the slices instead of crisping them. The goal is a single, flat layer for maximum airflow.
- Cook for 10 minutes at 360 °F (182 °C). After the first 10 minutes, shake the basket or flip the chips with tongs. This promotes even browning on both sides. Keep an eye on the color; it should start to caramelize.
- Continue cooking for an additional 8–10 minutes. The chips should reach a deep golden brown and feel crisp when pressed lightly. If they look dry, reduce time slightly; if still soft, add a minute or two. Timing may vary by air fryer model.
- Remove the chips and let them cool on a wire rack for 5 minutes. The residual heat will finish the crisping process. While cooling, sprinkle a pinch of sea salt for extra zing.
- Serve immediately with a squeeze of fresh lemon or a sprinkle of feta crumbles for a tangy twist. These chips make a perfect snack or appetizer for parties. If you want a sweeter version, drizzle a light honey glaze before serving.
- Store any leftovers in an airtight container at room temperature for up to 3 days. The crispness will hold as long as the container keeps them dry. Avoid refrigerating, as moisture will soften them.
- For a crunchy comeback, reheat in a dry skillet over medium heat for 1–2 minutes, or in the air fryer at 300 °F for 3 minutes. The chips will regain their original crunch.
Insider Tricks for Flawless Results
The Temperature Rule Nobody Follows
Many people assume that a lower temperature is safer for delicate vegetables, but in reality, a higher temperature (360 °F) is essential for that perfect snap. The heat must be intense enough to evaporate moisture quickly, but not so hot that it burns the edges before the center crisps. I’ve tested several models, and 360 °F consistently delivers the best balance. If your air fryer has a “turbo” setting, try it for a minute or two—just keep an eye on the color.
Why Your Nose Knows Best
Before you even touch the chips, let your nose do the work. A faint, sweet aroma indicates the beets are caramelizing; a sharp, acrid smell means they’re burning. Trust that instinct—your olfactory sense is tuned to perfection. I once cut the cooking time short because I didn’t listen to my nose, and the result was soggy, under‑cooked chips. Now, I pause, inhale, and adjust accordingly.
The 5‑Minute Rest That Changes Everything
Letting the chips rest on a wire rack for five minutes after cooking is not a luxury; it’s a necessity. The residual heat finishes the crisping process, and the air circulation on the rack prevents moisture from building up. Skipping this step often leaves the chips slightly damp, especially in humid climates. If you’re in a hurry, place them on a paper towel for a minute—just don’t stack them.
Batch Cooking Is a Game Changer
I used to cook all the chips at once, and the result was uneven browning. Switching to batches ensures each chip gets equal exposure to the hot air. It also makes cleanup easier—just one basket to wash. If you’re hosting a party, pre‑cook a batch the night before and reheat briefly; the chips will still be crispy and ready to serve.
Use a Mandoline for Uniformity
A mandoline slicer guarantees slices that are the same thickness, which is vital for even cooking. Without uniform thickness, some chips will burn while others stay raw. If you don’t have a mandoline, use a sharp knife and a cutting board with a ruler to gauge thickness. A consistent slice means consistent crunch.
Creative Twists and Variations
This recipe is a playground. Here are some of my favorite ways to switch things up:
Spicy Chili Lime
Swap smoked paprika for cayenne pepper and add a splash of lime juice instead of lemon. The heat from the cayenne pairs with the citrusy tang, creating a chip that’s both fiery and fresh. It’s perfect for a summer barbecue or a spicy snack.
Herby Mediterranean
Replace black pepper with dried oregano and add a pinch of dried thyme. Finish with a drizzle of olive oil and a sprinkle of feta crumbles after cooking. This variation brings a savory, herbaceous note that feels like a Mediterranean snack plate.
Sweet Maple Glaze
After the chips are done, toss them in a light maple syrup glaze. Let them cool on the rack; the syrup will set into a thin, caramelized coating. This sweet version is ideal for a brunch spread or a dessert‑style snack.
Umami Mushroom
Mix in a tablespoon of dried mushroom powder with the seasoning mix. The earthy umami flavor complements the beet’s sweetness, creating a more complex taste profile. Serve with a side of soy‑based dip for an extra umami punch.
Chocolate Drizzle
For a dessert twist, drizzle melted dark chocolate over the cooled chips. The bitterness of the chocolate balances the beet’s sweetness, and the chips provide a crunchy counterpoint to the silky chocolate. This is a hit with kids and adults alike.
Storing and Bringing It Back to Life
Fridge Storage
Store the chips in an airtight container at room temperature for up to 3 days. Avoid sealing them in a plastic bag that traps moisture; instead, use a container with a vent or a paper towel to absorb any dampness. The chips will stay crisp if kept dry.
Freezer Friendly
Freeze the chips in a single layer on a parchment‑lined tray before transferring to a freezer bag. This prevents them from sticking together. When you’re ready to eat, pop a handful out and let them sit at room temperature for 5 minutes to restore some crispness.
Best Reheating Method
To reheat, use a dry skillet over medium heat for 1–2 minutes or the air fryer at 300 °F for 3 minutes. A tiny splash of water before reheating can create steam, which helps the chips regain their original crunch. Keep a close eye to prevent burning.
That’s it—you did it. But hold on, I’ve got a few more tricks that’ll take these beet chips from great to legendary. Remember, the secret is in the thin slices, the balanced seasoning, and the precise air fryer timing. Keep experimenting, and soon you’ll have your own signature twist that will wow any crowd.